 Sign in to Mod The Sims
 Stair wall fix
 Stair wall fix
MTS has all free content, all the time. Donate to help keep it running.
SCREENSHOTS

1.JPG - width=1275 height=794
1-4swf.JPG - width=1225 height=427
maxisswf.JPG - width=806 height=525
cfeswf.JPG - width=813 height=314
Picked Upload!
This is a picked upload! It showcases some of the best talent and creativity available on MTS and in the community.

It's not up until recently I've begun meshing and was a tad surprised this area had been rather neglected.
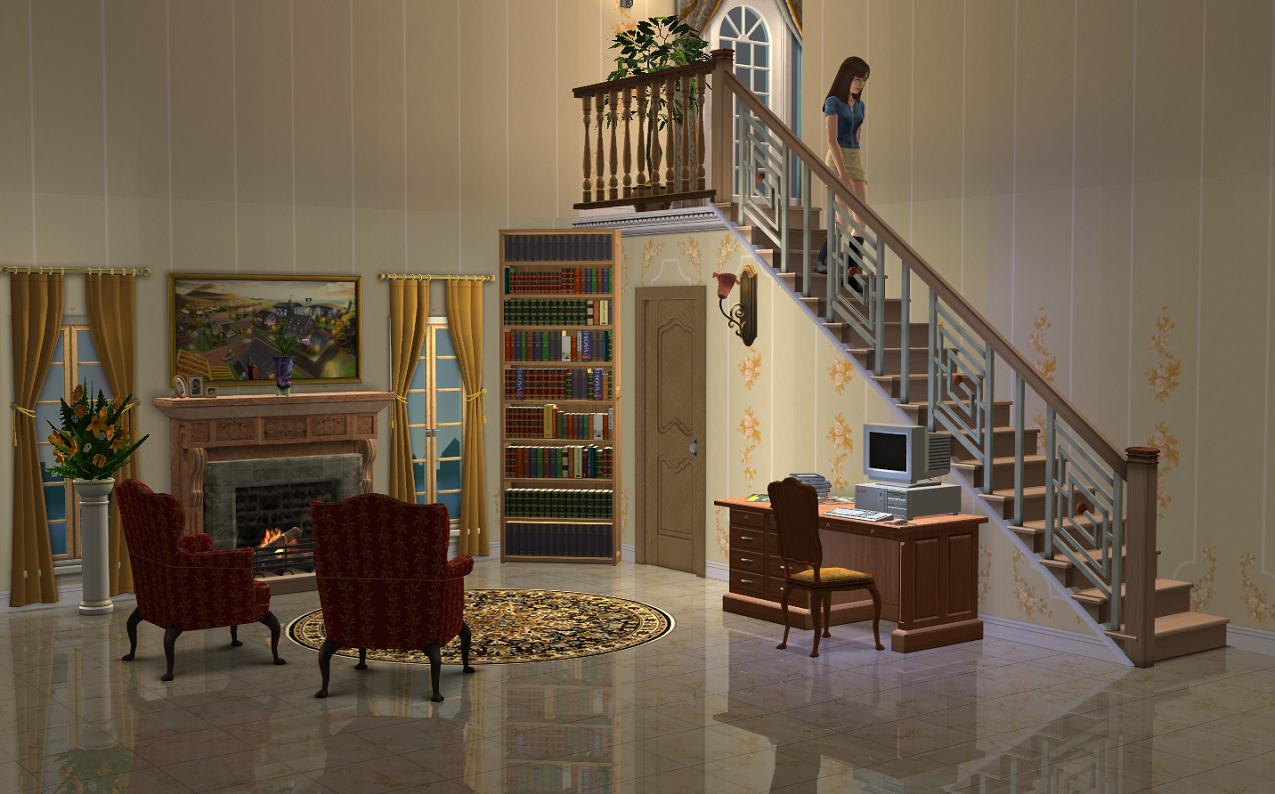
The stair wall, a.k.a that slant wall at the base of the stairs can now look appropriate for various of structures.
These are nothing more than differently shaped oblique full-wallmask windows.
How to apply for regular stairs (any simpler than this would be paying a homeless guy to do it for you):
1. Build the stairs;
2. Build a wall along them;
3. Place on it object called "x4 Stair wall fix" with the desired recolor.

If the stair wall shouldn't be visible for all the four tiles but only the first few because there's a room near the others, use "x{1/2/3 depending on how far the stair wall should go} Stair wall fix".
Is an illustrated explanation needed? Nah.
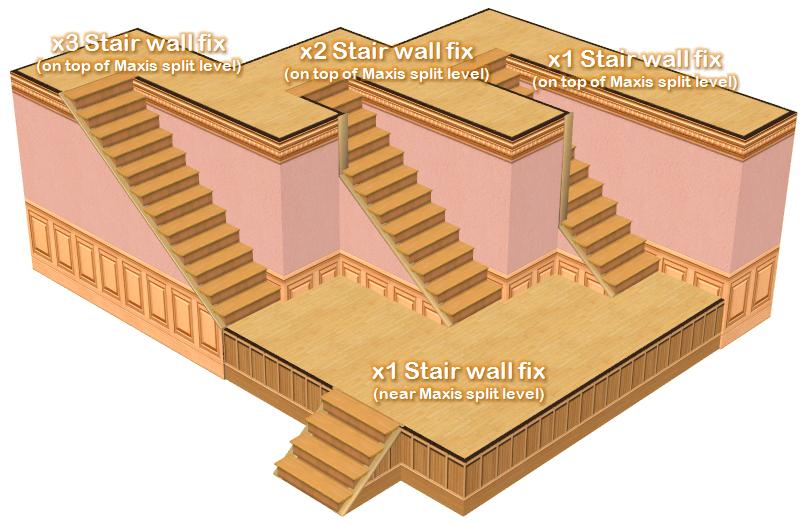
To fix the walls when using the *Maxis* split level, procced as follows:
1. Build the stairs;
2. Build walls along them;
3. On the long wall place object called "x3 Stair wall fix (on top of Maxis split level)" and "x1 Stair wall fix (near Maxis split level)" on the short one.

Ditto – use "x{1/2} Stair wall fix (on top of Maxis split level)" if the upper fix shouldn't go all the way through.
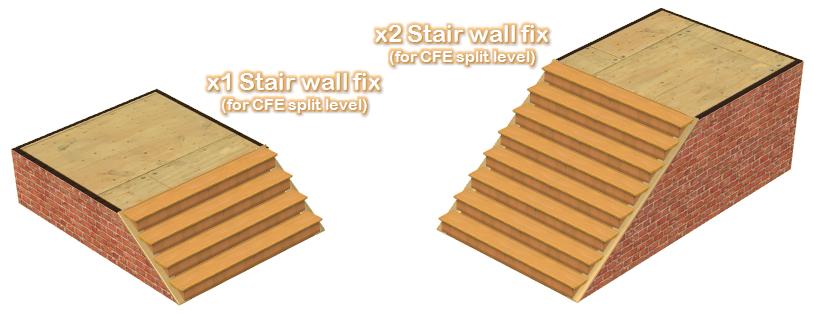
Fixing the foundation stair wall is a bit trickier, since it requires basic acquaintance with the CFE cheat (it being the only known way to attach a wall to the foundation):
1. Build the stairs;
2. Using CFE build a wall along them;
3. Lower it to the foundation height;
4. Place "x1 Stair wall fix (for CFE split level)" on it.

NOTE that the wallmask of the CFE adapted objects may look distorted.
It's a tiny built-in bug involved with CFE construction.
Bringing the walls down and then back up again should refresh the display.
Likewise, you may use the one that has "x2" in its name if your foundation is 8 clicks high.
These two are intended for general work with CFE split levels, I just gave the foundation as an example since it'll be most commonly used.
At this point a fairly askable question may rise – why have so many objects with strict assigned usages?
Why not just make 4 differently heightened single tiles and apply them customly?
Well, for a number of reasons actually:
First – due to lighting behavior the objects may look fragmented (since shadows are casted on the lower parts) and not line up right.
Each of them will also need to have abrupt edges and thereby lack the softened finish they have now.
Second – the wallmasks will have to fully stretch horizontally, which will create a nasty hole in the corner of the walls when used with interfacing rooms.
Noticed those vertical planks these have for such cases? That's what keeps the corners intact.
Tap yourself on the shoulder if you truly understood what I just wrote.
Third – time's a charm.
So yeah, those are 10 files.
The remaining 6 are recolors of the main 4-tile object that the others borrow theirs from. Don't delete it.
Apart from the default texture, there are the notorious three wooden hues and three shades of grey:

Inevitable bugs (what good would life be without them?) –
Sadly, since the game sees this as a wall with windows, surplus shadows may be casted if placed outside.
I find this a fair price to pay for this excellent result but if you're familiar with a way to fix that, do enlighten us.
Can be found under the Staircases category in Build Mode, for 0$ (to pay for bug fixes? I don't think so).
Credits:
BIGGEST THANKS EVER go out to MaryLou and IgnorantBliss for guiding mesh-dummies like myself through.
MTS moderator Phaenoh for advising me to add the frame and to set this in the stair category.
Sim PE creators as well as Numenor, RGiles and WesHowe, among whose deeds happen to be object editing tools.
Murano for the reflective floors which I used for the general snapshots.
HugeLunatic whose mod I used to prevent those rugs from sinking into the floor.
My parents.
Enjoy!
The stair wall, a.k.a that slant wall at the base of the stairs can now look appropriate for various of structures.
These are nothing more than differently shaped oblique full-wallmask windows.
How to apply for regular stairs (any simpler than this would be paying a homeless guy to do it for you):
1. Build the stairs;
2. Build a wall along them;
3. Place on it object called "x4 Stair wall fix" with the desired recolor.
If the stair wall shouldn't be visible for all the four tiles but only the first few because there's a room near the others, use "x{1/2/3 depending on how far the stair wall should go} Stair wall fix".
Is an illustrated explanation needed? Nah.
To fix the walls when using the *Maxis* split level, procced as follows:
1. Build the stairs;
2. Build walls along them;
3. On the long wall place object called "x3 Stair wall fix (on top of Maxis split level)" and "x1 Stair wall fix (near Maxis split level)" on the short one.
Ditto – use "x{1/2} Stair wall fix (on top of Maxis split level)" if the upper fix shouldn't go all the way through.
Fixing the foundation stair wall is a bit trickier, since it requires basic acquaintance with the CFE cheat (it being the only known way to attach a wall to the foundation):
1. Build the stairs;
2. Using CFE build a wall along them;
3. Lower it to the foundation height;
4. Place "x1 Stair wall fix (for CFE split level)" on it.
NOTE that the wallmask of the CFE adapted objects may look distorted.
It's a tiny built-in bug involved with CFE construction.
Bringing the walls down and then back up again should refresh the display.
Likewise, you may use the one that has "x2" in its name if your foundation is 8 clicks high.
These two are intended for general work with CFE split levels, I just gave the foundation as an example since it'll be most commonly used.
At this point a fairly askable question may rise – why have so many objects with strict assigned usages?
Why not just make 4 differently heightened single tiles and apply them customly?
Well, for a number of reasons actually:
First – due to lighting behavior the objects may look fragmented (since shadows are casted on the lower parts) and not line up right.
Each of them will also need to have abrupt edges and thereby lack the softened finish they have now.
Second – the wallmasks will have to fully stretch horizontally, which will create a nasty hole in the corner of the walls when used with interfacing rooms.
Noticed those vertical planks these have for such cases? That's what keeps the corners intact.
Tap yourself on the shoulder if you truly understood what I just wrote.
Third – time's a charm.
So yeah, those are 10 files.
The remaining 6 are recolors of the main 4-tile object that the others borrow theirs from. Don't delete it.
Apart from the default texture, there are the notorious three wooden hues and three shades of grey:
Inevitable bugs (what good would life be without them?) –
Sadly, since the game sees this as a wall with windows, surplus shadows may be casted if placed outside.
I find this a fair price to pay for this excellent result but if you're familiar with a way to fix that, do enlighten us.
Can be found under the Staircases category in Build Mode, for 0$ (to pay for bug fixes? I don't think so).
Credits:
BIGGEST THANKS EVER go out to MaryLou and IgnorantBliss for guiding mesh-dummies like myself through.
MTS moderator Phaenoh for advising me to add the frame and to set this in the stair category.
Sim PE creators as well as Numenor, RGiles and WesHowe, among whose deeds happen to be object editing tools.
Murano for the reflective floors which I used for the general snapshots.
HugeLunatic whose mod I used to prevent those rugs from sinking into the floor.
My parents.
Enjoy!

This is a new mesh, and means that it's a brand new self contained object that usually does not require a specific Pack (although this is possible depending on the type). It may have Recolours hosted on MTS - check below for more information.
| Filename | Size | Downloads | Date | |||||
|
swf.rar
Size: 223.6 KB · Downloads: 80,997 · 4th Jun 2010 |
223.6 KB | 80,997 | 4th Jun 2010 | |||||
| For a detailed look at individual files, see the Information tab. | ||||||||
Key:
- - File was updated after upload was posted
Install Instructions
Basic Download and Install Instructions:
1. Download: Click the download link to save the .rar or .zip file(s) to your computer.
2. Extract the zip, rar, or 7z file.
3. Place in Downloads Folder: Cut and paste the .package file(s) into your Downloads folder:
1. Download: Click the download link to save the .rar or .zip file(s) to your computer.
2. Extract the zip, rar, or 7z file.
3. Place in Downloads Folder: Cut and paste the .package file(s) into your Downloads folder:
- Origin (Ultimate Collection): Users\(Current User Account)\Documents\EA Games\The Sims™ 2 Ultimate Collection\Downloads\
- Non-Origin, Windows Vista/7/8/10: Users\(Current User Account)\Documents\EA Games\The Sims 2\Downloads\
- Non-Origin, Windows XP: Documents and Settings\(Current User Account)\My Documents\EA Games\The Sims 2\Downloads\
- Mac: Users\(Current User Account)\Documents\EA Games\The Sims 2\Downloads
- Mac x64: /Library/Containers/com.aspyr.sims2.appstore/Data/Library/Application Support/Aspyr/The Sims 2/Downloads
- For a full, complete guide to downloading complete with pictures and more information, see: Game Help: Downloading for Fracking Idiots.
- Custom content not showing up in the game? See: Game Help: Getting Custom Content to Show Up.
- If you don't have a Downloads folder, just make one. See instructions at: Game Help: No Downloads Folder.
Recolours of this mesh
There are 5 recolours of this mesh on MTS:
Also Thanked - Users who thanked this download also thanked:
About Me
Don't do anything with my stuff that I wouldn't do.
More Downloads BETA
Here are some more of my downloads: