 Sign in to Mod The Sims
- Site Map >
- Modding and Creation >
- Sims 3 Creation >
- Meshing >
- General/Other - Have my mesh done but why this?
- Site Map >
- Modding and Creation >
- Sims 3 Creation >
- Meshing >
- General/Other - Have my mesh done but why this?
 23rd Dec 2011 at 10:13 PM
Last edited by TDC95 : 23rd Dec 2011 at 10:24 PM.
23rd Dec 2011 at 10:13 PM
Last edited by TDC95 : 23rd Dec 2011 at 10:24 PM.
Posts: 328
Thanks: 4085 in 7 Posts
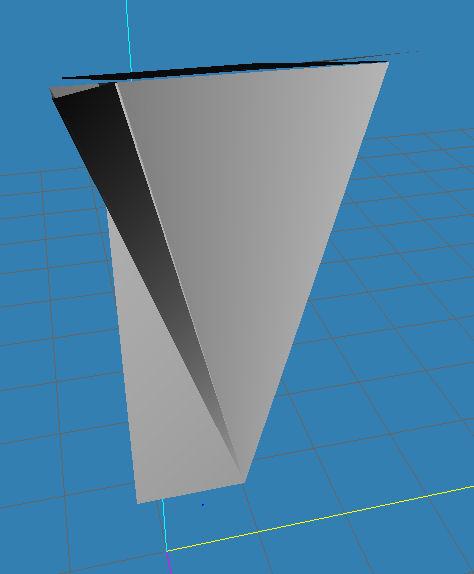
Also im posting a picture of the mesh in 3D view the map is the same as the last picture. I combined two sides so the black part is not viable. I will demonstrate what i mean by that by splitting the the sides apart to show you
As you can see in the second picture there is 2 sides to the mesh front and back, i have the black parts of them touch so that there is no invisible part. Normally the mesh is together but i split it so you know what i mean by two viable sides of the mesh.
| Project_contents.zip (369.5 KB, 6 downloads) - View custom content | ||||||||||
116146 12-23-11 17:05 TDC95_Two_story_tall_window.package 699192 12-19-11 16:05 AO.dds 183993 12-23-11 17:08 Backup.obj -------- ------- 999331 3 files |
||||||||||
23rd Dec 2011 at 10:30 PM
Posts: 4,419
Thanks: 2483 in 21 Posts
23rd Dec 2011 at 11:44 PM
Posts: 2,932
Thanks: 15575 in 28 Posts
|
Just one question, will i have to get the mesh again from SIMPE? becuase you said start over and i did, this time just using MTS tools, and im still getting the error, i have not used the mesh i edited i deleted it and when back to the original one extracted from SimPE why this is happening idk but im starting to get really annoyed with this. I'm attaching the mesh im using in .obj forum and the .package i made with s3oc, and the mutltiplier from blender, the .package has had no alterations yet since i'm having problems with putting the mesh into it. Also im posting a picture of the mesh in 3D view the map is the same as the last picture. I combined two sides so the black part is not viable. I will demonstrate what i mean by that by splitting the the sides apart to show you As you can see in the second picture there is 2 sides to the mesh front and back, i have the black parts of them touch so that there is no invisible part. Normally the mesh is together but i split it so you know what i mean by two viable sides of the mesh. |
 Never had that happen before...in any case that cleared up my idea about what was going on with your object.
I don't blame you for getting frustrated but remember...conversions from Sims2 are not a simple project. It takes time to get the hang of it and even then it can be a pia. Windows are not necessarily an easy project either. So you've taken on a challenge with this...stick with it and you'll get it done

I'll take a look at the zip you posted.
24th Dec 2011 at 8:52 PM
Posts: 328
Thanks: 4085 in 7 Posts
|
I don't think you should have to re-extract the mesh from SimPe. Which error are you getting? If this is the specific joint error again take a look at the joint names for each of your lods. Chances are they have different joint names. If this is the case you'll have to bring in each lod separately and overwrite rather than try to overwrite using the same joint. If that isn't clear let me know and I'll explain it better. But if you try to overwrite one lod that has one joint with the joint from another lod it will give you that error. When we first talked about this before I hadn't run into an object like this (that has different joint numbers for various lod joints). I think with the Pets patch some objects now have this...or maybe they did before and I didn't happen to clone one. Anyway, I cloned one that is like this and got the same error as you got about the specific joint and was very surprised Never had that happen before...in any case that cleared up my idea about what was going on with your object. I don't blame you for getting frustrated but remember...conversions from Sims2 are not a simple project. It takes time to get the hang of it and even then it can be a pia. Windows are not necessarily an easy project either. So you've taken on a challenge with this...stick with it and you'll get it done I'll take a look at the zip you posted. |
25th Dec 2011 at 2:42 PM
Last edited by orangemittens : 25th Dec 2011 at 3:01 PM.
Posts: 2,932
Thanks: 15575 in 28 Posts
| Yes it was the ERR:Defined bone [0] 0xCD68F001 again, so whats the recommended step to take and how do it do it? you said something about a LOD but im not sure about what to do please explain. |
If you're using Direct-X to lower the polys on your window mesh you need to be sure you're not doing that when the joint is present because it will strip the joint off the object. If neither of these is the problem please list the steps you're taking that are resulting in this error.
I looked at your double-sided window .obj and you still don't have the map on the image in the TCE. Open your .obj in Milkshape, select the group called windowtrim so that it lights up red. Then apply your AO.dds to it. Then open the TCE and you will see your AO.dds there but there will be no white lines on it. This is because your map isn't in the right place. Click the button called Fit Selection. What will happen is you will now see the white lines but not the AO.dds. This is because your map is actually located above the .dds. Click the Reset button so you can see your AO.dds again. Put a check in the Lock X box, select Move, and then move your mouse so that you're sliding your map downward. You will see the white lines moving downward over your .dds. This will get your map onto the image. You'll have to do this for the other windowtrim piece also.
31st Dec 2011 at 1:15 AM
Posts: 328
Thanks: 4085 in 7 Posts
|
When you open the original window...the EA one that is numbered 00000 and look at it in MS it will have a joint which typically appears as a blue dot in MS. Go to the joints tab and look at the number there. Then close MS and open the other lod...the one numbered 00001 and do the same thing. If those joint numbers are different you will have to overwrite each one separately after assigning the joint. If they are the same then I still think the problem is that somehow you're stripping the joint off the mesh prior to overwriting. If you're using Direct-X to lower the polys on your window mesh you need to be sure you're not doing that when the joint is present because it will strip the joint off the object. If neither of these is the problem please list the steps you're taking that are resulting in this error. I looked at your double-sided window .obj and you still don't have the map on the image in the TCE. Open your .obj in Milkshape, select the group called windowtrim so that it lights up red. Then apply your AO.dds to it. Then open the TCE and you will see your AO.dds there but there will be no white lines on it. This is because your map isn't in the right place. Click the button called Fit Selection. What will happen is you will now see the white lines but not the AO.dds. This is because your map is actually located above the .dds. Click the Reset button so you can see your AO.dds again. Put a check in the Lock X box, select Move, and then move your mouse so that you're sliding your map downward. You will see the white lines moving downward over your .dds. This will get your map onto the image. You'll have to do this for the other windowtrim piece also. |
 31st Dec 2011 at 6:57 PM
Posts: 2,932
Thanks: 15575 in 28 Posts
|
Strangely when i go to the joints tab with the custom mesh im working with i see nothing the list is blank ( i'm not referring to the EA mesh but the one im trying to convert) . When you say assign the joints separately what do you mean, im not sure please clarify. and im not using Direct-X so i'm not stripping any joints off by that means. Sorry for asking more questions im new
|
1. Get your mesh all made and ready for import to the .package and save it.
2. Delete your mesh from Milkshape after it is saved. At this point there should be nothing open in Milkshape.
3. Import the EA window into Milkshape. Import your new mesh into Milkshape with the EA mesh.
4. Position your window so that it's in the right place using the EA window as a guide.
Make sure the groups of your mesh are in the same order the groups of EA's mesh are. So where EA has a group that is glass yours is glass and etc.
5. Delete the EA mesh's groups and then go the the Joints tab. Click SelUnassigned and then click Assign. This will assign the EA joint to your object. I think the window has only one joint but if it has more than that you'll need to figure out which joint goes with what part and assign them accordingly to your object.
6. Export your new mesh to overwrite the EA mesh.
Is your map working now?
1st Jan 2012 at 9:23 PM
Posts: 328
Thanks: 4085 in 7 Posts
|
The mesh you're trying to convert isn't going to have any joints because it's a .obj and those don't carry joint information. What you need to do to convert one to a Sims 3 object is this: 1. Get your mesh all made and ready for import to the .package and save it. 2. Delete your mesh from Milkshape after it is saved. At this point there should be nothing open in Milkshape. 3. Import the EA window into Milkshape. Import your new mesh into Milkshape with the EA mesh. 4. Position your window so that it's in the right place using the EA window as a guide. Make sure the groups of your mesh are in the same order the groups of EA's mesh are. So where EA has a group that is glass yours is glass and etc. 5. Delete the EA mesh's groups and then go the the Joints tab. Click SelUnassigned and then click Assign. This will assign the EA joint to your object. I think the window has only one joint but if it has more than that you'll need to figure out which joint goes with what part and assign them accordingly to your object. 6. Export your new mesh to overwrite the EA mesh. Is your map working now? |
just one thing im wondering about is...... the window i chose to clone wasn't a normal one it only had a MODL with 2 groups and a MLOD with 3 groups. Most windows have like 6 groups per MODL and 8 per MLOD.There was 2 France windows to clone and i chose the one with less groups to work with, since it had almost the same amount of groups as my custom one.
But when i import the EA mesh into milkshape the EA mesh comes in diagonal

do you think i should try cloning the other France window? because this one is a bit of an odd ball.
BTW that 6 step guide actually helped a lot i could actually import my custom mesh into the MODL file but i got some error when i put the new MODL in S3PE, different from the one i originally had, so im thinking its just this EA window clone that i shouldnt mess with. What do you think?
4th Jan 2012 at 10:59 PM
Posts: 2,932
Thanks: 15575 in 28 Posts
|
Thanks for the info just one thing im wondering about is...... the window i chose to clone wasn't a normal one it only had a MODL with 2 groups and a MLOD with 3 groups. Most windows have like 6 groups per MODL and 8 per MLOD. There was 2 France windows to clone and i chose the one with less groups to work with, since it had almost the same amount of groups as my custom one. But when i import the EA mesh into milkshape the EA mesh comes in diagonal do you think i should try cloning the other France window? because this one is a bit of an odd ball. BTW that 6 step guide actually helped a lot i could actually import my custom mesh into the MODL file but i got some error when i put the new MODL in S3PE, different from the one i originally had, so im thinking its just this EA window clone that i shouldnt mess with. What do you think? |
7th Jan 2012 at 1:28 AM
Last edited by TDC95 : 7th Jan 2012 at 2:13 AM.
Posts: 328
Thanks: 4085 in 7 Posts
| The reason it's coming in diagonal is because you cloned the diagonal window. I think you're prolly better off cloning the one that isn't diagonal. What was the error you got on import to s3pe? |
i change to the normal France window (non diagonal) and i got a new error Mesh: 0xCD0A6E60JointReferences with no assigned (via BlendIndex) vertex: 1
(0xCD68F001) I dont know what that means but at least i can import the window into my .package file now

:EDIT well the issue i said above in this post has been fixed ( it didn't come up when i imported this time ) im going to test im-game and see how this thing looks lol
:EDIT#2 Ok so i tested it in-game and my first reaction was ------>
then I dont honestly know what happened but look at this lol im attaching the file im working with and pictures
I need help
i exported the mlod and modl just wondering what it looked like and it looks completely different from what i imported its like a tornado hit it 0_0 what have i done to make it so crazy?
| window.zip (128.1 KB, 6 downloads) - View custom content | ||||||||||
182466 01-06-12 20:46 TDC95_VersaillesWindow.package -------- ------- 182466 1 file |
||||||||||
7th Jan 2012 at 4:46 PM
Posts: 2,932
Thanks: 15575 in 28 Posts
|
Hi again i change to the normal France window (non diagonal) and i got a new error Mesh: 0xCD0A6E60 JointReferences with no assigned (via BlendIndex) vertex: 1 (0xCD68F001) I dont know what that means but at least i can import the window into my .package file now :EDIT well the issue i said above in this post has been fixed ( it didn't come up when i imported this time ) im going to test im-game and see how this thing looks lol :EDIT#2 Ok so i tested it in-game and my first reaction was ------> then I dont honestly know what happened but look at this lol im attaching the file im working with and pictures I need help i exported the mlod and modl just wondering what it looked like and it looks completely different from what i imported its like a tornado hit it 0_0 what have i done to make it so crazy?
|
Can I see your edited 00000 that you imported into the .package for comparison's sake? This would be the one in your working folder that you overwrote with your mesh.
7th Jan 2012 at 10:25 PM
Posts: 328
Thanks: 4085 in 7 Posts
|
I exported your 00000 and looked at it in MS. Some of your groups look a bit odd. This is group02 which I'm guessing is supposed to be a simple plane because it's one of the glass groups: Can I see your edited 00000 that you imported into the .package for comparison's sake? This would be the one in your working folder that you overwrote with your mesh. |
2 i then import my custom mesh.
3 Then i delete the EA mesh, create a new texture and use my multiplier and assign it to my window trim groups 1 and 2 and open the TCE and hit fit selection for windowtrim groups 1 & 2.
4 Then assign the EA mesh joints to my custom mesh.
5. Then i over-wright the EA s3asc file that i exported from S3PE with my custom one i made in milkshape, then i close milkshape.
6. Now that the s3asc file now contains my new custom mesh i open milkshape again i re-import it just to take a look and see if everything looks like its supposed to i don't edit the mesh anymore since it doesn't need it and this step is just testing.
No errors have occurred so far.
7. Since i have taken a look in milkshape and it seemed to be perfect i import into S3PE nothing pops up other than the bounding box thing.
8. i export the MLOD/MOLD file that i just overwrote and import it into milkshape at this point the mesh looks nothing like it did before it entered S3PE, it looks like i took a hammer to it and beat to poo out of it. Its at this point that you see the nasty looking picture you posted above.
Tell me what i did wrong please.
7th Jan 2012 at 10:55 PM
Posts: 2,932
Thanks: 15575 in 28 Posts
|
Here is What i do. 1 i export the original EA mesh then import it into milkshape. 2 i then import my custom mesh. 3 Then i delete the EA mesh, create a new texture and use my multiplier and assign it to my window trim groups 1 and 2 and open the TCE and hit fit selection for windowtrim groups 1 & 2. 4 Then assign the EA mesh joints to my custom mesh. 5. Then i over-wright the EA s3asc file that i exported from S3PE with my custom one i made in milkshape, then i close milkshape. 6. Now that the s3asc file now contains my new custom mesh i open milkshape again i re-import it just to take a look and see if everything looks like its supposed to i don't edit the mesh anymore since it doesn't need it and this step is just testing. No errors have occurred so far. 7. Since i have taken a look in milkshape and it seemed to be perfect i import into S3PE nothing pops up other than the bounding box thing. 8. i export the MLOD/MOLD file that i just overwrote and import it into milkshape at this point the mesh looks nothing like it did before it entered S3PE, it looks like i took a hammer to it and beat to poo out of it. Its at this point that you see the nasty looking picture you posted above. Tell me what i did wrong please. |
8th Jan 2012 at 12:24 AM
Last edited by TDC95 : 8th Jan 2012 at 12:43 AM.
Posts: 328
Thanks: 4085 in 7 Posts
I'd have to say that doing this conversion has taught me a lot. Its one positive thing about it
I attached the file

| 00000_MLOD.zip (152.9 KB, 7 downloads) - View custom content | ||
     5155  01-07-12 19:36   S3_01D10F34_08000000_288DA7B67FA2C5BC_windowFrance3x1%%+MLOD_group01.s3ascg
     5159  01-07-12 19:36   S3_01D10F34_08000000_288DA7B67FA2C5BC_windowFrance3x1%%+MLOD_group02.s3ascg
   265120  01-07-12 19:36   S3_01D10F34_08000000_288DA7B67FA2C5BC_windowFrance3x1%%+MLOD_group03.s3ascg
    20054  01-07-12 19:36   S3_01D10F34_08000000_288DA7B67FA2C5BC_windowFrance3x1%%+MLOD_group04.s3ascg
     6163  01-07-12 19:29   S3_01D10F34_08000000_288DA7B67FA2C5BC_windowFrance3x1%%+MLOD_group00.s3ascg.bak00
     1834  01-07-12 19:29   S3_01D10F34_08000000_288DA7B67FA2C5BC_windowFrance3x1%%+MLOD_group01.s3ascg.bak00
     1818  01-07-12 19:29   S3_01D10F34_08000000_288DA7B67FA2C5BC_windowFrance3x1%%+MLOD_group02.s3ascg.bak00
   245547  01-07-12 19:29   S3_01D10F34_08000000_288DA7B67FA2C5BC_windowFrance3x1%%+MLOD_group03.s3ascg.bak00
   244825  01-07-12 19:29   S3_01D10F34_08000000_288DA7B67FA2C5BC_windowFrance3x1%%+MLOD_group04.s3ascg.bak00
        0  01-07-12 19:29   S3_01D10F34_08000000_288DA7B67FA2C5BC_windowFrance3x1%%+MLOD_filebase.s3asc
   134532  01-07-12 19:36   S3_01D10F34_08000000_288DA7B67FA2C5BC_windowFrance3x1%%+MLOD_group00.s3ascg
 --------                   -------
   930207                   11 files
|
||
8th Jan 2012 at 3:56 AM
Posts: 2,932
Thanks: 15575 in 28 Posts
|
I'm using version 11-1001-1447, sure ill attach it to this post. I'd have to say that doing this conversion has taught me a lot. Its one positive thing about it I attached the file
|
8th Jan 2012 at 2:01 PM
Posts: 328
Thanks: 4085 in 7 Posts
| How are you exporting this? You should be exporting as .s3asc. |
When i export using milkshape i use the "Sims3 Object Export 1.01 - by Wesley Howe"
What am i doing wrong>
 8th Jan 2012 at 3:14 PM
Posts: 2,932
Thanks: 15575 in 28 Posts
| I am in S3PE i right click on my MLOD file and a list pops up, an option to export as .s3asc is on the list and i click it. And like 5 files come out 4 are the groups to the mesh and 1 is the entire mesh with all the groups. Isn't that whats its supposed to do? |
8th Jan 2012 at 4:12 PM
Posts: 328
Thanks: 4085 in 7 Posts
8th Jan 2012 at 4:40 PM
Posts: 2,932
Thanks: 15575 in 28 Posts
| So basically what your saying is I need to re-map this thing right? |
22nd Jan 2014 at 12:35 PM
Posts: 1
|
Hey all, My mesh seems to be perfectly fine, i made a 1 story tall paintings frame with historical paintings on it, looks nice except for the fact my paintings keep coming up crunchy or pixelated. The pictures i'm using are very clear, i am not expanding them to a large extent. And they look clear when i put them on. Is there anyway to stop them from looking so blurry? Please help! I want to upload here when done im so you guys can enjoy it |
Hi have you got any smaller custom meshes for paintings (preferably not 1 story)

Who Posted
|
|