 Sign in to Mod The Sims
- Site Map >
- Modding and Creation >
- Sims 3 Creation >
- Meshing >
- General/Other - Collaboration (IceCreamStand meshing) and occluders (LITE resources)
- Site Map >
- Modding and Creation >
- Sims 3 Creation >
- Meshing >
- General/Other - Collaboration (IceCreamStand meshing) and occluders (LITE resources)
Replies: 23 (Who?), Viewed: 8803 times.
#1
 16th May 2015 at 2:41 PM
Last edited by Arsil : 19th Jun 2015 at 11:03 PM.
Reason: edited title for better indexing
16th May 2015 at 2:41 PM
Last edited by Arsil : 19th Jun 2015 at 11:03 PM.
Reason: edited title for better indexing
16th May 2015 at 2:41 PM
Last edited by Arsil : 19th Jun 2015 at 11:03 PM.
Reason: edited title for better indexing
Posts: 997
Thanks: 22102 in 95 Posts
I guess this is a request, so I hope to get some mercy.
EDIT: in the next post there's also an attempt to a constructive discussion, so please leave at least that.
I made a mod for a basegame custom food stand, it can be used as general purpose
but I configured it especially for selling ice creams (I made a few recolors of the existing
one. I know it's stupid, I tried to use only one with different materials but it didn't turn out
well, I did get different thumbnails but not different textures, maybe I did it wrong or maybe
it's because ice creams aren't created in the same way of regular foods so the "material"
defined in the recipes xml is ignored. I can probably find a solution for this but meh).
The ice creams are fine, don't focus on them.
The stand is cloned from one of the concessions stands of the EP Seasons. I changed the mesh
(simply removing the "upper pieces" and leaving only the "counter") and slightly edited the textures.
By the way, I don't think I have modified them enough to be re-uploaded with a clean conscience :P
I have a few problems:
- I don't like meshing (nor I'm good at it)
- I'd like to change more the mesh and the textures
- I'd like to change the presets
- the package is almost 2MB (too much for my tastes) because there are a lot of textures, I'm not even sure if they are all used, and I'd like to safely remove some or at least reduce their size.
- I haven't re-done the UV mapping after changing the mesh (laziness and I always have a hard time with that process, it takes me a lot of time)
- I don't understand how the occluders of the LITE resource are defined so I can't update them to reflect (pun intended) the new shape of the stand (I deleted a few using intuition but it didn't work well).
The mod is finished (it can be improved, but it seems like it's already working fine), it's just
the stand that needs to be fixed. Is there someone willing to collaborate for this little project?
I'd like to learn about the LITE (I'd need a very elementary explanation),
but for the meshing I just hope to find someone who enjoys doing that.
Hell, I could probably do that myself but I just don't want to.
I've uploaded the mod here, in case someone want to check it out.
EDIT: attachment removed, work in progress
Advertisement
#2
17th May 2015 at 7:28 AM
Last edited by Arsil : 17th May 2015 at 8:18 AM.
17th May 2015 at 7:28 AM
Last edited by Arsil : 17th May 2015 at 8:18 AM.
Posts: 997
Thanks: 22102 in 95 Posts
[I fixed the blue ice cream cone]
So, let's try to figure this out, shall we? I already know I'll end up talking to myself, but hey.
I think the occluders defined in LITE resources, like their name suggests,
block light/illumination to create shadows (or anyway diminish the brightness).
Rectangle? Check. Bi-dimensional, 4 vertices, 4 sides (2 by 2 parallel). I own this concept.
Origin? A point in the 3D space, {x, y, z} coordinates.
Normal? No clue. It has something to do with normalizing a vector? Not that I remember exactly what that means.
Values seems to be 0, 1 or -1. If I had to take a guess, I'd say this is used to specify in what plane the origin point belongs.
XAxis and YAxis? No clue. Are they used for the size of the rectangle? Could they be rotations on those axes?
Or these are used to define a plane?
PairOffset? No clue. What pair? XAxis and YAxis? Since ZAxis is missing, is the offset of the rectangle in that axis?
But then I'll get a ... 3d equivalent of a rectangle (ehm... I don't remember its name even in my first language...
oh yeah, got it, cuboid or rectangular parallelepipedon)
What defines the size of the rectangle?
Anyone so nice to explain and possibly show me in MilkShape (or whatever you like) a representation of that rectangle?
-----
EDIT: Let's try a bit harder.
Let's suppose origin and normal define a vector.
Origin are coordinates (x = -0.91 and z = -0.61) and normal (with z = 1) means it points in the z direction with a positive orientation.
Something like this?
If what I supposed is true, now we have our plane, so we need the size of the rectangle.
XAxis: x = 0,5624
YAxis: y = 1
PairOffset: 1,3026
If I add those x and y values to the coordinates of the origin to get a second point
(the opposite vertex) I get a "vertical" rectangle, but its size doesn't match with the
shape of the mesh, so that must be wrong.
------
Not a geometry major here, that's a safe bet ^^
So, let's try to figure this out, shall we? I already know I'll end up talking to myself, but hey.
I think the occluders defined in LITE resources, like their name suggests,
block light/illumination to create shadows (or anyway diminish the brightness).
Code:
Occluder_Type: 0x00000001 (Rectangle)
Origin: { -0,9106; 0,0000; -0,6124 }
Normal: { 0,0000; 0,0000; 1,0000 }
XAxis: { 0,5624; 0,0000; 0,0000 }
YAxis: { 0,0000; 1,0000; 0,0000 }
PairOffset: 1,3026
Rectangle? Check. Bi-dimensional, 4 vertices, 4 sides (2 by 2 parallel). I own this concept.
Origin? A point in the 3D space, {x, y, z} coordinates.
Normal? No clue. It has something to do with normalizing a vector? Not that I remember exactly what that means.
Values seems to be 0, 1 or -1. If I had to take a guess, I'd say this is used to specify in what plane the origin point belongs.
XAxis and YAxis? No clue. Are they used for the size of the rectangle? Could they be rotations on those axes?
Or these are used to define a plane?
PairOffset? No clue. What pair? XAxis and YAxis? Since ZAxis is missing, is the offset of the rectangle in that axis?
But then I'll get a ... 3d equivalent of a rectangle (ehm... I don't remember its name even in my first language...
oh yeah, got it, cuboid or rectangular parallelepipedon)
What defines the size of the rectangle?
Anyone so nice to explain and possibly show me in MilkShape (or whatever you like) a representation of that rectangle?
-----
EDIT: Let's try a bit harder.
Let's suppose origin and normal define a vector.
Origin are coordinates (x = -0.91 and z = -0.61) and normal (with z = 1) means it points in the z direction with a positive orientation.
Something like this?
If what I supposed is true, now we have our plane, so we need the size of the rectangle.
XAxis: x = 0,5624
YAxis: y = 1
PairOffset: 1,3026
If I add those x and y values to the coordinates of the origin to get a second point
(the opposite vertex) I get a "vertical" rectangle, but its size doesn't match with the
shape of the mesh, so that must be wrong.
------
Not a geometry major here, that's a safe bet ^^
#3
18th May 2015 at 8:31 PM
18th May 2015 at 8:31 PM
Posts: 157
Hi Arsil, I am on the road right now but when I get home I will download your food stand and look it over in game. I can probably help with a custom mesh and sun shadow. Is that what you're looking for?
PJ
PJ
#4
18th May 2015 at 8:51 PM
18th May 2015 at 8:51 PM
Posts: 997
Thanks: 22102 in 95 Posts
Thanks. Yeah, something like that. Mostly re-do the uv mapping, update the textures accordingly and possibly
also reduce their number and resolution to get a lighter package (or maybe just remove the patterns and replace
them with default basegame ones to save some space).
Probably the mesh has to be modified more because it's still very similar to the one I cloned. I'd like a slightly
rounded counter, not too much round so to keep the actual footprint, like the shape of the letter "D".
(top view) clerk-side D client-side
There might be also an issue with the TXTC resources (their settings don't match those in the presets),
I always have trouble with them.
About the occluders, when I find some time and patience I'll try to study those of simply shaped object to figure out how they work.
#5
19th May 2015 at 3:43 AM
19th May 2015 at 3:43 AM
Posts: 157
I've downloaded the file but not put it in game yet. Looked at it in s3pe. I believe that the file is larger than necessary because it was "Deep Cloned" with s3oc.
There are several unnecessary IMG resources with Group 0x00000000 which came from the FullBuild.packages, which could be removed.
When you cloned the food stand, these resources all got new instance numbers, but the references inside the presets etc probably still point to the original files.
I will start working on a new mesh for you tomorrow.
#6
19th May 2015 at 8:17 AM
Last edited by Arsil : 21st May 2015 at 4:17 PM.
19th May 2015 at 8:17 AM
Last edited by Arsil : 21st May 2015 at 4:17 PM.
Posts: 997
Thanks: 22102 in 95 Posts
Good point. I think deleting those and updating the references to point to the original resources
will save a lot of bytes (so there's no need to lower the resolution of the textures).
Maybe re-cloning the object from scratch will be quicker.
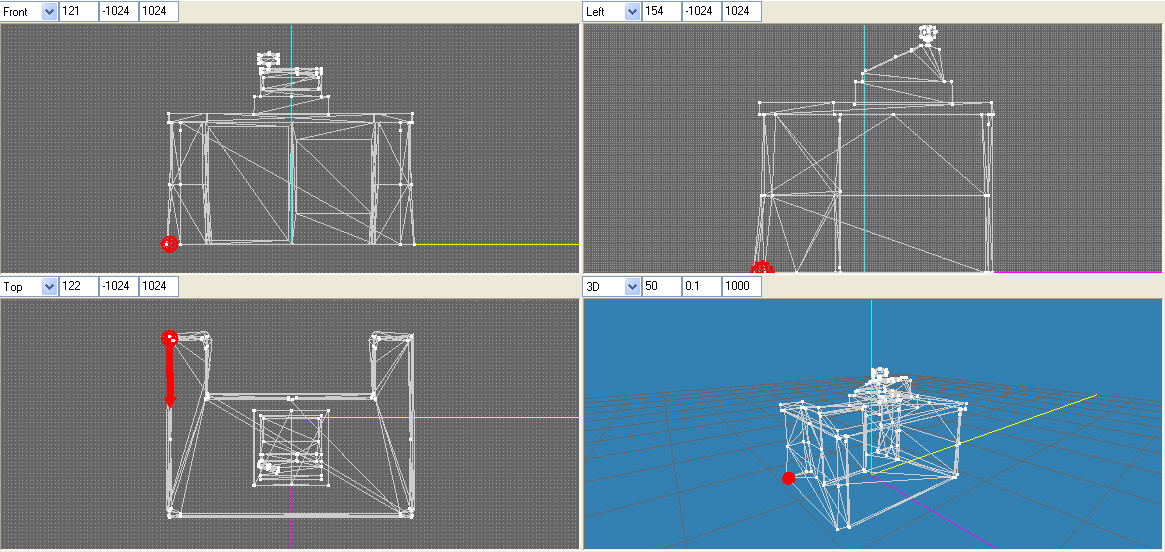
In the meantime, I've put in a tight corner the LITE resource of sculptureFloorDiveDivider (LN)
and I'll start questioning it until it confesses. It has only 1 occluder. I'm not proud, but I've
threatened to override it.
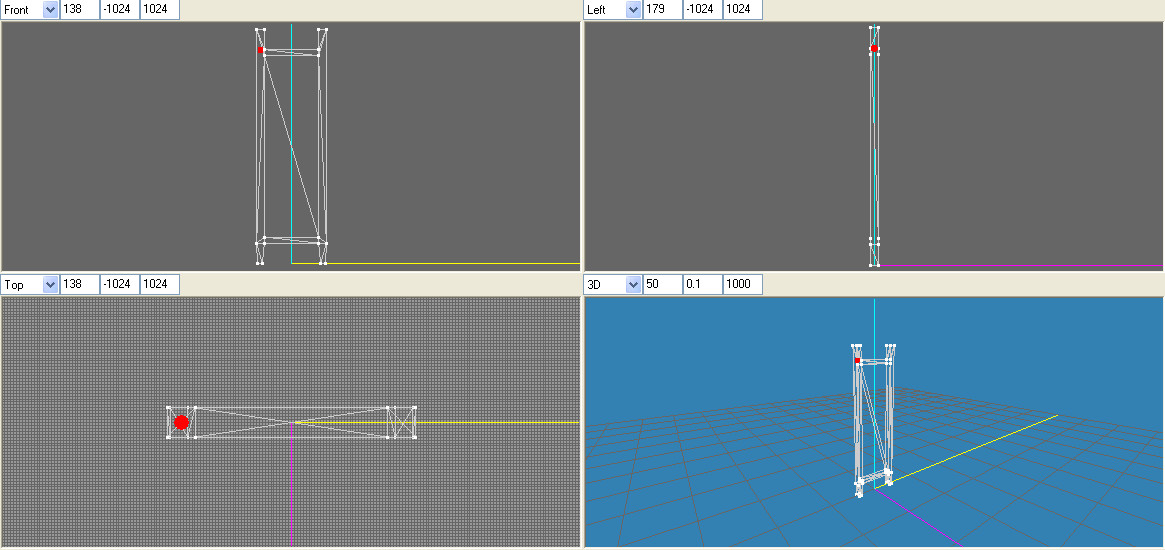
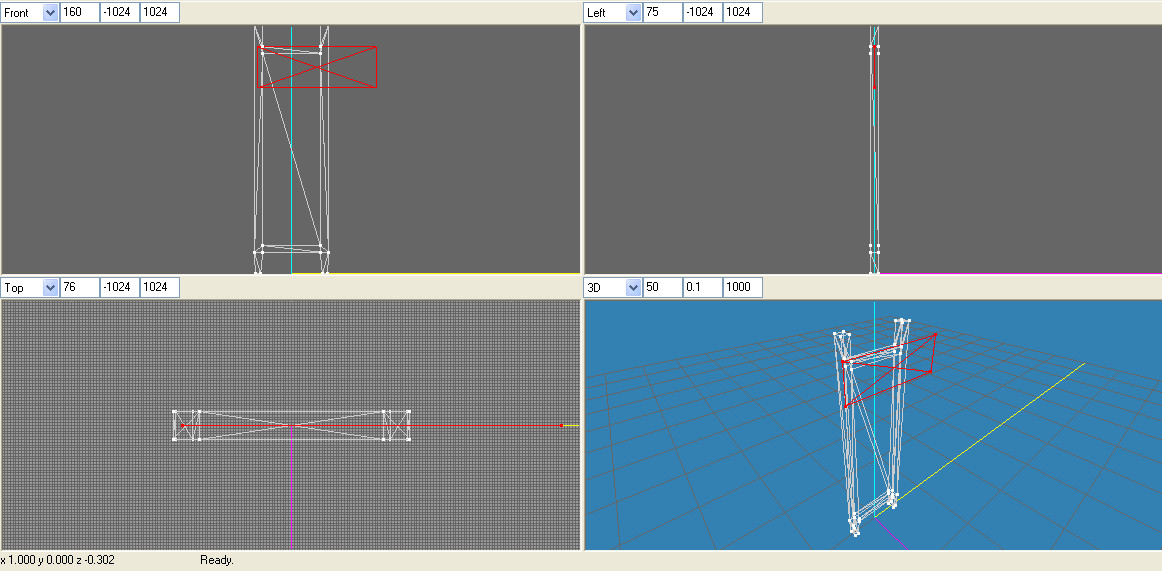
So, if that's the origin, it means the opposite vertex of the damn rectangle is the one in the bottom-right.
Now that I can visualize the rectangle, maybe my little brain can understand how it's defined.
EDIT
In 3D space, a plane can be defined by a point (Origin) and a Normal vector perpendicular to the plane.
I think I got this right, I still miss the meaning of the other fields and so how to
obtain width and height of the rectangle.
It seems logical to consider "Origin" as one of the vertices of the rectangle (point A),
the other 3 (point B, C and D) could be obtained adding to its coordinates the values of XAxis and YAxis:
A = origin
B = origin + XAxis
C = origin + Xaxis + YAxis (opposite vertex)
D = origin + YAxis
(still no clue about PairOffset unless it's used to define a second rectangle in a plane parallel to the first one)
But this way you don't get a rectangle that matches the "face" of the mesh.
Maybe that's not supposed to happen.
will save a lot of bytes (so there's no need to lower the resolution of the textures).
Maybe re-cloning the object from scratch will be quicker.
In the meantime, I've put in a tight corner the LITE resource of sculptureFloorDiveDivider (LN)
and I'll start questioning it until it confesses. It has only 1 occluder. I'm not proud, but I've
threatened to override it.
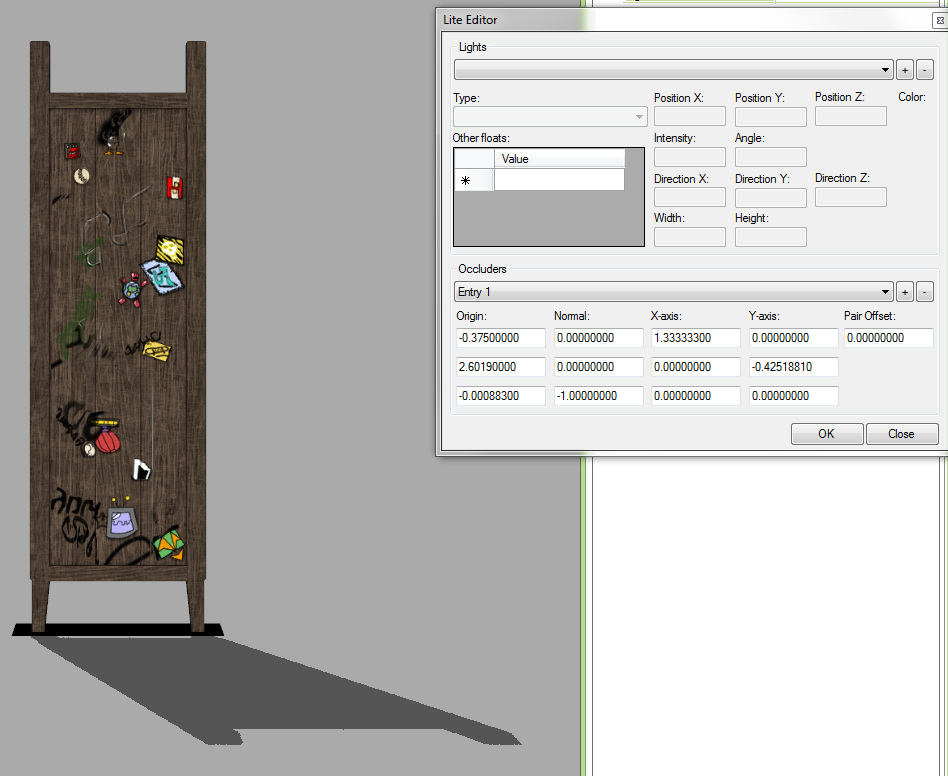
Code:
      Occluder_Type: 0x00000001 (Rectangle)
      Origin: { -0,3750; 2,6019; -0,0009 }
      Normal: { 0,0000; 0,0000; -1,0000 }
      XAxis: { 1,3333; 0,0000; 0,0000 }
      YAxis: { 0,0000; -0,4252; 0,0000 }
      PairOffset: 0,0000
So, if that's the origin, it means the opposite vertex of the damn rectangle is the one in the bottom-right.
Now that I can visualize the rectangle, maybe my little brain can understand how it's defined.
EDIT
In 3D space, a plane can be defined by a point (Origin) and a Normal vector perpendicular to the plane.
I think I got this right, I still miss the meaning of the other fields and so how to
obtain width and height of the rectangle.
It seems logical to consider "Origin" as one of the vertices of the rectangle (point A),
the other 3 (point B, C and D) could be obtained adding to its coordinates the values of XAxis and YAxis:
A = origin
B = origin + XAxis
C = origin + Xaxis + YAxis (opposite vertex)
D = origin + YAxis
(still no clue about PairOffset unless it's used to define a second rectangle in a plane parallel to the first one)
But this way you don't get a rectangle that matches the "face" of the mesh.
Maybe that's not supposed to happen.
#7
20th May 2015 at 7:35 PM
20th May 2015 at 7:35 PM
Posts: 157
I don't know anything about LITE resources, but I'm sure you'll figure it out. 
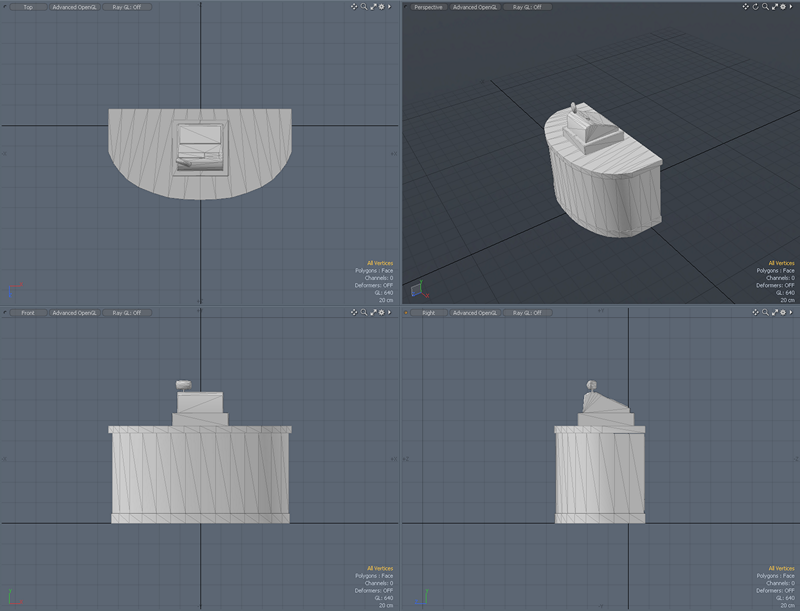
As for the food stand mesh, here's what I've got so far. I made the counter "D"-shaped like you requested. What do you think?
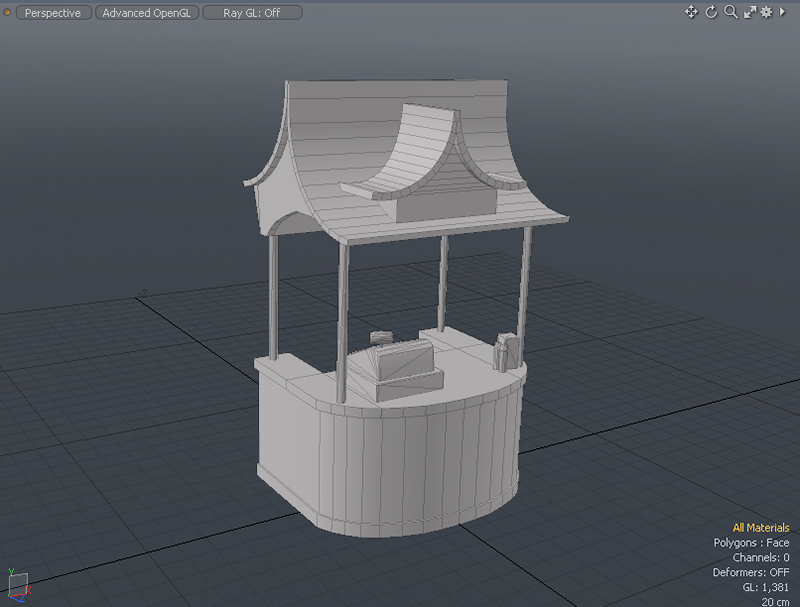

As for the food stand mesh, here's what I've got so far. I made the counter "D"-shaped like you requested. What do you think?

#8
20th May 2015 at 8:54 PM
20th May 2015 at 8:54 PM
Posts: 997
Thanks: 22102 in 95 Posts
You nailed the "rounding" I was talking about ^^
You were so nice that I'm almost afraid to ask this, but I'd like to:
- have only the counter without the upper part, so it's more versatile (fits better indoors for instance), and with the register centered. See my mesh as reference.
- remove those "rear wings" (optional, it's not really important)
#9
21st May 2015 at 3:29 AM
21st May 2015 at 3:29 AM
Posts: 157
how about this

#10
21st May 2015 at 10:07 AM
Last edited by Arsil : 2nd Jun 2015 at 9:38 AM.
21st May 2015 at 10:07 AM
Last edited by Arsil : 2nd Jun 2015 at 9:38 AM.
Posts: 997
Thanks: 22102 in 95 Posts
Perfect.
Did you move the mesh along the "z" axis (or even the "x" one)? Please, leave it exactly
in the same position as the original, so we don't have to change the routing slots.
I should have told you this before, sorry.
Feel free to do whatever you like with the textures.
A front logo with an ice cream will be nice (maybe changeable with presets),
but it's totally optional, do it as you please.
In the meantime I noticed that using a selectable Sim as clerk seems to cause some issues, I'll investigate that.
EDIT: nah, it has nothing to do with the clerk being selectable or not, it has to do with the "line" to buy.
#11
27th May 2015 at 4:19 PM
27th May 2015 at 4:19 PM
Posts: 157
The new mesh is in the same position as the original foodstand:
I've been having a bit of trouble with the textures but I hope to get it figured out soon. Sorry for the delay.

I've been having a bit of trouble with the textures but I hope to get it figured out soon. Sorry for the delay.
#13
1st Jun 2015 at 3:41 AM
1st Jun 2015 at 3:41 AM
Posts: 157
Here you go, Arsil. I hope you like what I did. I added two colours of ice cream (the pink and orange), because it made it look better IMHO. Hope you don't mind.


Attached files:
| Arsil_CustomFoodStand.zip (354.7 KB, 58 downloads) - View custom content | ||||||||||
500402 05-31-2015 22:09 Arsil_CustomFoodStand.package --------- ------- 500402 1 file |
||||||||||
#14
1st Jun 2015 at 9:51 AM
Last edited by Arsil : 2nd Jun 2015 at 9:42 AM.
1st Jun 2015 at 9:51 AM
Last edited by Arsil : 2nd Jun 2015 at 9:42 AM.
Posts: 997
Thanks: 22102 in 95 Posts
I'm sorry, I don't like it... I LOVE IT! You did a terrific job. As far as I'm concerned,
this is uploading material***, if you agree. Do you have any particular policy/TOU
you want me to mention? Or do you want to be the one to upload it?
*** EDIT: actually the blurring is very annoying. See below.
I'll add an orange ice cream cone to match the texture.
I fixed the footprint:
- there was still the "upper piece" so it couldn't be placed indoors (I forgot that in mine too).
- there were still the two rear wings that blocked routing.
- no need to adjust the footprint shape to match the curve of the counter (not worth it)
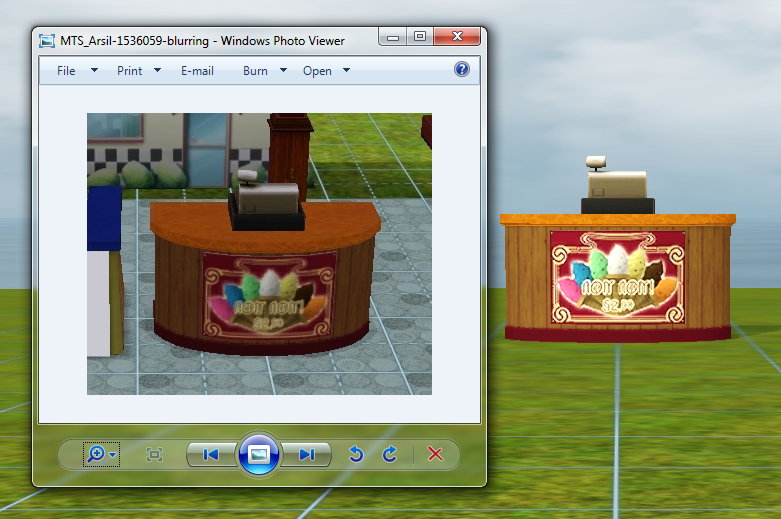
Quick question: I'm not expert and maybe I'm wrong, but usually overlay textures use DXT5 compression,
any particular reason you used DXT1? Never mind. The overlay texture looks blurred from afar (see screenshot),
I thought you didn't use mipmaps but they are there. Was 1024x1024 the original size? The hex code for 1024 is 0x400,
but it seems you used that (presuming I checked in the right places). Maybe it's the image itself or the fact that it's
mapped on a curved surface?
EDIT: for lack of a better explanation, I'm assuming it's the latter. Boy, the blurring is very annoying actually,
do you mind trying to re-mesh it keeping flat the front of the counter and only curving it near the edges
(so the overlay texture lays on a flat surface)?
EDIT2: Meh, I don't think that's the problem.
I like the use of simlish! Putting the price is a nice touch, it doesn't match the real price though (which is also tunable). Bah, who cares!
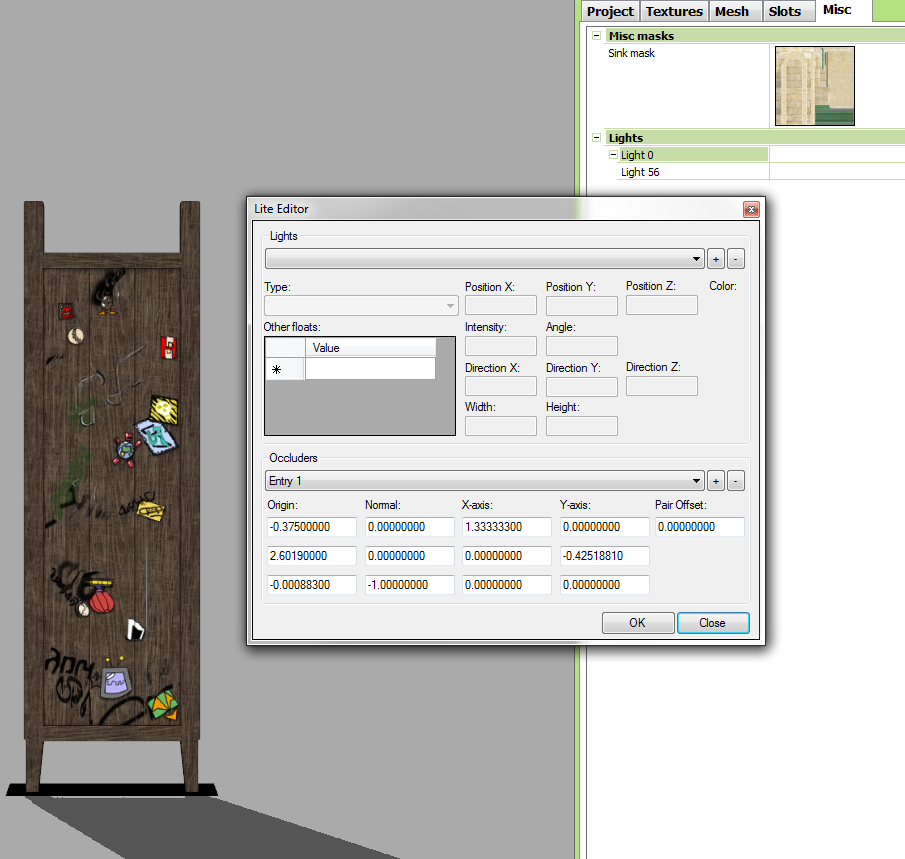
I can tell you used TSRW, does it have a tool for editing LITE resources visually? If it does, can you please do an experiment?
You take the sculptureFloorDiveDivider (see one of my previous posts) and modify the occluder halving its vertical length
("uplifting" the bottom side, so the origin doesn't change), then you upload the LITE here so I'll track the differences.
EDIT
In the meantime I noticed a bug when someone tries to buy the default cone (this really doesn't make any sense
to me) and there's definitely a problem with the line. When more Sims are in line to buy something the clerk seems
to freeze and doesn't serve anyone (a client occupies the routing slot but the clerk is trying to serve another client).
Does that happen even with Seasons' or IP's stands?
Yet Another Edit
I think I fixed both issues (somehow). So, now there are 2 things left to do:
- try to remove the blurring from the overlay texture (the one with the icecreams' logo)
- fix the LITE resource
this is uploading material***, if you agree. Do you have any particular policy/TOU
you want me to mention? Or do you want to be the one to upload it?
*** EDIT: actually the blurring is very annoying. See below.
I'll add an orange ice cream cone to match the texture.
I fixed the footprint:
- there was still the "upper piece" so it couldn't be placed indoors (I forgot that in mine too).
- there were still the two rear wings that blocked routing.
- no need to adjust the footprint shape to match the curve of the counter (not worth it)
any particular reason you used DXT1?
I thought you didn't use mipmaps but they are there. Was 1024x1024 the original size? The hex code for 1024 is 0x400,
but it seems you used that (presuming I checked in the right places). Maybe it's the image itself or the fact that it's
mapped on a curved surface?
EDIT: for lack of a better explanation, I'm assuming it's the latter. Boy, the blurring is very annoying actually,
do you mind trying to re-mesh it keeping flat the front of the counter and only curving it near the edges
(so the overlay texture lays on a flat surface)?
EDIT2: Meh, I don't think that's the problem.
I like the use of simlish! Putting the price is a nice touch, it doesn't match the real price though (which is also tunable). Bah, who cares!
I can tell you used TSRW, does it have a tool for editing LITE resources visually? If it does, can you please do an experiment?
You take the sculptureFloorDiveDivider (see one of my previous posts) and modify the occluder halving its vertical length
("uplifting" the bottom side, so the origin doesn't change), then you upload the LITE here so I'll track the differences.
EDIT
In the meantime I noticed a bug when someone tries to buy the default cone (this really doesn't make any sense
to me) and there's definitely a problem with the line. When more Sims are in line to buy something the clerk seems
to freeze and doesn't serve anyone (a client occupies the routing slot but the clerk is trying to serve another client).
Does that happen even with Seasons' or IP's stands?
Yet Another Edit
I think I fixed both issues (somehow). So, now there are 2 things left to do:
- try to remove the blurring from the overlay texture (the one with the icecreams' logo)
- fix the LITE resource
#15
2nd Jun 2015 at 2:09 PM
2nd Jun 2015 at 2:09 PM
Posts: 157
The blurry textures are caused by Photoshop not using the optimal settings when generating the mipmaps. The game engine also adds to the blurriness by scaling up the smaller textures. An image mapped to a curved mesh will not look blurry in of itself.
I'm almost finished remaking the mipmaps so they are as sharp as possible and will upload the fixed file when done.
The ice cream textures - I made the orange version, tweaked the other colours a bit, and the pink is definately much darker than EA's (see sim holding cone in above screenshot). I've made DDS files of those as well.
Regarding the LITE resources: which settings do I change and by how much?
#16
2nd Jun 2015 at 5:03 PM
2nd Jun 2015 at 5:03 PM
Posts: 997
Thanks: 22102 in 95 Posts
Oh, so the mipmaps are responsible for the blurring?
I'll try to generate them with Gimp then... I don't see much difference,
I hope you are more lucky (or skilled).
I've added also a custom pink ice cream because I was getting issues with the existing one.
I'll use yours textures if mine don't match with the logo of the stand.
About the LITE. The changes you made are visually reflected somehow?
I see the drop shadow and what seems to be the sun shadow in the screenshot.
If you change the values of the occluder you see any change?
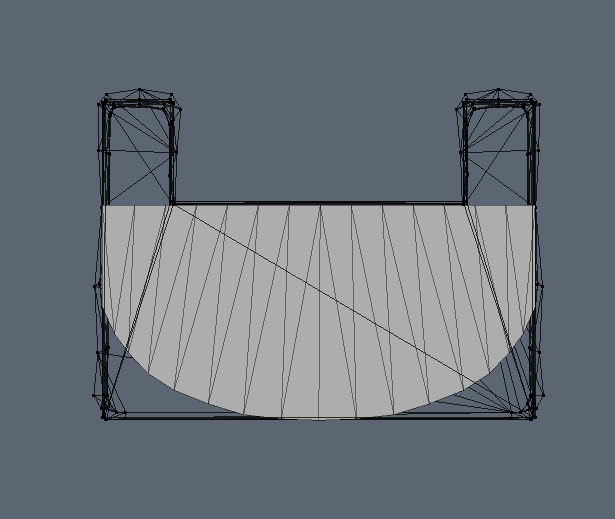
Our pretty stand has 6 occluders, using intuition I deleted 3 of them,
because they had an Y coordinate for the Origin very high so I thought they
were related to the upper part of the original mesh (that our doesn't have).
I don't think I can be a good judge of the result, I don't have a good eye for this
kind of things and my graphic settings are pretty low anyway.
Another option is to use the LITE of a desktop, the shape is very similar.
But at the end of the day I'd like to learn how the hell define the occluders myself.
Let me know ^^
I'll try to generate them with Gimp then... I don't see much difference,
I hope you are more lucky (or skilled).
I've added also a custom pink ice cream because I was getting issues with the existing one.
I'll use yours textures if mine don't match with the logo of the stand.
About the LITE. The changes you made are visually reflected somehow?
I see the drop shadow and what seems to be the sun shadow in the screenshot.
If you change the values of the occluder you see any change?
Our pretty stand has 6 occluders, using intuition I deleted 3 of them,
because they had an Y coordinate for the Origin very high so I thought they
were related to the upper part of the original mesh (that our doesn't have).
I don't think I can be a good judge of the result, I don't have a good eye for this
kind of things and my graphic settings are pretty low anyway.
Another option is to use the LITE of a desktop, the shape is very similar.
But at the end of the day I'd like to learn how the hell define the occluders myself.
Let me know ^^
#17
2nd Jun 2015 at 9:54 PM
2nd Jun 2015 at 9:54 PM
Posts: 157
Attached is the foodstand with new and improved mipmaps. I can't sharpen them any more than this without degrading the quality of the images. I've made a screenshot with a side by side comparison of the old and new version made at about the same camera distance, for which the game probably uses the 128x128 pixel image. I think it looks somewhat better. Hope you agree.
Divider Occluder testing (exported LITE resources for each change attached):
Original Values
1st Value Changed
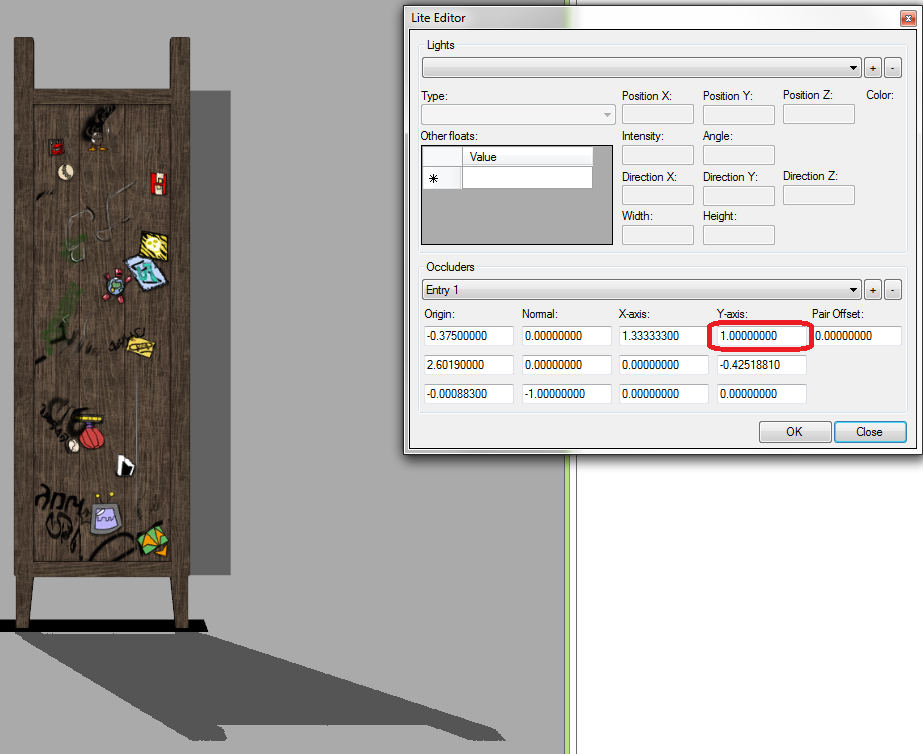
2nd Value Changed

3rd Value Changed
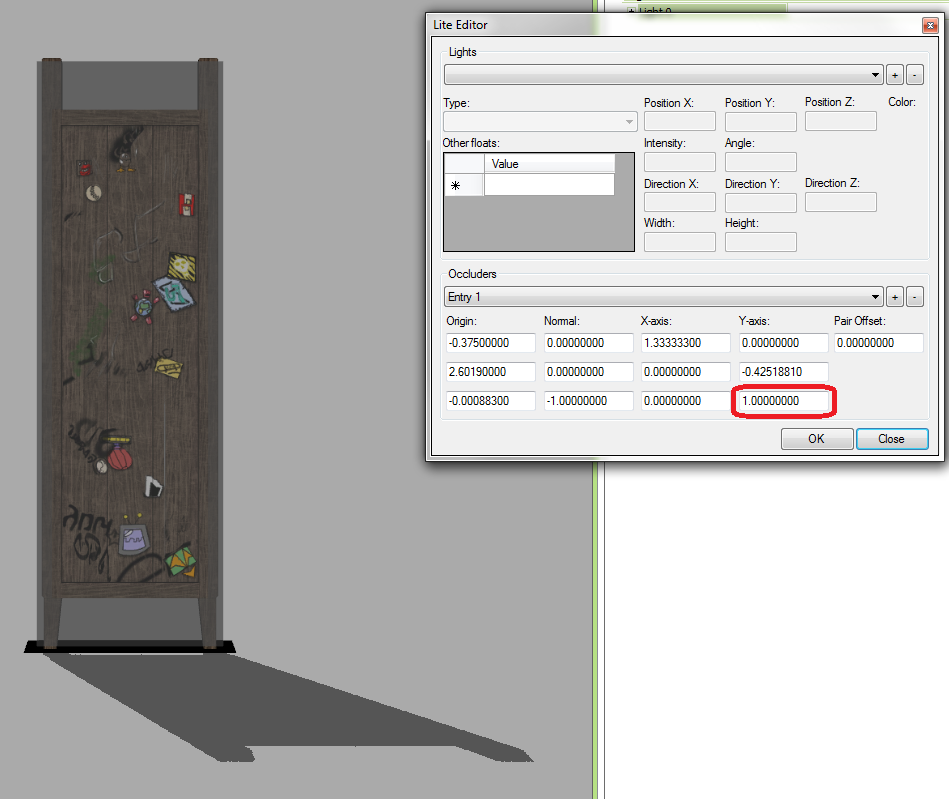
Divider Occluder testing (exported LITE resources for each change attached):
Original Values
1st Value Changed
2nd Value Changed
3rd Value Changed
Attached files:
| Arsil_CustomFoodStand_final.7z (363.9 KB, 32 downloads) - View custom content | ||||||||||
   Date      Time    Attr         Size   Compressed  Name
------------------- ----- ------------ ------------  ------------------------
2015-06-02 14:18:00 ....A       503926       352856  Arsil_CustomFoodStand_final.package
2015-06-02 13:49:43 ....A        19337        19565  icecream_DDS.7z
------------------- ----- ------------ ------------  ------------------------
                                523263       372421  2 files, 0 folders
|
||||||||||
| divider_LITEresources.7z (397 Bytes, 20 downloads) - View custom content | ||||||||||
   Date      Time    Attr         Size   Compressed  Name
------------------- ----- ------------ ------------  ------------------------
2015-06-02 16:08:54 ....A          116           88  divider_LiteResource_y-axis_value1_change/S3_03B4C61D_28000000_251855E41A849A6B%%+LITE.light
2015-06-02 16:10:24 ....A          116               divider_LiteResource_y-axis_value2_change/S3_03B4C61D_28000000_251855E41A849A6B%%+LITE.light
2015-06-02 16:10:45 ....A          116               divider_LiteResource_y-axis_value3_change/S3_03B4C61D_28000000_251855E41A849A6B%%+LITE.light
2015-06-02 16:10:57 D....            0            0  divider_LiteResource_y-axis_value3_change
2015-06-02 16:10:29 D....            0            0  divider_LiteResource_y-axis_value2_change
2015-06-02 16:09:51 D....            0            0  divider_LiteResource_y-axis_value1_change
------------------- ----- ------------ ------------  ------------------------
                                   348           88  3 files, 3 folders
|
||||||||||
#18
3rd Jun 2015 at 8:07 AM
Last edited by Arsil : 3rd Jun 2015 at 9:35 AM.
3rd Jun 2015 at 8:07 AM
Last edited by Arsil : 3rd Jun 2015 at 9:35 AM.
Posts: 997
Thanks: 22102 in 95 Posts
You only changed that texture in the stand package, right?
Now it's much better. Maybe the best solution is to "draw manually" the mipmaps since the original
texture is very big and detailed, so I guess it's only natural that it gets blurry when scaled.
I won't ask you to do that, I think I've already been a PITA with all my requests, I'll try to do it myself
even if I'm not very good at graphic editing or we can use it as is.
EDIT: Yep, I think I improved them a bit further. Instead of generating the mipMaps automatically,
I scaled the 1024x1024 texture with no interpolation for every resolution (until 32x32) and pasted
it to the level of the correspondent mipMap. That 128x128 mipMap was very naugthy!
About the LITE, thank you very much, that will be very useful to understand how occluders
are defined but ATM it still doesn't make sense to me. The only thing your tests confirmed
to me so far is that the occluder perfectly matches the shape of the object (that's good to
know, because I was starting to doubt it).
Since TSRW makes it so easy to edit them, please adjust those of the stand with that tool.
You probably have to delete the last 3 occluders (those with the Y coordinate of the Origin > 2)
and see if the other 3 match the shape of our stand (probably they still include the "back wings"
of the original stand). Of course a rectangle won't perfectly match the curved surface of the front
of the counter, but it shouldn't be a big deal (I hope). Then please upload just the LITE here.
Thanks again for your help ^^
#19
3rd Jun 2015 at 3:08 PM
3rd Jun 2015 at 3:08 PM
Posts: 157
Arsil, I should have explained in my last post exactly what I did with the images. The mipmaps in the new version of the foodstand were not automatically generated by Photoshop. I spent quite a bit of time yesterday manually editing the individual mipmap levels to make them sharper. Original mipmaps that Photoshop produced are on the left, my manually-edited improved versions are on the right:

512x512

256x256

128x128

64x64

32x32
I didn't include anything smaller than 32 px because they're just blobs anyways. Would you mind uploading the mipmap images that you modified in this thread so I can compare them for myself?
As for the LITE resources, I've never edited them - perhaps I'll tackle that another time. The only reference I've found regarding them is on Pocci's blog: Shadows in TS3 Objects
Perhaps it would just be better to make a new sign image at 512x512 (I think 1024 is too large for an object that size and that the reductions from an original image half that size will be less blurred) and manually produce the mipmaps, simplifying them the smaller the image size.
I've put so much time into making the mesh and textures, I'd like to finish it properly, so that we're both happy with the end result.
512x512
256x256
128x128
64x64
32x32
I didn't include anything smaller than 32 px because they're just blobs anyways. Would you mind uploading the mipmap images that you modified in this thread so I can compare them for myself?
As for the LITE resources, I've never edited them - perhaps I'll tackle that another time. The only reference I've found regarding them is on Pocci's blog: Shadows in TS3 Objects
Perhaps it would just be better to make a new sign image at 512x512 (I think 1024 is too large for an object that size and that the reductions from an original image half that size will be less blurred) and manually produce the mipmaps, simplifying them the smaller the image size.
I've put so much time into making the mesh and textures, I'd like to finish it properly, so that we're both happy with the end result.
#20
3rd Jun 2015 at 3:31 PM
3rd Jun 2015 at 3:31 PM
Posts: 997
Thanks: 22102 in 95 Posts
I'll upload the dds. I suggest you to create a clone of the stand and import my texture there
(well, not using import, but right clicking on the texture and choosing replace, so the
IID of the cloned texture is preserved). This way you can compare them directly in
game and see which one works best (I'm not sure it's mine).
I agree that probably using a 512x512 texture would give us better results,
but I'm not sure where I have to change the mask_width/height parameters
(in the complate xml, or in the material block of the OBJD, and in the TXTCs?)
Thanks for that link!
I think he/she means rectangle instead of plane (or maybe not, I'm not sure).
And I think the pair offset is used to specify an offset (on the axis specified by the normal)
to generate a copy of the rectangle, so with the same occluder you can handle two paralles faces of a shape.
(well, not using import, but right clicking on the texture and choosing replace, so the
IID of the cloned texture is preserved). This way you can compare them directly in
game and see which one works best (I'm not sure it's mine).
I agree that probably using a 512x512 texture would give us better results,
but I'm not sure where I have to change the mask_width/height parameters
(in the complate xml, or in the material block of the OBJD, and in the TXTCs?)
Thanks for that link!
Quote:
| The meaning of X-axis and Y-axis values had been mystery for me. But recently I noticed that those values are inversely proportional to the size of the occlusion plane. Pair Offset value is still mystery... |
And I think the pair offset is used to specify an offset (on the axis specified by the normal)
to generate a copy of the rectangle, so with the same occluder you can handle two paralles faces of a shape.
Attached files:
| S3_00B2D882_00000000_25B8E08C60740821%%+_IMG.dds.zip (145.0 KB, 29 downloads) - View custom content | ||
699192 06-03-2015 16:18 S3_00B2D882_00000000_25B8E08C60740821%%+_IMG.dds --------- ------- 699192 1 file |
||
#21
3rd Jun 2015 at 5:52 PM
3rd Jun 2015 at 5:52 PM
Posts: 997
Thanks: 22102 in 95 Posts
Question: who is the idiot who suggested to make the counter round? Oh, right, it was me.
So, I've been playing with the LITE, but there's still something wrong. I used 3 occluders:
- for the back lateral side (with an offset to also cover the front curved side),
- for the lateral sides (with an offset to cover the parallel side), only for the rectangular part of the counter
- for the top of the counter (only for the rectangular part)
I haven't considered the cash register.
In the attachment you can see the results with the light source in 4 different positions.
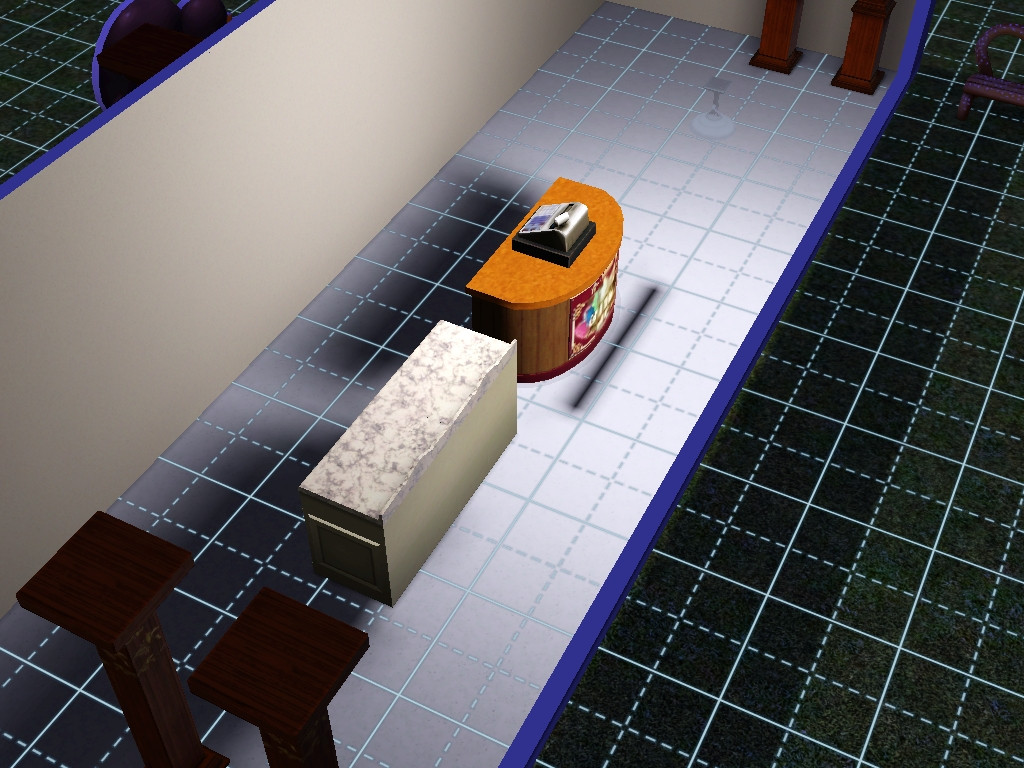
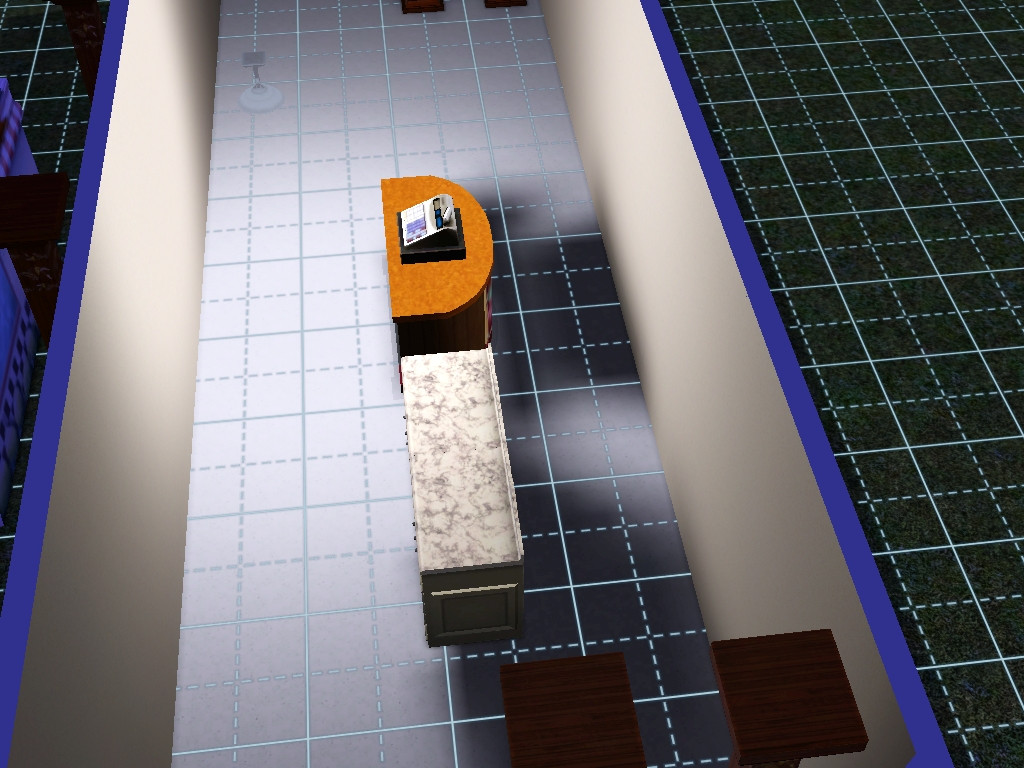
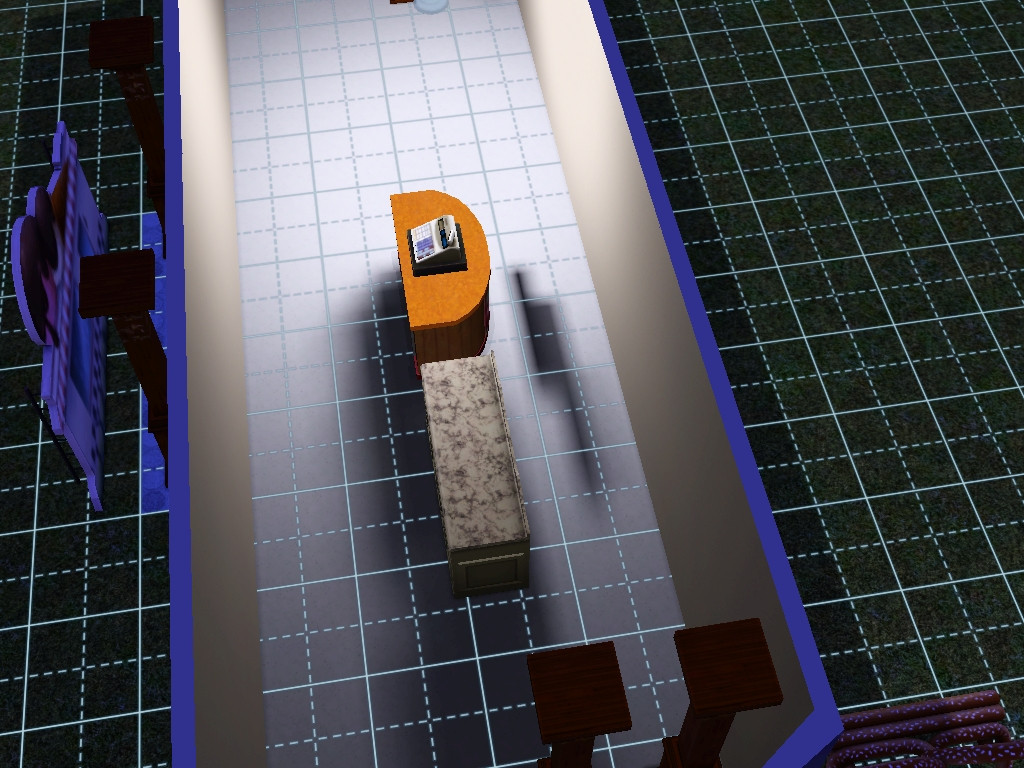
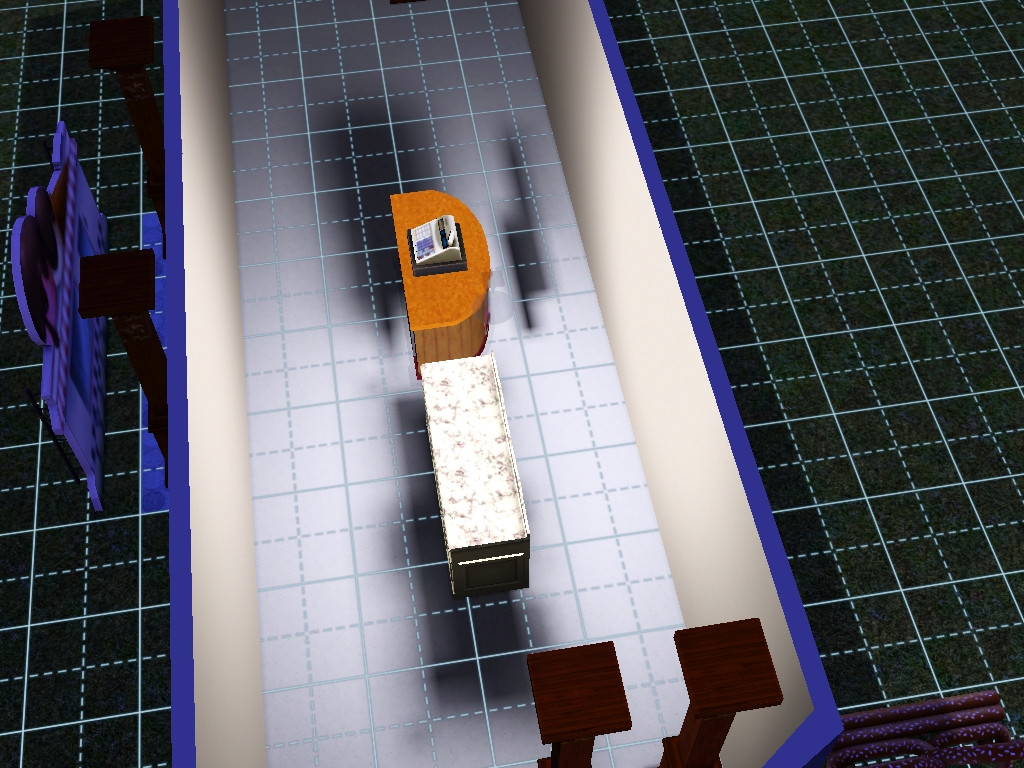
Bleah!
I removed the pair offset of the back lateral side. This removed that frontal "wall".
Then I also removed the top occluder (I thought it was more trouble than help). Here's the result.
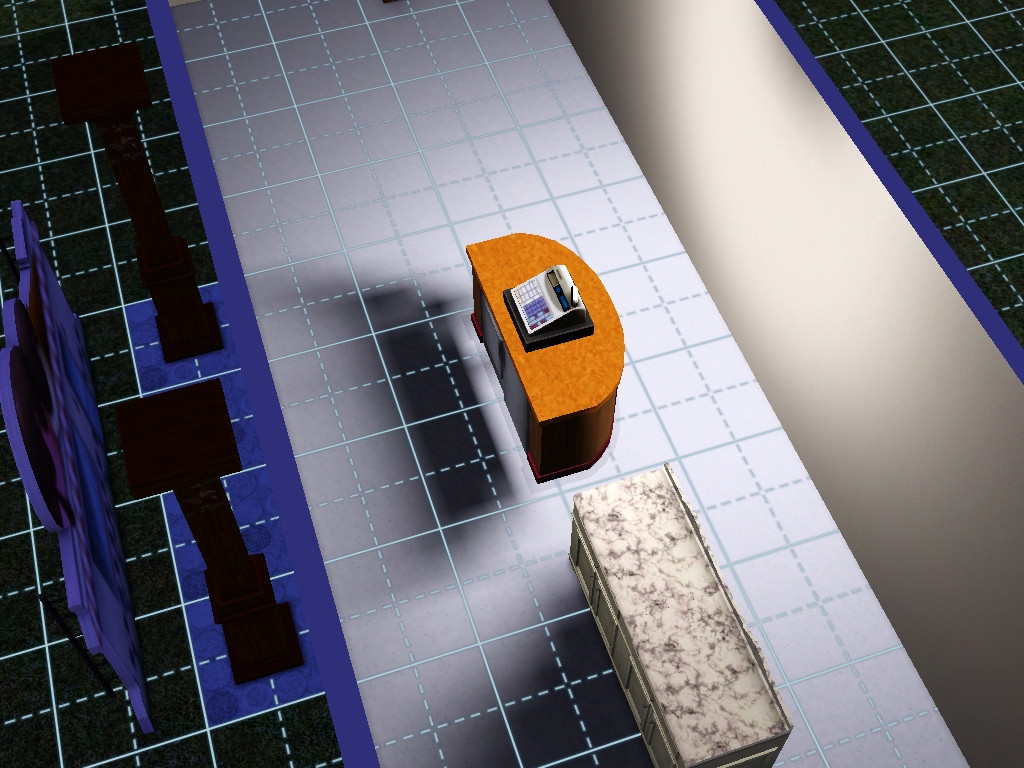
I don't understand that spacing between the counter and the shadow.
So, I've been playing with the LITE, but there's still something wrong. I used 3 occluders:
- for the back lateral side (with an offset to also cover the front curved side),
- for the lateral sides (with an offset to cover the parallel side), only for the rectangular part of the counter
- for the top of the counter (only for the rectangular part)
I haven't considered the cash register.
In the attachment you can see the results with the light source in 4 different positions.
Bleah!
I removed the pair offset of the back lateral side. This removed that frontal "wall".
Then I also removed the top occluder (I thought it was more trouble than help). Here's the result.
I don't understand that spacing between the counter and the shadow.
#22
11th Jun 2015 at 6:33 AM
11th Jun 2015 at 6:33 AM
Posts: 997
Thanks: 22102 in 95 Posts
I'm not in a hurry, but I'm afraid you are waiting news from me while I'm waiting news from you ^^
When you can, please let me know.
When you can, please let me know.
#23
11th Jun 2015 at 10:02 PM
11th Jun 2015 at 10:02 PM
Posts: 157
Hi Arsil. I had to walk away from the project for a bit because I was getting very frustrated. I've started working on the textures again today. I've redone the sign image to be 512x512 and I'm manually editing the mipmaps. I'm a perfectionist and I want it to look as good as possible. Thank you for your patience. I hope to have it finished in the next few days.
~pj
~pj
#24
15th Jun 2015 at 2:35 AM
15th Jun 2015 at 2:35 AM
Posts: 157
Arsil, I sent you a PM.
Who Posted
|
|