Page 1 of 3
|
Page 1 of 3
|
[Tutorial] Sunken/True Basement Without Sloping Ground
I hope V1ND1CARE that you don't mind that I have created this tutorial, because I saw that you discovered how to build caves/true sunken basements, but I was able to figure out how to to make the sunken basement from your journal entry (http://www.modthesims2.com/journal....howentry&e=3604)
Thus, I have written this tutorial while we wiat for a tutorial from V1ND1CARE to come out, which will be far superior than what I have written, but as I know that there are many people interested in knowing how to do this, I have written this tutorial for now. UPDATE: I have posted the tutorial here now. You can still find the old tutorial at The Sims 2.com at: Here is the link to the tutorial: http://thesims2.ea.com/exchange/sto...y&user_id=64982 ------------------- How to Create a True/Sunken Basement without Sloping Ground REQUIREMENTS: In order complete this tutorial, you will need: • The Invisible Floor Tile (from this site) http://www.modthesims2.com/download.php?t=166311 • At least, The Sims 2 Open for Business Expansion Pack, or any one after • Some knowledge of the CFE Cheat (boolProp constrainfloorelevation (true/false) • Recommended: Read V1ND1CARE’s Reducing Wall Heights Below 4 Clicks Tutorial (http://www.modthesims2.com/showthread.php?t=190663) Welcome to this tutorial! This idea of a sunken basement/cave idea was discovered by V1ND1CARE at MTS2, who, by the way, is just an absolutely amazing builder! However, because many people have been waiting for a tutorial for this, I decided to create this one, as I figured out how to do this finally.  Now, let's get started with this tutorial! Step 1: First, begin with a flat lot/level lot...  Step 2: Now, using the modular stairs tool, create something similar to the picture as show. What we are doing is saving some time and dropping down one level in the ground.  Step 3: Delete the stairs, then, from the lowest part we just created, level the rest of the lot to that height.  Step 4: Finish leveling off the lot... 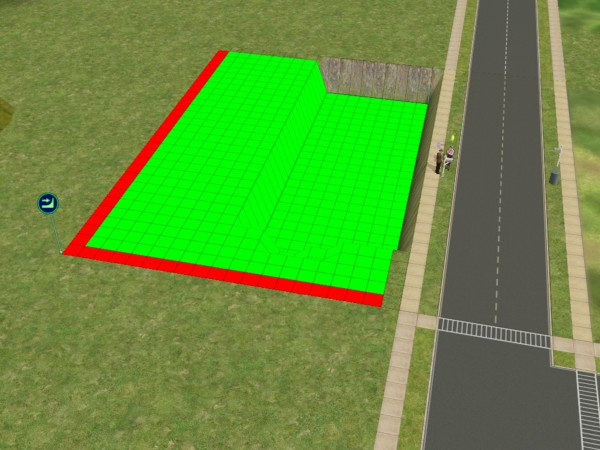 Step 5: Now, using the modular stairs tool again, add five stairs like so...  Step 6: Then delete the stairs and level the lot off from the lowest point.  Step 7: Finish leveling the lot...  Step 8: Now, in the corners of the lot, add two 1 x 1 foundations  Step 9: One top of each foundation, add a diagonal wall. These will be our scaffolds we will use when it comes time to use the CFE cheat.  Step 10: Now, for this tutorial, I am going to create only a small house. So, create on the ground outline of your house. 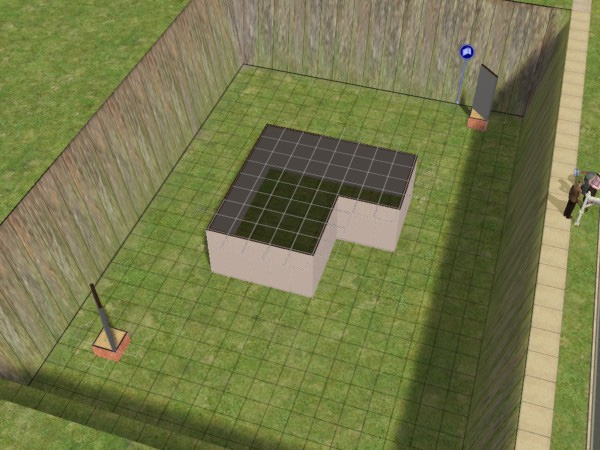 Step 11: On top of the first floor, build the second level. The second floor will become the basement floor, as you will see later on.  Step 12: Now, on your keyboard, hit Ctrl + Shift + C to open the cheat box. Then, type in the cheat, boolprop constrainfloorelevation false. With this cheat, enter into the terrain tool, and use the level terrain tool used earlier from the second floor tile of the first scaffold, and drag it over to the tile of the second floor tile of the other scaffold  Step 13: There! You have reduced the second floor of the ground building to only four clicks high! This is an important step in creating the sunken basement, as it will allow us further manipulate the height of the wall.  Step 14: With the CFE cheat still set on false, with the largest raise terrain tool on, raise the house high into the sky like so.  Step 15: Continue doing so with the other sides of the house...  ...and keep raising the other sides...  Step 16: Now, with the raise terrain tool set to raise only one tile, raise the rest of the tiles until the floor is level. This is a very time consuming process! Note: you can not use the level terrain tool during this part of the process, otherwise, what we will do in the next few steps will not work, as I will explain later on. 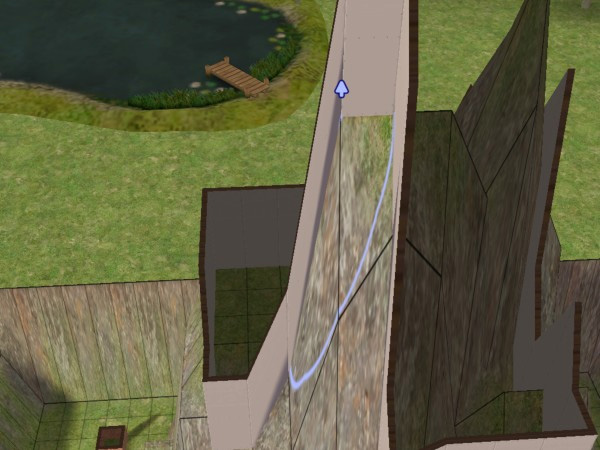 ...as you can see, this is a very long process!  Step 17: There! The house is all level now. Now, it's time to enter the cheat boolprop constrainfloorelevation true.  Step 18: After entering the cheat, start hitting Ctrl + Z on the keyboard, or pushing the undo numerous times. What we are doing is lowering the ground back to how it was before we began raising it. However, you will notice that the house stays at the height it was at!  Step 19: Once you get near the back to the ground almost being level again, start letting off of hitting ctrl + z or hitting the undo button...  Step 20: Here, the ground is level again, but you need to hit undo one more time!  Step 21: And now hit redo! Had you used the level tool instead of raising each tile individually, this trick would not work. I don't know why, but it doesn't. 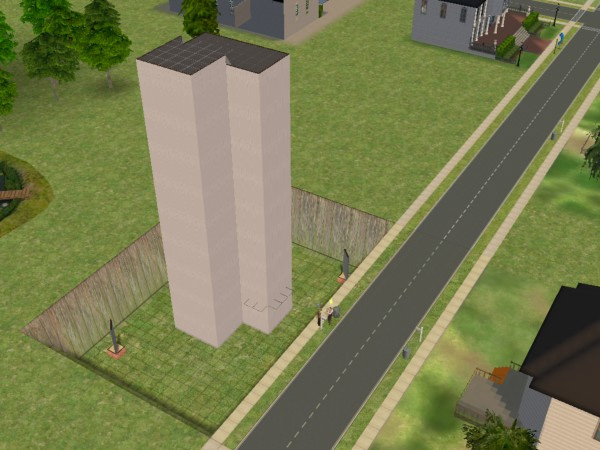 Step 22: Delete the first story ground walls, and you should have a second floor that looks like this! It looks pretty strange! What we did was lowered the walls below 4 wall clicks and into subzero clicks, if that makes sense. What this will allow us to do is to raise the ground up as high as the second story, over the wall, without having to use the CFE cheat! However, it will not allow you to raise the ground over the height of this wall, but we will not be building that high.  Step 23: First though, lay down any floor tile on grid the wall is on. You may need to go into top down view in order to see it though.  Step 24: Now, while in biuld mode, enter in the cheat box, deleteallwalls. This will delete those funny looking walls. With the floor tiles on the grid though, we can build normal walls over them, and the ground will still raise over them. However, it can be tricky building on this grid, so I recommend using the top down view to lay the walls.  Step 25: At this point, you should have a two story house that looks similar to this. Now, delete the foundations you used for your scaffolds from earlier... 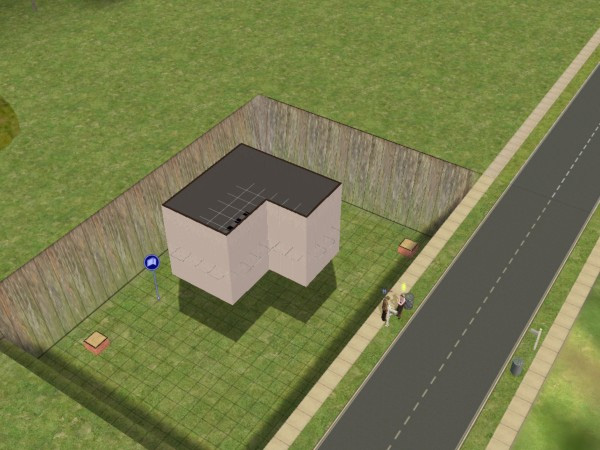 Step 26: ...and level the ground.  Step 27: To finish leveling the ground, use a floor tile to level the ground 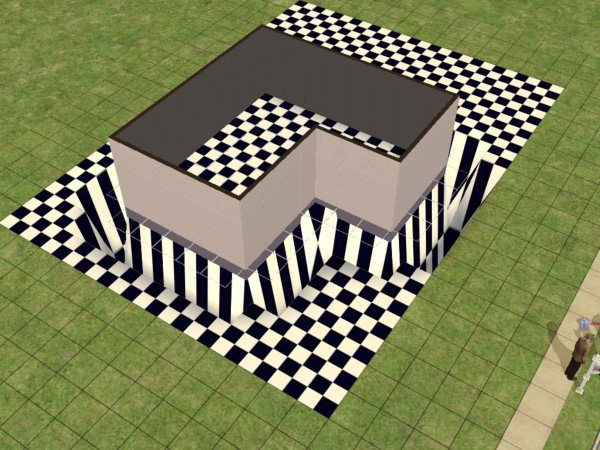 Step 28: ...and it raise the ground up!  Step 29: Delete the floor tiles, and you will have something that looks like this! But, as you will notice, you can't see into the lower level! However, this is where the invisible floor tile comes in!  Step 30: When you go down to the lowest level, place the invisible floor tile on the ground. This will reveal the lower level! However, you may not be able to place a door on the upper level...  Step 31: The Final Step (of this tutorial) ...to fix that, we can build a third story, and place stairs going up to it like so! And that's all there is to creating a sunken basement. Using this same technique, you can create "caves". Instead of digging down with the modular stairs at the begging of the tutorial, just begin building on the top ground layer! I hope you enjoyed this tutorial! Happy simming!  |
Is there an issue with the shadows with the sunken basement or is that just your games shadows?
|
I believe the shadows are caused by the upper floors. Essentially, the basement is the second floor just floating in the air, so I believe that is what is causing the shadows.
I think the shadows are not as much of a problem if the basement is not entirely sunken and the top of the room is showing a bit above the ground. At least when I have built a house with a basement that is not entirely below the ground, I could place windows and it would light up the house on the lower level. Hopefully this helps :-) |
thanks for this tutorial even though I think I'm not gonna use this. XD I also read V1ND1CARE's tutorial, but I didn't really uderstand that one. I do understand this one, but it's still sooooo much work. XD I'm too lazy for that. But at least I understand now so if i ever want to I could build a basement. :3
|
Thanks for this massively useful tutorial (and in particular for liberating it from the Exchange)! I've stickied it, because this is something that people have been asking about for a long time.
|
1 Attachment(s)
This doesn't work for me
 Step 18 tells me to hit undo until the ground is level again, then to hit undo one more time and redo (redo doesn’t change anything, I’m afraid). Problem is, I can’t delete the ground walls like you say in step 22. It’s like one gigantic wall, like in the picture I attached. Can you please tell me what I've done wrong? |
I'm not sure what went wrong. You may have had to hit the undo button one more time before hitting redo. If it helps, you should watch the position of hte second floor grid too when you are using the undo-redo trick. When you hit redo, the second floor grid level should drop down a bit.
When using the undo-redo trick, you have to remember back to the step where you lowered the wall to four clicks. When using the undo-redo trick, you should undo so that the second story wall returns back to its normal 16-click height, and then hit redo so that the second story wall will shrink to below 4 clicks. I hope this helps. Just let me know if that sounds too confusing and I'll try to find another way to explain it :-) |
Easier method using TS2GridAdjuster
4 Attachment(s)
[Update]
Please note that this technique is now obsolete. There's a much easier method now available. Check out post # 62 in the TS2GridAdjuster download thread for a tutorial. No CC required! [End Update] I just made a "real" basement using the TS2GridAdjuster: http://www.modthesims2.com/download.php?t=327439 If you want to see the results, here is a lot made using this technique: http://www.modthesims.info/download.php?t=329909 I believe that this is easier than the CFE method. It works with the base game and is compatible with all EPs. Here's what I did: http://www.modthesims.info/showthre...232#post2641232 1) Create a walled dummy first (ground) level. This level will be unusable in the game. Add muse's invisible tiles for the floor of this level. Note that these tiles appear light blue (I think that you can see the sky through them). If you want to keep this level, you may want to create it using the foundation tool, rather than the standard wall tool, since this will be significantly less expensive. 2) Create a walled second level which will be pushed underground. This level will be the basement, and needs a real floor. The walls of this level will become the basement and foundation walls. 3) Optional: Once all levels have been created with the appropriate floors and walls, remove the walls from the ground level, so that the other level(s) are floating in the air. This step is optional. If you like to play with walls down, you may want to keep the walls on the ground level, to block out the sky when you are playing the basement. However, this will increase the cost of your home; walls are expensive. You can defray most of this additional cost by creating the level in step 1 using the foundation tool, or by performing step 4. 4) Optional: If you want to reduce the cost of your house by using standard foundation walls for your new basement (level 1), or for the dummy level which you kept by skipping step 3 (level 0), run ConvertiWall to change all normal walls on the appropriate levels to foundation walls: http://www.modthesims2.com/download.php?t=327132 Note: ConvertiWall only changes the Wall ID, it doesn't change the wall covering. If you want the default brick foundation wall covering, just use the standard technique for removing wall coverings: <ctrl><shift><click> with an arbitrary wall covering. 5) Use the GridAdjuster to set a range for levels 1 and above which includes your walls and the inside of the house. Then choose: Flat Elevation = -12 (minus 12) clicks (standard foundation height of 4 less the standard wall height) and Add per level = 16 clicks (standard wall height). If you'd like a higher basement, adjust the Elevation accordingly. Note that the Elevation that you specify must be negative, to push the basement underground. However, the "per level" value should be positive, to ensure that each floor is higher than the last. Be sure to use a range which includes only the walls and inside of the house. If you include the yard, you might have problems placing things in the yard outside the house. 6) Sometimes, you will find yourself unable to access objects inside of the basement. If so, then use the TS2GridAdjuster to change the ground level inside of your basement (level 0). You will need to choose whether to try 6.A (lower ground level) or 6.B (raise ground level). 6.A will always resolve the problem, but objects near the walls may still be difficult to access; 6.B may not always work, but is better when it does work. For the base game, you will need to perform 6.A. It is unknown at this time which EP is required for 6.B to function correctly. 6.A) Lower the level of the ground inside of the basement (level 0) to ensure that the invisible tiles are below the basement floor. Be sure to set your range to include only the inside of the basement, not the basement walls. * OR * 6.B) Raise the level of the ground inside of the basement (level 0) to ensure that the invisible tiles are 10 clicks above the basement floor. For example, if you chose a basement elevation of -8, then raise the ground level to 2; a basement elevation of -6 requires a ground level of 4. Be sure to set your range to include only the inside of the basement, not the basement walls. |
Quote: Originally posted by Mootilda
Nice idea, but it doesn't worked very well for me, because after tranforming it was nearly impossible to edit the ground level (adding plants, editing ground texture) and it was difficult to edit the underground level, too. You should probably finish your house first and then push it underground. Too complicated for me. |
Just change the range to include only the walls and inside of the house. If you honestly find the original tutorial easier, that's fine. But, I'm sure that there are a lot of people who will find it easier to use the GridAdjuster, rather than the tedious process in the original tutorial. It's always nice to have options.
Actually, I realized that I could make my tutorial even simpler, so I'm hoping to update soon. I'm reasonably sure that the two techniques result in the same internal grid elevations within the lot package. If someone knows of a lot which uses the first technique and is available for download (preferably with a minimum of CC), I could check this. |
Quote: Originally posted by Mootilda
I will try that.
Quote:
Of course not, and your tool is really great. But I think I will stick to classical foundation basements with slope. Your method and the original method have the additional problem, that you see the sky around the basement when walls are down. |
Ah, I understand. Yes, the standard basements are a lot easier, but many of us just hate that additional slope. I'm hoping that we'll be seeing some lots with real basements available to be downloaded soon.
If you weren't using a test lot for the test of my "easier" method, let me know and I'll tell you how to fix your lot. |
Quote: Originally posted by jonha
|
So, you're suggesting that people use ConvertiWall to stack two foundations for the first 2 levels? Or perhaps just convert the entire 2nd level to foundation walls once it's sunken into the ground? Interesting thought... might work. I'll try this when I get a chance.
[Update:] I tried changing the bottom two levels to brick foundations, but it didn't change whether the wall drops down to show the sky. That may be because ConvertiWall only changes the Wall ID, but I believe that there is more information about walls stored inside of the lot package that we don't really understand yet. However, I found a different solution. Just leave the walls on the bottom level and do everything else the same. Now, when the "basement" walls drop down, you will still see the walls for the dummy level, rather than seeing through to the sky. You can still use ConvertiWall to change the normal walls on the bottom two levels to brick foundation walls, both for the look and for the "basement" pricing. |
AFAIK even foundations gets pulled down in wall-down mode. So I think, this is the wrong method.
Another method could be, to make the sky completely black below the horizon. |
The solution is in my most recent post. Just use my technique, but skip step 3 (removing the walls on the bottom level). Now, when you go into the basement with walls down, the walls on the first level will block out the sky.
I've updated my technique with this info. |
Quote: Originally posted by Mootilda
But when walls are up, I think there will be 2 walls at the same place. Doesn't this cause enourmous flickering? I'm too lazy to test now, but I will give it a try. |
You would think so, but I didn't find any flickering when I did it. Perhaps I just didn't do enough testing when I tried it. If I don't hear back from you, I'll test this more thoroughly myself.
One thing to keep in mind is that the first set of walls goes from 0 to -12 clicks, and the second set of walls goes from -12 to 4 clicks. This means that the only flickering would occur underground, and then only if both sets of walls are being displayed. [Update:] Did further testing with all EPs and SPs. No flickering detected. Both level 1 and 2 were changed to foundation walls using ConvertiWall. Default normal wall covering on level 1, default brick and various other wall coverings tried on level 2. Might want to run the same test with base game, just to hit both ends of TS2. |
Quote: Originally posted by Mootilda
Yes, I tested it myself, and you're right. Because the wall is going downwards, you see actually the "outer" wall face and not the inner, so that there is no conflict with the default inner wall face of the level2 wall.
Quote: Originally posted by Mootilda
Converting level 1 to foundation makes sense to me, as it will not be put partially down then anymore, which looks ugly, but why level2? After that, you wont be able to put wall hangings, toilets etc. at the wall without cheats.
Quote:
Because you can't change the wall texture on the reversed level1 wall after pulling it down, right? |
I tried Mootilda's method last night, with somewhat mixed results. Mostly I just need to practice and get more familiar with how to achieve what I want with the technique. It was pretty easy though, much less hassle than the original method looked like being. I was thankful to find Mootilda's post when I came back to check the tutorial.
One thing - after altering the wall type to foundation, it still looks like normal wall, not brick. (I can place doors and windows without cheats, too, but I may have altered my files to allow this.) However, I cannot delete any of the existing walls, and they don't go down at all in cutaway view. Is that because they are foundations? I'm going to change the second level back to normal and try again, but I thought I'd ask / record the phenomenon. EDIT - changing the level 2 walls back to normal ones makes them work properly again. Can be deleted , drop with cutaway view. Excellent. Off to experiment some more... |
Quote: Originally posted by jonha
Quote: Originally posted by jonha
Quote: Originally posted by aelflaed
Quote: Originally posted by aelflaed
Alternatively, as you've seen, you can change foundation walls to normal walls using ConvertiWall, to make them easier to delete. And, I suppose that people could also mod their walls.txt file to make foundation walls deletable using the default wall tool. |
Thanks to both SimFreakForever and Mootilda, for showing up how to perform this neat trick!
|
And thanks to you and jonha for the insightful questions, which helped to smooth out some of the rough areas in this technique. And, of course, to V1ND1CARE, who came up with the original method.
I'm really hoping that this means that we'll be seeing some new lots with real basements uploaded soon. Right now, I'm working on a tool which will allow people to add a new level, such as a foundation or basement, to an existing house. Combined with this tutorial, we should be able to retrofit existing houses with real basements. What fun! In a way, I'm almost sorry that TS3 is shipping so soon, since it seems that there are so many interesting things still to be done with TS2. |
I have just finished my first test lot with your basement method, to see, if it really works well and if it makes sense to start a more complicated lot.
I had no problems, and I think, I will publish my first basement-lot soon. A really nice improvement to you tool would be, to automatically lower every (second level) floor tile (which is not empty) tile so that people don't have to measure their lots and don't have to restart your tool several times if the floor plan isn't rectangle. |
For me, I just picked a starting point - I was building a cave which had -no- straight edges, so there really wasn't an easy place to choose. I admit I was making it difficult by doing so.
Is there any reason we can't build a rectangular basement, with an irregular-shaped upper floor over it? |
| All times are GMT +1. The time now is 11:58 PM. |
Page 1 of 3
|
Powered by: vBulletin Version 3.0.14 · Copyright ©2000 - 2024, Jelsoft Enterprises Ltd.