 Sign in to Mod The Sims
 Blender GEOM Tools v2.1.4 (Blender 2.8x-3.x)
 Blender GEOM Tools v2.1.4 (Blender 2.8x-3.x)
MTS has all free content, all the time. Donate to help keep it running.
SCREENSHOTS


blender_80YSQifVPH.png - width=1328 height=766
morphs.png - width=699 height=708
MTS_SmugTomato-1847763-simgeom_rig.png - width=833 height=869
ui.png - width=415 height=274
ui_morph.png - width=417 height=126
MTS_SmugTomato-1847774-simgeom_fnv2.gif - width=320 height=236
update.png - width=410 height=256
The add-on will now work with Blender 3.0
Version 2.1.4
- The addon will now work with Blender 3.0
Version 2.1.3
- The default behaviour when importing morph or slider GEOMs is now to map the deltas to vertexIDs instead of vertex order, the old behaviour can be enabled by unticking 'VertexID Lookup' in the import menu. The new default behaviour should be fine 99% of the time.
Version 2.1.2
- Morphs accidentally exported with normals from the base mesh instead of their own, this has now been fixed
- Recalculating vertex IDs now works with a small distance allowed between vertices, allowing to properly recalculate for sloppy EA meshes.
- Users can adjust said margin between 0.1 and 0.0 (default 0.00001)
- Users can reset said margin back to it's default value(0.00001) with the 'Reset' button under 'Vertex IDs'
- Users can adjust the maximum allowed bones on export in case I'm wrong about it being 63. (default: 63)
Version 2.1.1
- The add-on would fail to load when not connected to the internet, this has now been fixed
Version 2.1.0
- Added an update checker, checks for updates every time Blender first loads the add-on
- Having loose vertices on export will now provide a descriptive error message
It's been quite a while since I released the original version of my GEOM Tools for Blender 2.8.
While that version works, it is plagued with improper error handling and couldn't handle the game's original normals.
This new version aims to get rid of these issues.
I've reworked how meshes and morphs are imported to support custom normals and tried to get better error handling implemented, so hopefully no more mysterious stacktraces pop up for the poor users. If they do, let me know an I'll try to fix it. Remember to check this page every now and then, smaller updates may have been released since you've first downloaded it
If you're currently working on something with the old GEOM Tools I'd recommend first exporting your work with the old version, then installing this new version and reimporting the file(s) with the new version.
If something doesn't work please let me know, I'll see what i can do to help you out.
Add-on Installation
This add-on is installed like any other Blender add-on, to install it follow the menus as shown below.
Edit > Preferences > Add-ons > Install
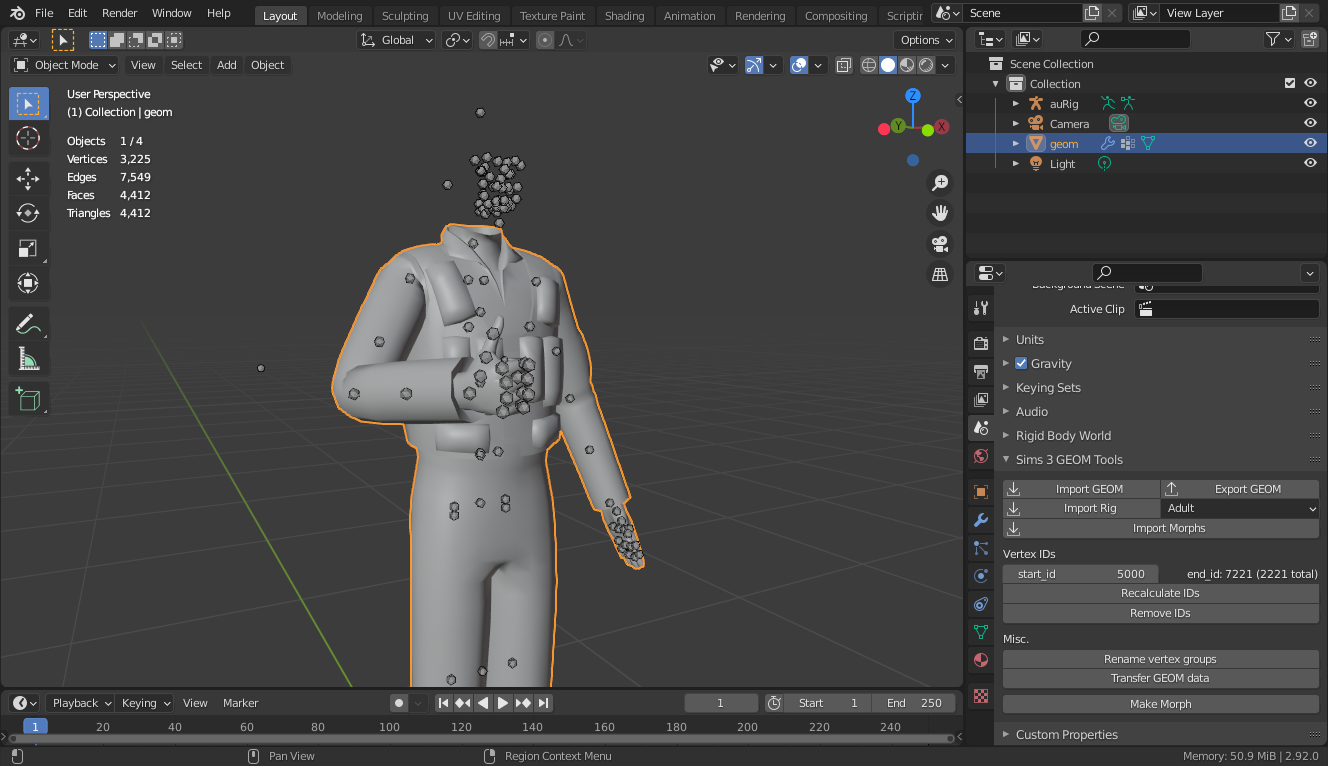
Tools
Tool Panel
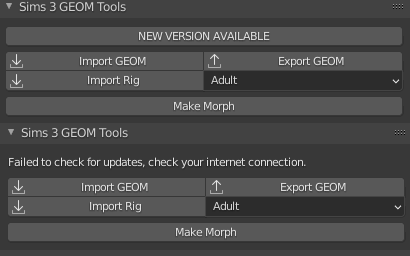
Update Checker
The add-on will now automatically look for available updates by connecting to my github page once every time the add-on is first loaded.
When an update is found the panel will display a button that's hard to miss that links to this page, if the connection fails it will instead notify you of the failure, if no updates are available nothing will show up.
In all cases you can keep using your currently installed version without any problems, but you won't have any new features or bugfixes of course.
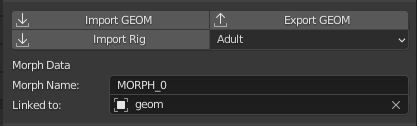
Morphs
Morphs can be imported from GEOM morph meshes, these can be extracted from BGEO files and the base GEOM file with Cmar's tool Make sure you have your base mesh selected and import the morphs, you can select all morphs and import them all in one go.
The way morphs work has been completely overhauled, they are now separate meshes instead of shape keys for technical reasons. Instead morph meshes will now have two properties, their name and the mesh they're linked to. Any morph linked to you selected GEOM mesh in it's 'Linked to' field will get exported as a morph GEOM. The 'Morph Name' field is what will be added to the name of your exported GEOM file for the morph GEOM files, if two or more have the same in this field they will overwrite each other.
Morphs can have custom normals, just like the base GEOM meshes
Splitting UV seams
This used to be a button in the UI panel, but it didn't always work properly. Instead of fixing this I decided to remove it completely, since it's so trivial to do manually anyway.
This is still an important step that should not be overlooked or you will have issues.
All you have to do is the following: Open the UV Editor, got to 'UV -> Seams from islands', go back to the 3D view with edge select mode active, select one or more edges that are marked as a seam(orange), go to 'Select -> Select Similar -> Seam'. Now with all the edges marked as seam selected you can simply press the 'v' key to split the seams. Don't forget to recalculate the vertex IDs after if your mesh uses them.
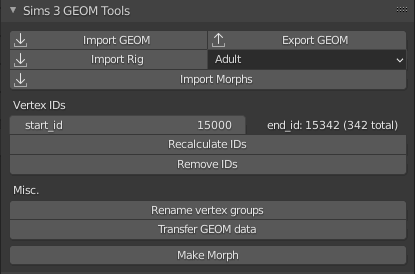
Vertex IDs
start_id tells the add-on the vertex ID to start renumbering at.
Displayed to the right of it is the highest vertex ID and the amount of unique vertex IDs, these are updated after the 'Recalculate IDs' button is pressed. Don't touch these if you don't plan on adding/removing vertices, this way the original vertex IDs are preserved. It's also possible to remove vertex IDs from a mesh if it is needed, some things like pet accessories don't seem to use them.
Transferring GEOM Data
It's now possible to transfer GEOM data from one mesh to one or more other meshes, this is a lot less tedious than combining 2 meshes and deleting the geometry you don't need. The data will be copied from the active (mesh)object to all other selected (mesh)objects. The data that is transferred is part of the GEOM header structure, allowing the mesh to be successfully considered a GEOM mesh and to be exported.
Rebuilding the FNV map
If you ever import something and vertex groups have names like 0xef89a3e3, you'll probably want to change those to their proper names. To do this, you'll have to import the rig for the mesh in question, make sure the rig is selected and press the 'Rebuild Bonehash Database' button on the panel. After doing that select the mesh and press the 'Rename Vertex Groups' button on the same panel. You will only have to do this once, as the bone names are added to a json file mapping the fnv32 hashes to names.
Github link
https://github.com/SmugTomato/blender-sims3-geom
Credits
cmomoney for the original rig importer that I adapted into this one, can be found here
| Filename | Type | Size |
|---|---|---|
| BlenderGeom_2.1.4.zip | zip | |
| operators.py | py | 8684 |
| ui.py | py | 4497 |
| __init__.py | py | 5207 |
| fnv_hashmap.json | json | 18310 |
| acRig.grannyrig | grannyrig | 16010 |
| adRig.grannyrig | grannyrig | 16010 |
| ahRig.grannyrig | grannyrig | 16010 |
| alRig.grannyrig | grannyrig | 16010 |
| auRig.grannyrig | grannyrig | 19886 |
| ccRig.grannyrig | grannyrig | 16010 |
| cdRig.grannyrig | grannyrig | 16010 |
| chRig.grannyrig | grannyrig | 16010 |
| cuRig.grannyrig | grannyrig | 19886 |
| puRig.grannyrig | grannyrig | 19886 |
| geom_export.py | py | 14311 |
| geom_import.py | py | 8374 |
| geom_load.py | py | 7812 |
| geom_write.py | py | 7881 |
| morph_import.py | py | 6202 |
| rig_import.py | py | 4890 |
| rig_load.py | py | 2486 |
| geom.py | py | 829 |
| vertex.py | py | 525 |
| bytereader.py | py | 2768 |
| bytewriter.py | py | 2140 |
| fnv.py | py | 1474 |
| globals.py | py | 2737 |
| LICENSE | 35765 |
| Filename | Size | Downloads | Date | |||||
|
BlenderGeom_2.1.4.zip
Size: 89.1 KB · Downloads: 1,917 · 11th Apr 2023 |
89.1 KB | 1,917 | 11th Apr 2023 | |||||
| For a detailed look at individual files, see the Information tab. | ||||||||
Key:
- - File was updated after upload was posted
Install Instructions
Quick Guide:
1. Click the file listed on the Files tab to download the file to your computer.
2. Extract the zip, rar, or 7z file. Now you will have either a .package or a .sims3pack file.
For Package files:
1. Cut and paste the file into your Documents\Electronic Arts\The Sims 3\Mods\Packages folder. If you do not already have this folder, you should read the full guide to Package files first: Sims 3:Installing Package Fileswiki, so you can make sure your game is fully patched and you have the correct Resource.cfg file.
2. Run the game, and find your content where the creator said it would be (build mode, buy mode, Create-a-Sim, etc.).
For Sims3Pack files:
1. Cut and paste it into your Documents\Electronic Arts\The Sims 3\Downloads folder. If you do not have this folder yet, it is recommended that you open the game and then close it again so that this folder will be automatically created. Then you can place the .sims3pack into your Downloads folder.
2. Load the game's Launcher, and click on the Downloads tab. Find the item in the list and tick the box beside it. Then press the Install button below the list.
3. Wait for the installer to load, and it will install the content to the game. You will get a message letting you know when it's done.
4. Run the game, and find your content where the creator said it would be (build mode, buy mode, Create-a-Sim, etc.).
Extracting from RAR, ZIP, or 7z: You will need a special program for this. For Windows, we recommend 7-Zip and for Mac OSX, we recommend Keka. Both are free and safe to use.
Need more help?
If you need more info, see:
- For package files: Sims 3:Installing Package Fileswiki
- For Sims3pack files: Game Help:Installing TS3 Packswiki
Also Thanked - Users who thanked this download also thanked:
Packs Needed
None, this is Sims 3 base game compatible!
Other Information
Operating System:
– Windows
: Windows XP, Windows Vista, Windows 7, etc
– Linux
: Various flavours of Linux, may need Mono or Wine
– Mac OS X
: OS X, may need Mono
Utility Type:
– Meshing Tools
: Tools and utilities helpful to meshers.
Plugin Type:
– Blender
: Plugins for Blender
Tags