 Sign in to Mod The Sims
- Site Map >
- Modding and Creation >
- Sims 3 Creation >
- Tutorials >
- Modding - General - TUTORIAL: Object Modding (aka adding interactions) - UPDATE 1/17/10
- Site Map >
- Modding and Creation >
- Sims 3 Creation >
- Tutorials >
- Modding - General - TUTORIAL: Object Modding (aka adding interactions) - UPDATE 1/17/10
#1
 9th Aug 2009 at 12:14 AM
Last edited by HugeLunatic : 20th Feb 2011 at 11:31 PM.
Reason: fixed namespace
9th Aug 2009 at 12:14 AM
Last edited by HugeLunatic : 20th Feb 2011 at 11:31 PM.
Reason: fixed namespace
9th Aug 2009 at 12:14 AM
Last edited by HugeLunatic : 20th Feb 2011 at 11:31 PM.
Reason: fixed namespace
 This tutorial has been updated and wiki'd
 Tutorial:Sims_3_Object_Moddingwiki
Update1/17/10
This tutorial was extremely outdated with S3OC and S3PE updates as well as Sims 3 updates. The tutorial is now updated for all of these, BUT THE PICTURES ARE NOT. The pictures stop being correct with the S3oc. Also updated was the code, Sims 3 decided to take out the ktip styled notification and made it stop working. Sorry for the long wait, and good luck.
Video Version
This tutorial is now on video and can be found at The Sims Supply, here.
Object Modding is not a very well - defined category. Usually an object mod is one that will clone an object and give it new interactions for it to be able to run. This tutorial will show you how you would set up to create an object mod, and add an interaction to it. By all means interactions are not all you can do with it. With codding experience you tell it to do a lot of things.
What You Need:
1. Microsoft Visual Studip C# 2008 Express Edition : You will use this for making the your new object do what you want it to do instead of just being another cloned object.
2. You need the modding framework and Resource.cfg for your Sims 3 directory, in order to run any mod, and you MUST have the included d3dx9_31.dll file, in the correct directory, to run any core mod. If you don't already have 'em, get them here: Framework .
3. Sims 3 Object Cloner
4. Sims 3 Package Editor
5. The Net Reflector : This will be used to explore through the Sims 3's code content.
6. Knowledge of C# Code: If you have no knowledge of C# code then you will be totally lost some time in this tutorial and will have to start asking questions about everything in your code. I highly advise you to read up on C# before starting this tutorial. (I know from personal experience). This is a pretty good site but it will not teach you everything: http://www.csharp-station.com/Tutorial.aspx
Setting Up:
Its best. when making mods, to create a folder for all of your things. The best place is on the desktop, its easy to reference. After you have your folder you will need to obtain some main Sims 3 dlls that will be used as references later in coding. If you have all ready core modding then you will know what to do.
- Open the S3PE
- Hit - File - Open
- Navigate to your Sims 3 main directory folder (usually in the c drive)
- From there go to the Game Folder and then the Bin Folder
- You will see 3 packages. These packages contain the dlls that you will be needing.
- First open the gameplay package
- Four files will appear, you will be exporting 3 of them.
- Click on the first sting and hit value. Scroll down the lot of words untill you see Manifest Module:
- If the Manifest Module says TestGameplay, you can close out of the window and continue to the next item on the list. If it doesnt say TestGameplay close out of the the window and hit "Grid". At the top of the data grid should be called Assemly. His the down arrow next to the Import/Export and hit "Export"
- S3pe will then prompt you to save. Navigate to your mod folder and save the file as what the Manifest Module said followed by ".dll"
- After you have saved, hit cancel in the datagrid and move on to the next item in the package.
- Extract it the same way you did the first one nameing it with the Manifest Module it has followed by ".dll"
- Do these for all of the items in that package.
- When done with that pick open up one of the other 3 packages in the Game/Bin directory and do the same. (be sure not to take the test gameplay, it is not needed)
- When finished with that package move on to the last package and do the same.
Making you Object
The next step in this process is to make your new cloned object. Start by opening the S3OC (Sims 3 Object Cloner). First time users will have to navigate to their Sims 3 folder to start off the program. Once opened we will want to make our new clone so hit Cloning - and choose the type of object you will be using. For this tutorial we are using Normal Objects. S3OC will then load the object catalog with all the objects in the game. Next you need to choose witch object you want to clone. In this example i'm going to use the Teddy Bear witch is called ToyStufffedAnimalTeddyBear. When you have picked out your object hit the "Clone or Fix" button. S3OC will then ask you to determine some options. You will need to make sure you give it a unique name. We will name ours "Kolipoki_AddInteractiontoBear". At this time you might also want to give it a new name, catalog description, price, and even which categories it will go into. Then hit start, and S3OC will then create your new object and ask you to save it to a new location.
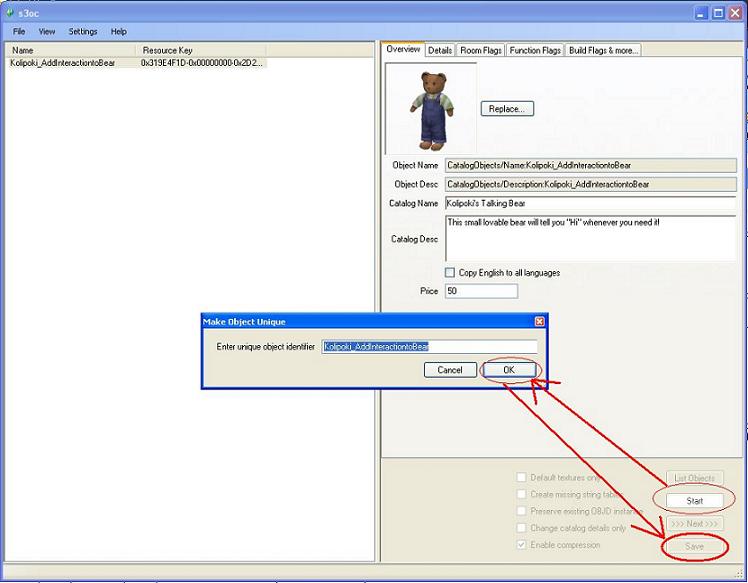
Congratulations you have your own cloned object.
Setting Up MVSC# (Microsoft Visual Studio C#)
Before we start coding we need to set up MVSC# So that we can use it and make the code work. Of course there is all ready a tutorial on that out there. http://www.sims2wiki.info/wiki.php?..._Studio_project. Its small but you need to follow it. The files in step 4 are the files that we extracted in the beginning of this tutorial.
Finding the Original Object's Name
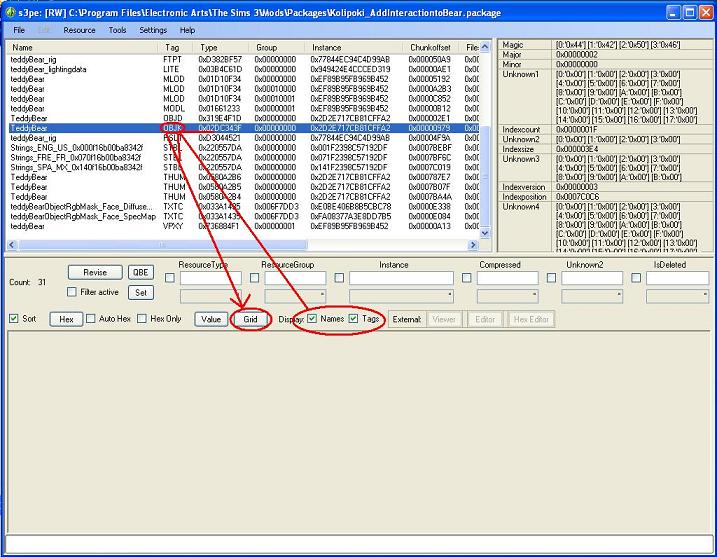
This next step is important because it will later be used to make your script be derived from the previous object making it the same so it will work in game. Start off by open your cloned object in the S3PE (in my case Kolipoki_AddInteractiontoTeddy). Next your going want to make sure that names and tags are on. Click the buttons right next to them as shown in the screen shot. Afterwards find the item in the list with a tag name of OBJK. Open the OBJK with the grid button.
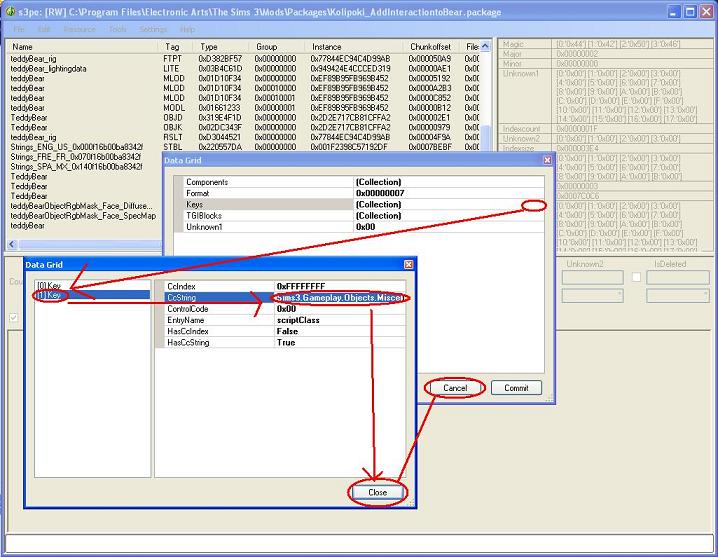
You should see a "Component Data" category click on the category and a small button with three little dots appears to the far right. Click on this button and it will bring up a new menu. On the left of that new pop-up, you should see two items. Click on the second item labeled "[1]CDTString". The data row should have a rather long name usually starting with "Sims3....." That is the original name and how to call that item. Be sure to write it, or paste it somewhere else so that we can use it later. In the case of a cloned teddy bear the co-string is "Sims3.Gameplay.Objects.Miscellaneous.StuffedAnimal".
Starting Your Code
Open up your project that you made in step "Setting up MVSC#". We are going to start off by changing the namespace and the class. The namespace is what contains classes and separates out two of the same classes. Lets name our research after Yourname Followed by mod. For Example:
Code:
namespace Sims3.Gameplay.Objects.Miscellaneous.KolipokiMod
Next we need to change the class name. Its needs to be something that will tell you what you are doing. Since we are adding a simple interaction i'm going to make it:
Code:
public class TalkingTeddy : StuffedAnimal
Now you may notice in my class name that i have what functions as a deriver. What it does is it takes the code with the StuffedAnimal and assigns the TalkingTeddy to it. The deriver should be what was in your co-string. You may be wondering what your co-string was way longer then that and it was. MVSC# will the things before it for you. If it does not right click on it and hit resolve and then it should work. What it is doing is that on the top of the code it is adding a Using qualifier witch makes it so you dont have to say that name space over and over again when calling something within it.
Adding the interaction
Through this step we will be using the reflector for a while so make sure you have it opened and that you opened the dlls that we extracted in the first step.
If you do not know how the game calls an interaction it is best to see how to they do it. Because all we are doing is telling the interaction to tell us hi we need an immediate interaction. In the Sims 3 immediate interactions have those orange circle things next to their name. We are going to be exploring the Stereo TurnOnOff function.
Expand your Sims3GameplayObjects - Sims3GameplayObjects.dll - Sims3.Gameplay.Objects.Electronics - Stero - TurnOnOff. We now need to open the Dissasembler. To open the dissasembler hit space. Once open click on the TurnOnOff to see what it does. Be sure to hit the expand method at the bottom of the dissasembler so you can see the hole code. Look through the disassembler and see how the code works.
When you have finished exploring we are going to need most of the code of the TurnOnOff Method so select the code in the disassembler and copy it. Paste it within your class definition in MVSC#. Because this is for the stero we will need to be changing it.
Change the private sealed class name of TurnOnOff to what you want the name of it to be, make it something that describes the interaction. I'll be naming mine TalktoMe. Also make note that that class is derived from an immediateInteraction class. be sure to change the Stero to the name of your object (the first class). In my case it will say TalkingTeddy instead of stero.
Allot of this stuff we took we will not be needing and we will have to change. With your C# knowledge you can figure out what you have to change and edit but for our example after removing the code. You will also need to change the code so that where it says stereo you refer to your object and where it says TurnOnOff you refer to your interaction name.
Code:
private sealed class TalktoMe : ImmediateInteraction<Sim, TalkingTeddy>
{
    // Fields
    public static readonly InteractionDefinition Singleton = new Definition();
    private const string sLocalizationKey = "Gameplay/Objects/Miscellaneous/TalkingTeddy/TalktoMe";

    // Methods
    private static string LocalizeString(string name, params object[] parameters)
    {
        return Localization.LocalizeString("Gameplay/Objects/Miscellaneous/TalkingTeddy/TalktoMe:" + name, parameters);
    }

    protected override bool Run()
    {
        //do interaction here
        return true;
    }

    // Nested Types
    private sealed class Definition : ImmediateInteractionDefinition<Sim, TalkingTeddy, TalkingTeddy.TalktoMe>
 {
                      // Methods
                      protected override string GetInteractionName(Sim a, TalkingTeddy target, InteractionObjectPair interaction)
                      {
                          return TalkingTeddy.TalktoMe.LocalizeString("TalktoMe", new object[0]);
                      }
                      protected override bool Test(Sim a, TalkingTeddy target, bool isAutonomous, ref GreyedOutTooltipCallback greyedOutTooltipCallback)
                      {
                          return !isAutonomous;
                      }
                  }
}
Making the Interaction Do Something
With the right code, interactions could do anything. They could start a fire to a whole lot like in the ChaosMagePainting. They could lock doors such as in the Lockable door.
For this tutorial i will simply make it say "Hi". The Sims 3 has a nice way of setting up a notification. It's simply:
Code:
                          base.Actor.ShowTNSIfSelectable("Hello", StyledNotification.NotificationStyle.kTip, ObjectGuid.InvalidObjectGuid, base.Actor.ObjectId);
                          base.Target.mRevealingSim = base.Actor;
The first line in this code is calling the ShowTNSIfSelectable, which is a nice method of telling things through notifications. If you search in the relfector for the ShowTNSIfSelectable you will find that the parameters are 1)what you want it to say, 2)the theme of the notification is this case kTip(there are i believe 5 different themes, so go look them up and choose one you like), 3)thumbnail 1 and 4) thumbnail 2. This code will going into the "protected override bool Run" inside your interaction class.
Congratulations now your code will add the interaction and tell you hello. Here is what the final product should look like:
Code:
using System;
using System.Collections.Generic;
using System.Text;
using Sims3.Gameplay.Objects.Miscellaneous;
using Sims3.Gameplay.Utilities;
using Sims3.Gameplay.Interactions;
using Sims3.Gameplay.Actors;
using Sims3.Gameplay.Autonomy;
using Sims3.SimIFace;
using Sims3.Gameplay.Skills;
using Sims3.UI;
using Sims3.Gameplay.Objects;

      namespace Sims3.Gameplay.Objects.Miscellaneous.KolipokiMod
      {
          public class TalkingTeddy : StuffedAnimal
          {
              protected Sim mRevealingSim;

              public override void OnStartup()
              {
                  base.OnStartup();
                  base.AddInteraction(TalktoMe.Singleton);
              }
              private sealed class TalktoMe : ImmediateInteraction<Sim, TalkingTeddy>
              {
                 // Fields
                   public static readonly InteractionDefinition Singleton = new Definition();
                    private const string sLocalizationKey = "Gameplay/Objects/Miscellaneous/TalkingTeddy/TalktoMe";
                // Methods
                   private static string LocalizeString(string name, params object[] parameters)
                  {
                   return Localization.LocalizeString("Gameplay/Objects/Miscellaneous/TalkingTeddy/TalktoMe:" + name, parameters);
                  }
                  protected override bool Run()
                  {
                      //Do the interaction here.
                      base.Actor.ShowTNSIfSelectable("Hello", StyledNotification.NotificationStyle.kGameMessagePositive, ObjectGuid.InvalidObjectGuid, base.Actor.ObjectId);
                      base.Target.mRevealingSim = base.Actor;
                      return true;
                  }
                  // Nested Types
                  private sealed class Definition : ImmediateInteractionDefinition<Sim, TalkingTeddy, TalkingTeddy.TalktoMe>
                  {
                      // Methods

                      protected override string GetInteractionName(Sim a, TalkingTeddy target, InteractionObjectPair interaction)
                      {
                          return TalkingTeddy.TalktoMe.LocalizeString("TalktoMe", new object[0]);
                      }
                      protected override bool Test(Sim a, TalkingTeddy target, bool isAutonomous, ref GreyedOutTooltipCallback greyedOutTooltipCallback)
                      {
                          return !isAutonomous;
                      }
                  }
              }
          }
      }
Now that your script is complete save the project and hit "f6". This will build the project see if it has any errors and if it doesn't it will create a nice dll for you. This dll is stored in the Visual Studio 2008 - Projects - [name of saved project here] - [name of saved project here] - obj - release - [nameofproject].dll . That file will be used to add your script to your nice cloned object and make it work. If you ever change the code be sure to run "f6" again or you will get the old dll.
Adding your script to your package
The next step in this process is to add the script to the package. First your going to need to open S3PE and then open your cloned object.
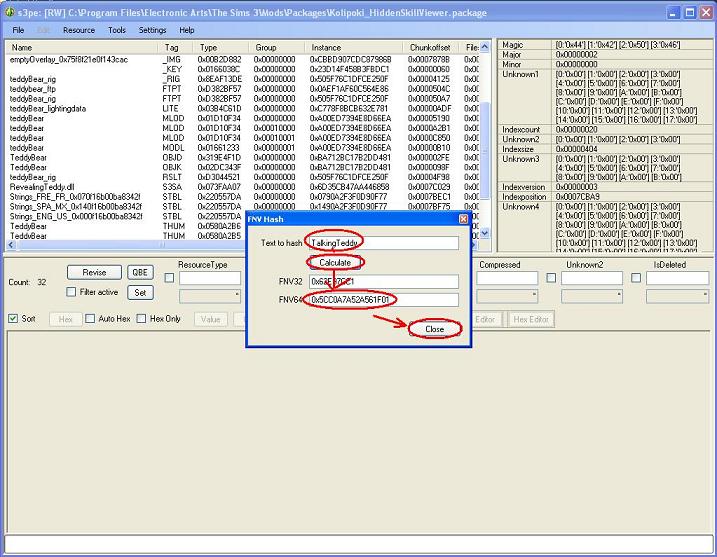
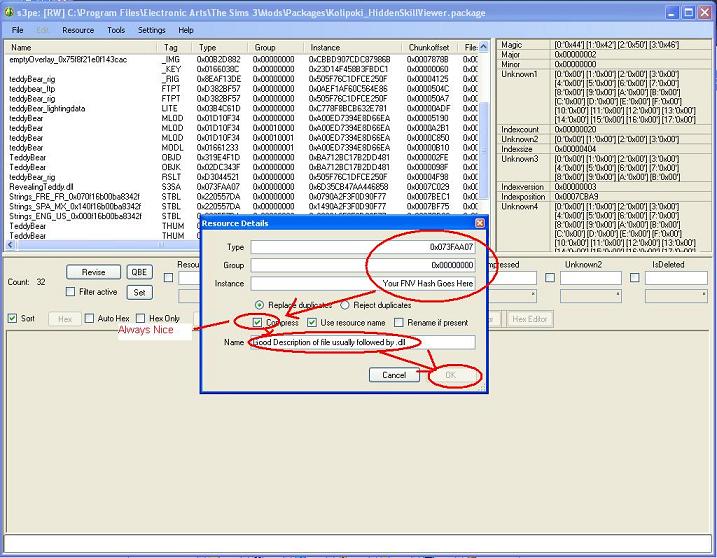
We are going to be making a new resource that will have the tag S3SA. Before we go making a new resource we need to FNV Hash and get an instance name. In S3PE hit ctrl - f or go Tools - FNV Hash. Inside the box that says text to has write the class name of your object. For me i would write "TalkingTeddy". Copy the FNV64 number. That will become the new instance.
Close out of the FNV Hash and hit Resource - Add. The Type number for all S3SA files is 0x073FAA07, and the group number is 0x00000000. The instance number is the number you just obtained in the FNV Hash. Ep flags are used to tell the object if it requires the EP or not (i assume). For those who do not have WA the EP name is 0x00. Hit ok and you will have a new S3SA type resource.
After your new resource is created go to the OBJK, Collection of Keys, 2nd Key and type "[Your Namespace Name].[Your Class Name] For this example it would say Sims3.Gameplay.Objects.Miscellaneous.KolipokiMod.TalkingTeddy. Next you need to import your dll. Click on the S3SA and hit grid. The first item on the list should have an import/export click on it, bring the drop down menu down and click import. Navigate to your dll of your code "Visual Studio 2008 - Projects - [name of saved project here] - [name of saved project here] - obj - release - [nameofproject].dl" and hit open, after that hit commit and save your project. If all went well then you know have a nice object that will tell you Hi.
Finishing Up
If you testing your object in game after finishing the last step you may have noticed that the interaction would say Something like KolipokiMod.TalkingTeddy.TalktoMe . If you would like to change that open your cloned object in s3pe. FNV Hash the name that shows up in game and copy the instance in the FNV64. Find the file with an STBL file type (make sure its your language) and hit editor. A STBL Resource Editor will appear. Change the instance in the bottom to the FNV64 Hash and hit add. A new string will appear. Click on it and in the box to the right write out what you want it to say.
Congratulations
You have now finished your object and should have an understanding of how to make your own object mod. I cannot wait to see what you guys create.
Special Thanks
Special Thanks goes specially to Wito who helped me start out in object modding. I'd also like to thank Rick, Tiger, and ChaosMage for there help answering questions that i had come across. Thanks for Sri for telling me to try Object Modding.
9 users say thanks for this.
(Who?)
Thanks
Advertisement
#2
9th Aug 2009 at 12:16 AM
9th Aug 2009 at 12:16 AM
This is absolutely awesome, thank you so so much for writing this tutorial!! This is great! :lovestruc
#3
9th Aug 2009 at 12:46 AM
9th Aug 2009 at 12:46 AM
Posts: 133
Thanks: 828 in 8 Posts
Yes! I know a bit of Java and can kind of understand C, so I think I can maybe attempt this. Thanks!
#4
15th Aug 2009 at 5:43 AM
15th Aug 2009 at 5:43 AM
Posts: 62
Thanks: 2430 in 5 Posts
Hello and thank you for this. I'm just having one problem importing my .dll into the package. At The Part at "Click on the S3SA and hit grid" Grid is grayed out and S3PE displays this in the value preview... 
Smile tomorow will be worse.
Error reading resource 073FAA07:00000000:EDCD663D13E88570
Exception has been thrown by the target of an invocation.
Destination array is not long enough to copy all the items in the collection. Check array index and length.
----
Stack trace:
at System.RuntimeMethodHandle._InvokeConstructor(Object[] args, SignatureStruct& signature, IntPtr declaringType)
at System.Reflection.RuntimeConstructorInfo.Invoke(BindingFlags invokeAttr, Binder binder, Object[] parameters, CultureInfo culture)
at s3pi.WrapperDealer.WrapperDealer.WrapperForType(String type, Int32 APIversion, Stream s)
at S3PIDemoFE.MainForm.browserWidget1_SelectedResourceChanged(Object sender, ResourceChangedEventArgs e)
----
Stack trace:
at System.BitConverter.ToInt64(Byte[] value, Int32 startIndex)
at System.BitConverter.ToUInt64(Byte[] value, Int32 startIndex)
at ScriptResource.ScriptResource.decrypt()
at ScriptResource.ScriptResource.Parse(Stream s)
By Any Chance would you know what i missed or did'nt do right? Exception has been thrown by the target of an invocation.
Destination array is not long enough to copy all the items in the collection. Check array index and length.
----
Stack trace:
at System.RuntimeMethodHandle._InvokeConstructor(Object[] args, SignatureStruct& signature, IntPtr declaringType)
at System.Reflection.RuntimeConstructorInfo.Invoke(BindingFlags invokeAttr, Binder binder, Object[] parameters, CultureInfo culture)
at s3pi.WrapperDealer.WrapperDealer.WrapperForType(String type, Int32 APIversion, Stream s)
at S3PIDemoFE.MainForm.browserWidget1_SelectedResourceChanged(Object sender, ResourceChangedEventArgs e)
----
Stack trace:
at System.BitConverter.ToInt64(Byte[] value, Int32 startIndex)
at System.BitConverter.ToUInt64(Byte[] value, Int32 startIndex)
at ScriptResource.ScriptResource.decrypt()
at ScriptResource.ScriptResource.Parse(Stream s)

Smile tomorow will be worse.
#5
15th Aug 2009 at 7:57 AM
15th Aug 2009 at 7:57 AM
Did you make sure to change the script of the OBJK to your new code instead of the old object code?
#6
15th Aug 2009 at 7:40 PM
Last edited by PigiePower : 15th Aug 2009 at 8:11 PM.
15th Aug 2009 at 7:40 PM
Last edited by PigiePower : 15th Aug 2009 at 8:11 PM.
Posts: 62
Thanks: 2430 in 5 Posts
I have changed the second key in OBJK to KolipokiMod.TalkingTeddy. If that what your asking.
EDIT: I downgraded my S3PE to the second newest one and it works!
Smile tomorow will be worse.
EDIT: I downgraded my S3PE to the second newest one and it works!

Smile tomorow will be worse.
#7
16th Aug 2009 at 2:27 AM
16th Aug 2009 at 2:27 AM
Posts: 334
Thanks: 27 in 4 Posts
I'm stuck on getting it to say what it's supposed to say. It just shows my namespace and class when it's moused over in game. I did the hashing and added a new key for the dialog, I even did it for all three STBL's. Just won't go. Deleted the game's cache files, too. Is there some missing step here, or when we hash it, does it have to have the dot in it or do you just hash it as a full name? I hashed it with the dot in it.
#8
19th Aug 2009 at 4:45 AM
19th Aug 2009 at 4:45 AM
Posts: 3
How would I go about getting it to perform an action of some sort?
#9
19th Aug 2009 at 7:12 AM
19th Aug 2009 at 7:12 AM
bojinda: an action in what way? This tutorial shows you how to make it say something to you, but if you mean have your sims do something, there are many different ways in order to do that you just have to use the proper code to make it do what you want.
#10
19th Aug 2009 at 10:19 PM
Last edited by bojinda : 19th Aug 2009 at 11:56 PM.
19th Aug 2009 at 10:19 PM
Last edited by bojinda : 19th Aug 2009 at 11:56 PM.
Posts: 3
Quote: Originally posted by Kolipoki
| bojinda: an action in what way? This tutorial shows you how to make it say something to you, but if you mean have your sims do something, there are many different ways in order to do that you just have to use the proper code to make it do what you want. |
Ah thanks for the reply sorry for not being more specific, I mean make it do something like the cheer that the sim (excitable ones maybe) will sometimes do autonomously if you just let them stand there for a while
#11
24th Aug 2009 at 9:41 PM
24th Aug 2009 at 9:41 PM
Posts: 133
Thanks: 828 in 8 Posts
If we wanted a certain item to do more than one ting (E.G, say hi for one interaction, then start a fire for another, etc.) could we organize each of these functions into different classes?
#12
25th Aug 2009 at 12:52 AM
25th Aug 2009 at 12:52 AM
If you wanted to make the object have more then one interaction you would just make a new class such as "private sealed class TalktoMe : ImmediateInteraction<Sim, TalkingTeddy>". If you wanted to have it where you click on something, something else would come up try looking at the Chaos Mage Painting.
Test Subject
#13
31st Aug 2009 at 5:38 PM
31st Aug 2009 at 5:38 PM
Posts: 4
Thx this Thread is a great help !! would give 5 ***** if it would be possible 
Regards
Kartesk
Regards
Kartesk
#14
2nd Sep 2009 at 1:35 PM
2nd Sep 2009 at 1:35 PM
Posts: 18
Hello! I have a problem with microsoft visual c# 2008 express edition (german).
If I create a new Project, I can't select ".NET Framework 2.0".. Why?
Here a screenshot:
http://img90.imageshack.us/img90/6600/mvs.jpg
(Klassenbibliothek = Class Library)
And here the screenshot from the tutorial:
http://www.sims2wiki.info/images/0/...New_Project.png
(sorry for my english!)
If I create a new Project, I can't select ".NET Framework 2.0".. Why?
Here a screenshot:
http://img90.imageshack.us/img90/6600/mvs.jpg
(Klassenbibliothek = Class Library)
And here the screenshot from the tutorial:
http://www.sims2wiki.info/images/0/...New_Project.png
(sorry for my english!)
#15
2nd Sep 2009 at 5:07 PM
2nd Sep 2009 at 5:07 PM
Posts: 1,728
Quote: Originally posted by Cytron
|
Hello! I have a problem with microsoft visual c# 2008 express edition (german). If I create a new Project, I can't select ".NET Framework 2.0".. Why? |
The tutorial appears to have been written using the full version of Visual C# (or perhaps an older Express edition), rather than the current Express version.
You'll find the Setting for ".NET Framework 2.0" in the Properties for the project.
Right click on top-level item for your project in the Solution Explorer, and use the "Properties" menu operation. Then go to the "Application" tab, and the "Target Framework" should be there.
Cheers.

#16
3rd Sep 2009 at 12:02 PM
Last edited by Cytron : 4th Sep 2009 at 2:23 PM.
Reason: another problem
3rd Sep 2009 at 12:02 PM
Last edited by Cytron : 4th Sep 2009 at 2:23 PM.
Reason: another problem
Posts: 18
Quote: Originally posted by twallan
|
The tutorial appears to have been written using the full version of Visual C# (or perhaps an older Express edition), rather than the current Express version. You'll find the Setting for ".NET Framework 2.0" in the Properties for the project. Right click on top-level item for your project in the Solution Explorer, and use the "Properties" menu operation. Then go to the "Application" tab, and the "Target Framework" should be there. Cheers.
|
Thank you very much

EDIT: Next Problem: I can't find "TurnOnOff"
.. Screenshot:http://img257.imageshack.us/img257/9373/vs2o.jpg
#17
4th Sep 2009 at 8:59 PM
4th Sep 2009 at 8:59 PM
Posts: 1,728
Quote: Originally posted by Cytron
|
EDIT: Next Problem: I can't find "TurnOnOff" |
If you are looking to turn off a Stereo, use the function
Sims3.Gameplay.Objects.Electronics.Stereo.TurnOff()
If you want to turn it on, use the function
Sims3.Gameplay.Objects.Electronics.Stereo.TurnOn()
The Sims3.Gameplay.Objects.Electronics.Stereo.ToggleStereo() function is a protected member of the class, and is not available for direct call. It is called by the TurnOn() and TurnOff() functions.
If you wish to call the ToggleStereo() function directly, you will need to change the protection level in the Sims3GameplaySystems.dll .
Cheers.
#18
9th Sep 2009 at 6:52 PM
9th Sep 2009 at 6:52 PM
Posts: 18
Quote: Originally posted by twallan
|
If you are looking to turn off a Stereo, use the function Sims3.Gameplay.Objects.Electronics.Stereo.TurnOff() If you want to turn it on, use the function Sims3.Gameplay.Objects.Electronics.Stereo.TurnOn() The Sims3.Gameplay.Objects.Electronics.Stereo.ToggleStereo() function is a protected member of the class, and is not available for direct call. It is called by the TurnOn() and TurnOff() functions. If you wish to call the ToggleStereo() function directly, you will need to change the protection level in the Sims3GameplaySystems.dll . Cheers.
|
Thanks again
EDIT: I copied the script from this thread, but I think the interaction-name is wrong.. where exactly can I edit this?:
http://img75.imageshack.us/img75/2271/bild2i.jpg
#19
9th Sep 2009 at 8:28 PM
9th Sep 2009 at 8:28 PM
Posts: 1,728
Quote: Originally posted by Cytron
|
Thanks again EDIT: I copied the script from this thread, but I think the interaction-name is wrong.. where exactly can I edit this?: |
This one provides the name for the menu item.
Code:
                      protected override string GetInteractionName(Sim a, TalkingTeddy target, InteractionObjectPair interaction)
                      {
                          return TalkingTeddy.TalktoMe.LocalizeString("TalktoMe", new object[0]);
                      }
It calls this function, which creates the long name you are seeing.
Code:
                  private static string LocalizeString(string name, params object[] parameters)
                  {
                   return Localization.LocalizeString("Gameplay/Objects/Miscellaneous/TalkingTeddy/TalktoMe:" + name, parameters);
                  }
Cheers.
NRaas Industries: Sims 3 Mods for the Discerning Player, hosted by The Wikispaces.
Test Subject
#20
25th Sep 2009 at 12:30 PM
Last edited by Jinxx : 25th Sep 2009 at 1:42 PM.
Reason: Change Of Attack hehe
25th Sep 2009 at 12:30 PM
Last edited by Jinxx : 25th Sep 2009 at 1:42 PM.
Reason: Change Of Attack hehe
Posts: 2
First of all thank you so much for this. its awesome!!
I think im in over my head a little though. What I want to do is make a BodySculptor (found in Sims3.Gameplay.Objects.Rewards) teach you a skill like logic, but at the same time, take hunger, bladder, and sleep down.
I figured I'd start simply with a copy and paste job of the bodysculptor code. With my namespace etc.
this is what I have:
I get a lot of errors just in that.... can anyone tell me what I'm doing wrong please
Thank you all in advance :D
I think im in over my head a little though. What I want to do is make a BodySculptor (found in Sims3.Gameplay.Objects.Rewards) teach you a skill like logic, but at the same time, take hunger, bladder, and sleep down.
I figured I'd start simply with a copy and paste job of the bodysculptor code. With my namespace etc.
this is what I have:
Code:
using System;
using System.Collections.Generic;
using System.Text;
using Sims3.SimIFace;
using Sims3.UI;
using Sims3.Gameplay;
using Sims3.Gameplay.Abstracts;
using Sims3.Gameplay.Actors;
using Sims3.Gameplay.ActorSystems;
using Sims3.Gameplay.Autonomy;
using Sims3.Gameplay.Core;
using Sims3.Gameplay.Interactions;
using Sims3.Gameplay.Objects;
using Sims3.Gameplay.Objects.Rewards;
using Sims3.Gameplay.Skills;
using Sims3.Gameplay.Socializing;
using Sims3.Gameplay.Utilities;


namespace JinxxMod
{
    public class Simhancer : Rewards
    {
        protected Sim mRevealingSim;

        public static float[] kPowerLevelPercentages;
        public static float[] kChancesOfFailure;

        public static int[] kRunTimes;
        public static int[] kRechargeTimes;

        public static int kSocialFailureLtrDelta;
        public static int kSocialFailureStcDelta;

        public static string kSocialFailureStc;
        public static readonly string sLocalizationKey;

        private PowerLevel mPowerLevel;
        private DateAndTime mLastUsed;
        private PowerLevel mPowerLevelLastUsed;
        private AlarmHandle mRechargeAlarm;


        public override void OnStartup()
        {
            base.OnStartup();
            base.AddInteraction(SimhanceMe.Singleton);
        }


        private enum Option
        {
            Thin = 0,
            Fat = 1,
            Weak = 2,
            Strong = 3,
            Original = 4
        }

        private enum PowerLevel
        {
            Low = 0,
            Medium = 1,
            High = 2
        }


        internal void OnUse()
        {
            this.mLastUsed = SimClock.CurrentTime();
            this.mPowerLevelLastUsed = this.mPowerLevel;
            base.SetMaterial("Default");
            Audio.StartObjectSound(base.ObjectId, "bodysculpt_light_red", false);
            base.AddOrResetAlarm(ref this.mRechargeAlarm, (float)this.ChargeTimeRemaining, TimeUnit.Minutes, new AlarmTimerCallback(this.RechargeAlarmCallback), "RechargeAlarmCallback", AlarmType.AlwaysPersisted);
        }

        public bool Charged
        {
            get
            {
                return (SimClock.ElapsedTime(TimeUnit.Minutes, this.mLastUsed, SimClock.CurrentTime()) > kRechargeTimes[(int)this.mPowerLevelLastUsed]);
            }
        }

        public static string LocalizeString(Sim actor, string name, params object[] parameters)
        {
            return Localization.LocalizeString((actor != null) && actor.IsFemale, sLocalizationKey + ":" + name, parameters);
        }


        private sealed class SimhanceMe : Interaction<Sim, Simhancer>
        {
            // Fields
            private bool mFailure;
            private IGameObject mReservedTile;
            public static readonly InteractionDefinition Singleton = new Definition();

            // Methods
            public override void Cleanup()
            {
                if (this.mReservedTile != null)
                {
                    this.mReservedTile.Destroy();
                    this.mReservedTile = null;
                }
                base.Cleanup();
            }

            private void PlayStopSound(StateMachineClient smc, IEvent evt)
            {
                string name = "fx_bodysculpt";
                if (this.mFailure)
                {
                    name = name + "_fail";
                }
                Audio.StartObjectSound(base.Target.ObjectId, name, false);
                base.Target.SetMaterial("Default");
            }

            protected override bool Run()
            {
                Simhancer.Option mOption = (base.InteractionDefinition as ItemDefinition).mOption;
                Sim mInstigator = (base.InteractionDefinition as ItemDefinition).mInstigator;
                if (!base.Actor.RouteToSlotAndCheckInUse(base.Target, Slot.RoutingSlot_0))
                {
                    return false;
                }
                base.StandardEntry();
                this.mReservedTile = Sims3.Gameplay.GlobalFunctions.CreateObject("ReservedTile", base.Actor.Position, base.Actor.Level, base.Actor.ForwardVector);
                base.EnterStateMachine("Simhancer", "Enter", "x");
                base.SetActor("Simhancer", base.Target);
                base.SetParameter("Set", base.Actor.SimDescription.Child ? "child" : (base.Actor.IsFemale ? "female" : "male"));
                base.SetParameter("Q", (base.Actor.SimDescription.Child || base.Actor.IsFemale) ? "" : (RandomUtil.CoinFlip() ? "1" : "2"));
                Simhancer.PowerLevel mPowerLevel = base.Target.mPowerLevel;
                int num = Simhancer.kRunTimes[(int) mPowerLevel];
                float num2 = Simhancer.kPowerLevelPercentages[(int) mPowerLevel];
                float fitness = base.Actor.SimDescription.Fitness;
                float num4 = base.Actor.SimDescription.Weight + 1f;
                switch (mOption)
                {
                    case Simhancer.Option.Thin:
                        num4 -= num2 * num4;
                        break;

                    case Simhancer.Option.Fat:
                        num4 += num2 * (2f - num4);
                        break;

                    case Simhancer.Option.Weak:
                        fitness -= num2 * fitness;
                        break;

                    case Simhancer.Option.Strong:
                        fitness += num2 * (1f - fitness);
                        break;
                }
                num4--;
                float num5 = 0f;
                if (num4 < 0f)
                {
                    num5 = 1f + num4;
                    num4 = 0f;
                }
                this.mFailure = false;
                if (RandomUtil.RandomChance01(Simhancer.kChancesOfFailure[(int)mPowerLevel]))
                {
                    this.mFailure = true;
                    bool flag = false;
                    switch (RandomUtil.GetInt(2))
                    {
                        case 0:
                            fitness = 0f;
                            break;

                        case 1:
                            fitness = 1f;
                            break;

                        case 2:
                            flag = true;
                            break;
                    }
                    switch (RandomUtil.GetInt(flag ? 1 : 2))
                    {
                        case 0:
                            num4 = 1f;
                            num5 = 0f;
                            break;

                        case 1:
                            num4 = 0f;
                            num5 = 1f;
                            break;
                    }
                }
                base.BeginCommodityUpdates();
                base.AnimateSim("Use");
                base.Actor.WaitForExitReason((float) (num / 2), ExitReason.HigherPriorityNext);
                if ((mOption == Simhancer.Option.Original) && !this.mFailure)
                {
                    base.Actor.SimDescription.ResetBodyShape();
                }
                else
                {
                    base.Actor.SimDescription.SetBodyShape(num4 - num5, fitness);
                }
                base.Actor.WaitForExitReason((float) (num - (num / 2)), ExitReason.HigherPriorityNext);
                base.AddOneShotScriptEventHandler(0x3e9, new SacsEventHandler(this.PlayStopSound));
                base.AnimateSim("Get Out");
                base.EndCommodityUpdates(!this.mFailure);
                base.Target.OnUse();
                if (this.mFailure)
                {
                    base.Actor.PlayReaction(ReactionTypes.TantrumIntense, ReactionSpeed.ImmediateWithoutOverlay);
                    if (mInstigator != null)
                    {
                        Relationship relationship = Relationship.Get(base.Actor, mInstigator, true);
                        if (relationship != null)
                        {
                            relationship.UpdateSTCAndLTR(base.Actor, mInstigator, Simhancer.kSocialFailureStc, (float) Simhancer.kSocialFailureStcDelta);
                        }
                        if ((mInstigator.CurrentInteraction != null) && (mInstigator.CurrentInteraction.InteractionDefinition == Simhancer.WatchChange.Singleton))
                        {
                            mInstigator.AddExitReason(ExitReason.CanceledByScript);
                        }
                    }
                }
                else
                {
                    if (((mInstigator != null) && (mInstigator.CurrentInteraction != null)) && (mInstigator.CurrentInteraction.InteractionDefinition == Simhancer.WatchChange.Singleton))
                    {
                        mInstigator.AddExitReason(ExitReason.Finished);
                    }
                    base.AnimateSim("React " + mOption);
                }
                base.StandardExit();
                return true;
            }

            // Nested Types
            public sealed class Definition : InteractionDefinition<Sim, Simhancer, Simhancer.SimhanceMe>
            {
                // Methods
                protected override void AddInteractions(InteractionObjectPair iop, Sim actor, Simhancer target, List<InteractionObjectPair> results)
                {
                    InteractionInstanceParameters parameters = new InteractionInstanceParameters(iop, actor, actor.InheritedPriority(), false, true);
                    GreyedOutTooltipCallback greyedOutTooltipCallback = null;
                    if (this.Test(ref parameters, ref greyedOutTooltipCallback))
                    {
                        if (!target.Charged)
                        {
                            results.Add(iop);
                        }
                        else
                        {
                            Simhancer.Option option = actor.SimDescription.IsInitialBodyShape() ? Simhancer.Option.Strong : Simhancer.Option.Original;
                            for (int i = 0; i <= option; i++)
                            {
                                Simhancer.SimhanceMe.ItemDefinition interaction = new Simhancer.SimhanceMe.ItemDefinition();
                                interaction.mOption = (Simhancer.Option) i;
                                results.Add(new InteractionObjectPair(interaction, target));
                            }
                        }
                    }
                }

                protected override string GetInteractionName(Sim a, Simhancer target, InteractionObjectPair interaction)
                {
                    return Simhancer.LocalizeString(null, "SimhanceMe", new object[0]);
                }

                protected override bool Test(Sim a, Simhancer target, bool isAutonomous, ref GreyedOutTooltipCallback greyedOutTooltipCallback)
                {
                    GreyedOutTooltipCallback callback = null;
                    if (target.Charged)
                    {
                        return true;
                    }
                    if (callback == null)
                    {
                        callback = delegate {
                            return Simhancer.LocalizeString(null, "TipNotCharged", new object[] { target.ChargeTimeRemaining });
                        };
                    }
                    greyedOutTooltipCallback = callback;
                    return false;
                }
            }

            [DoesntRequireTuning]
            public sealed class ItemDefinition : InteractionDefinition<Sim, Simhancer, Simhancer.SimhanceMe>
            {
                // Fields
                public Sim mInstigator;
                public Simhancer.Option mOption;

                // Methods
                protected override string GetInteractionName(Sim a, Simhancer target, InteractionObjectPair interaction)
                {
                    return Simhancer.LocalizeString(null, "SimhanceMeOption" + this.mOption, new object[0]);
                }

                public override string[] GetPath()
                {
                    return new string[] { Simhancer.LocalizeString(null, "SimhanceMe", new object[0]) };
                }

                protected override bool Test(Sim a, Simhancer target, bool isAutonomous, ref GreyedOutTooltipCallback greyedOutTooltipCallback)
                {
                    return (target.Charged && !target.InUse);
                }
            }
        }


    }
}
I get a lot of errors just in that.... can anyone tell me what I'm doing wrong please
Thank you all in advance :D
#21
26th Sep 2009 at 8:51 PM
Last edited by ani_ : 27th Sep 2009 at 10:15 AM.
26th Sep 2009 at 8:51 PM
Last edited by ani_ : 27th Sep 2009 at 10:15 AM.
Posts: 3,878
Thanks: 21111 in 16 Posts
Jinxx: VS usually gives you quite descriptive error messages, you should try reading them through.
I have a question about object modding.
Has anybody succesfully managed to get a custom JAZZ file attached to their object mod? Is there any specific thing one should take into consideration?
I can successfully get the game to use a pre-existing state, and do the animations in that, but not when I try it to use the jazz file I attached.
---edit---
ignore my question, figured it out.
Test Subject
#22
28th Sep 2009 at 9:03 AM
28th Sep 2009 at 9:03 AM
Posts: 2
thanks for your reply ani,
I have read the errors and not sure how to fix them. Sorry, I thought I'd put them in the original post.....
Error 1 The type or namespace name 'Rewards' could not be found (are you missing a using directive or an assembly reference?) C:\Games\The Sims 3\Mods\Jinxx.Sims3Game.Test\Jinxx.Sims3Game.Test\Class1.cs 23 30 Jinxx.Sims3Game.Test
Error 2 The type or namespace name 'IGameObject' could not be found (are you missing a using directive or an assembly reference?) C:\Games\The Sims 3\Mods\Jinxx.Sims3Game.Test\Jinxx.Sims3Game.Test\Class1.cs 101 21 Jinxx.Sims3Game.Test
from what I can see, I'm not missing a using directive. Any ideas?
Test Subject
#23
28th Sep 2009 at 11:51 AM
28th Sep 2009 at 11:51 AM
Posts: 2
#24
28th Sep 2009 at 12:24 PM
28th Sep 2009 at 12:24 PM
Posts: 3,878
Thanks: 21111 in 16 Posts
Jinxx: Click on those two that are giving you a problem with your mouse right button, then select resolve and it should give you options on references you need, you can straight click them from the list it gives you.
cheezegrate: You as well need to click the class you want to see with the right side mouse button and selecte it from there, I also couldn't launce it with space.
cheezegrate: You as well need to click the class you want to see with the right side mouse button and selecte it from there, I also couldn't launce it with space.
Test Subject
#25
30th Sep 2009 at 7:12 AM
30th Sep 2009 at 7:12 AM
Posts: 18
Ah well
| Locked thread | Locked by: HugeLunatic Reason: Please see updated tutorial in wiki, see first post. | |
Who Posted
|
|