 Sign in to Mod The Sims
- Site Map >
- Modding and Creation >
- Sims 4 Creation >
- Walls & Floors >
- AAAAGH Seams!
- Site Map >
- Modding and Creation >
- Sims 4 Creation >
- Walls & Floors >
- AAAAGH Seams!
 19th Oct 2014 at 6:54 AM
Last edited by Srikandi : 19th Oct 2014 at 7:07 AM.
19th Oct 2014 at 6:54 AM
Last edited by Srikandi : 19th Oct 2014 at 7:07 AM.
Posts: 6,105
Thanks: 12815 in 71 Posts
I was just trying to make a "build your own rug" set of floor tiles... corner, border and center that could be combined to make a fancy rug of any size or shape. But when testing my first piece I ran into this:
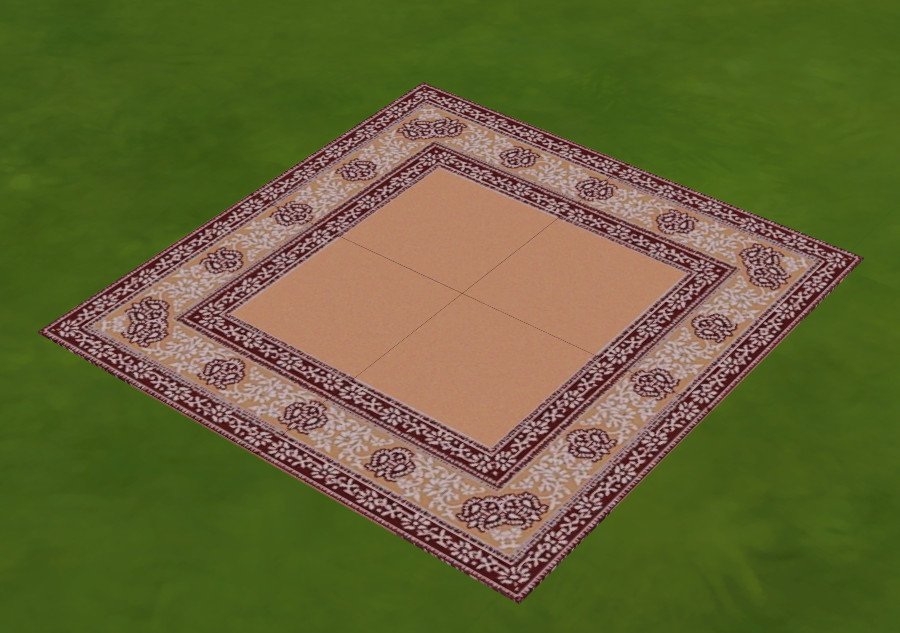
This is the source image:
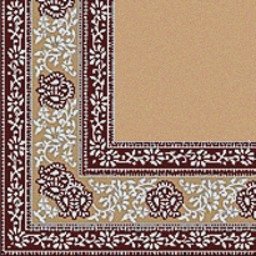
(That was saved as DXT1 dds, 256x256.)
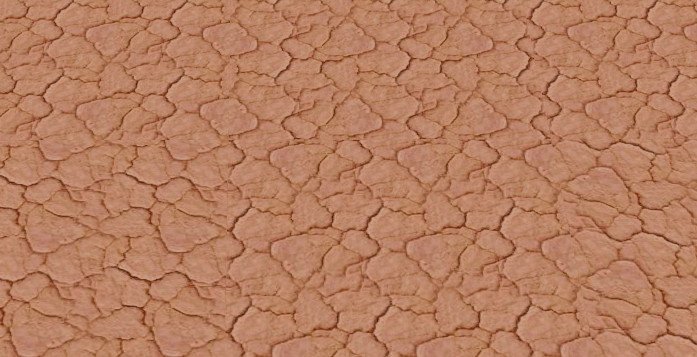
Other floors I've made haven't had this issue at all, for instance this, which I made earlier tonight also with WallEz (some of the tiles in this pic are rotated so it would be comparable to my rug; apparently that's not the source of the problem).
So it's something about certain images. A bunch of us have been talking about seams like this and how to prevent them, but we haven't found a solution. I thought I'd open up the discussion here, in case anybody else has better ideas
 20th Oct 2014 at 5:08 AM

CC4Sims
Love will humiliate you and hate will cradle you.
Jealousy would be far less torturous if we understood that love is a passion entirely unrelated to our merits.
20th Oct 2014 at 2:59 PM
Last edited by Bakie : 5th Nov 2014 at 12:29 PM.
Posts: 1,896
Thanks: 67316 in 209 Posts

So I think I will totally delete those 2 wallpapers and make other more simple ones instead.

The only thing I didn't do with these 2 wallpapers and did with the others was using the offset option in Photohop, because I can't use it for these 2..
I hope someone will find a solution for this.
For the people who would like to support me some more, take a look at my: BakieGaming Patreon page
For a quick mod overview, take a look at my Profile page
20th Oct 2014 at 3:19 PM

CC4Sims
Love will humiliate you and hate will cradle you.
Jealousy would be far less torturous if we understood that love is a passion entirely unrelated to our merits.
20th Oct 2014 at 5:50 PM
Posts: 1,896
Thanks: 67316 in 209 Posts
|
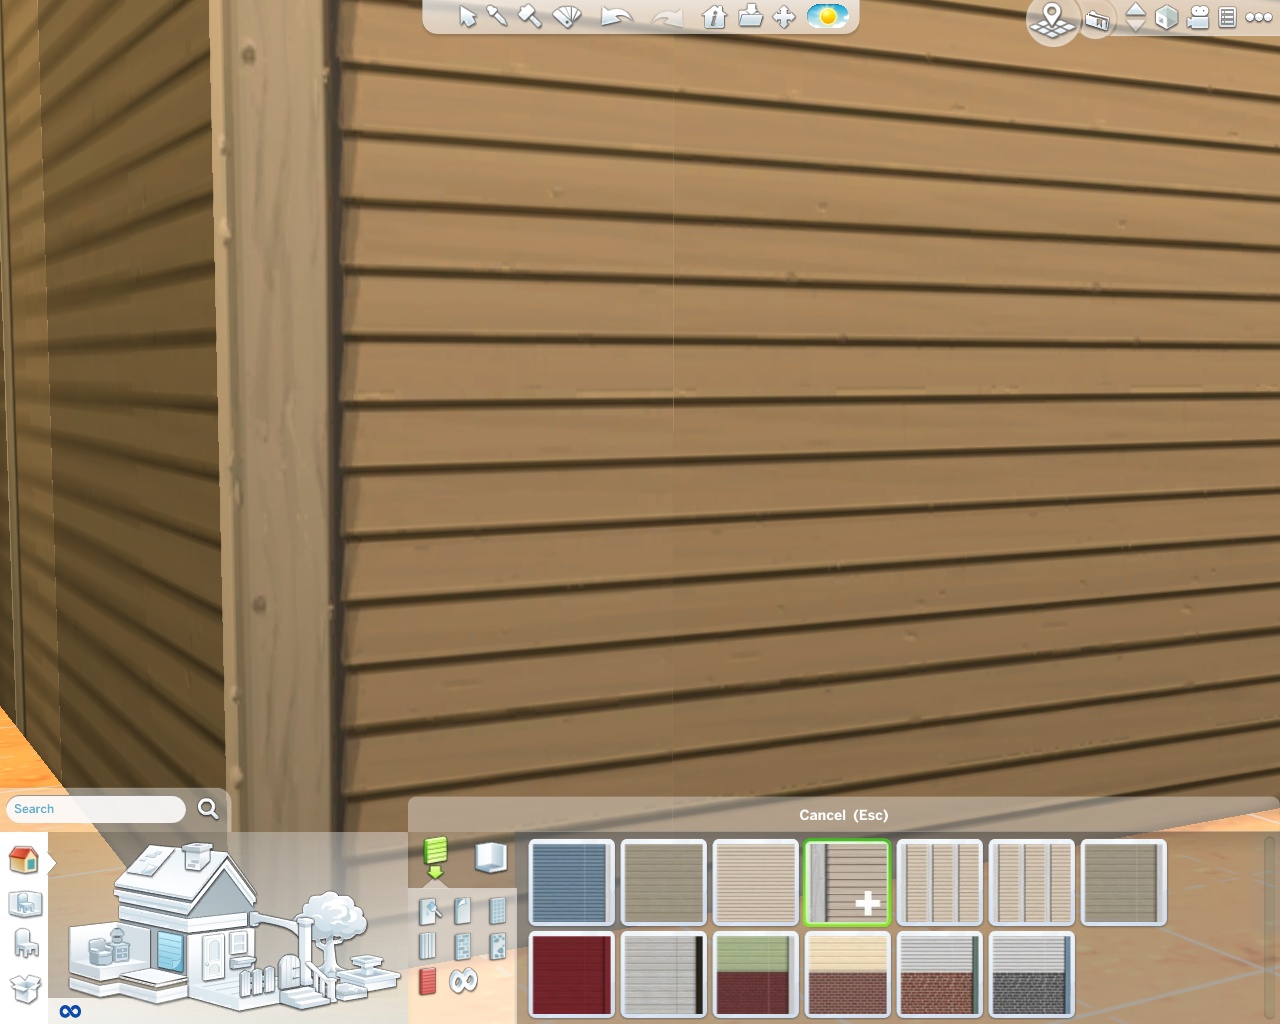
I figured out why I had the seam with the siding where I had the white stripe on the edge, it has to do with the way EA mapped the walls and it might be the problem with the floor tiles as well. A small part of the left side of the wall actually shows on the right side of the wall in game and vice versa. Normally when you create walls this is no big deal, but if you create a wall with an edge on one side it becomes an issue. I moved the white stripe over slightly and the wall tiled in game without the white line. See picture below: |
So if you use this on a corner, what happens to the red line?
I mean as shown in your first post, is there no red line in between the two corner/end wallpapers?
For the people who would like to support me some more, take a look at my: BakieGaming Patreon page
For a quick mod overview, take a look at my Profile page
20th Oct 2014 at 6:39 PM
|
So if you use this on a corner, what happens to the red line? I mean as shown in your first post, is there no red line in between the two corner/end wallpapers? |
Next time I am in game I will take a closer look and post pictures. (dv)
CC4Sims
Love will humiliate you and hate will cradle you.
Jealousy would be far less torturous if we understood that love is a passion entirely unrelated to our merits.
20th Oct 2014 at 11:23 PM


CC4Sims
Love will humiliate you and hate will cradle you.
Jealousy would be far less torturous if we understood that love is a passion entirely unrelated to our merits.
21st Oct 2014 at 1:07 AM
Posts: 11,006
Thanks: 422944 in 1121 Posts
This was a problem in TS3 too, it might have something do to with the fact that corner wall pieces are a little wider than regular ones in game (regular width + half of the wall thickness).
Stuff for TS2 · TS3 · TS4 | Please do not PM me with technical questions – we have Create forums for that.
In the kingdom of the blind, do as the Romans do.
21st Oct 2014 at 1:41 AM
Posts: 487
Thanks: 29000 in 78 Posts
|
The white line thing might have something to do with the mipmaps. Maybe try a few different settings for the mipmaps? The Maxian corner textures go edge to edge; they do not have an extra strip of wall like Christine suggests. This was a problem in TS3 too, it might have something do to with the fact that corner wall pieces are a little wider than regular ones in game (regular width + half of the wall thickness). |
I don't think this has to do with corners, specifically. The same thing happens for me when trying to make a mural type wallpaper:

Notice the seams?
But it only appears to happen when placing 2 different wall textures next to eachother, even if they line up. (Or floor textures, even when simply rotated.)
21st Oct 2014 at 1:56 AM
Posts: 11,006
Thanks: 422944 in 1121 Posts
Still, the
Stuff for TS2 · TS3 · TS4 | Please do not PM me with technical questions – we have Create forums for that.
In the kingdom of the blind, do as the Romans do.
 21st Oct 2014 at 3:48 AM
Posts: 7,898
Thanks: 204698 in 302 Posts
Obviously it doesn't happen to all images, as shown be some previously and the attached sample of a Maxis one.
Life Stories || EA Sims 2 Store Items || EA Pre-Order Incentives || Pet Stories || Dog Agility Items || Castaway Stories || Holy Simoly Add-ons || Overrides and Defaults
4esf Archive || Holy Simoly Archive || Sims2Artists || tumblr || CEP-Extras List || Buyable Game Ojbects
If you enjoy the content on s2a or GoS, consider donating to support hosting costs.
21st Oct 2014 at 7:28 AM
Posts: 487
Thanks: 29000 in 78 Posts
|
Is it possible the alpha layer is not correct? Or what about the dxt format you are saving the images in? Also, are these images all in one package? Under the same thumbnail? Have you tried separate thumbnails? Obviously it doesn't happen to all images, as shown be some previously and the attached sample of a Maxis one. |
I've tried both DXT1 and DXT5 (the in game ones are DXT1), walls don't use alphas. In fact, if you try to apply an alpha that is not totally white, the wall turns black.
Yes, they are in the same package, and under the same thumbnail. I don't see how that would affect anything, but I'll try it tomorrow, just to be sure. (I also want to play with the mip map settings in PS, like pbox suggested.)
21st Oct 2014 at 9:01 AM
Last edited by plasticbox : 21st Oct 2014 at 10:12 AM.
Posts: 11,006
Thanks: 422944 in 1121 Posts
Iterative Fit / Perceptual / Super Sampling results in seams for me (Paint.net). Bleargh.
One DDS converter that solved all sorts of issues for me back in the TS3 era was Aorta
Edit: Still seams with Aorta, mipmap options: Image Repeats, Filter: Kaiser, Halo Removal: Fast / Reconstruct Edge Colors. However, that was when saving from the previous DDS .. I'll try again from PNG.
From PNG, no image repeats, filter: Kaiser, Halo Removal: Fast / Reconstruct Edge Colors .. still seams.
From PNG, image repeats, filter: Triangle, Halo Removal: Fast / Reconstruct Edge Colors .. still seams.
From PNG, no image repeats, Kaiser, no halo removal (opacity type=2, thats DXT5 I believe?) .. still seams.
From PNG, image repeats, Box filter, Halo Removal: Fast / Reconstruct Edge Colors .. still seams.
 That might make those experiments a bit .. pointless.
Stuff for TS2 · TS3 · TS4 | Please do not PM me with technical questions – we have Create forums for that.
In the kingdom of the blind, do as the Romans do.
21st Oct 2014 at 10:18 AM
Posts: 33
Thanks: 788 in 11 Posts
It was saved as a dds using standard Sims texture settings:
DXT5 ARGB 8 bpp interpolated alpha
All mips maps
21st Oct 2014 at 10:21 AM
Posts: 11,006
Thanks: 422944 in 1121 Posts
Stuff for TS2 · TS3 · TS4 | Please do not PM me with technical questions – we have Create forums for that.
In the kingdom of the blind, do as the Romans do.
21st Oct 2014 at 10:49 AM
Posts: 33
Thanks: 788 in 11 Posts
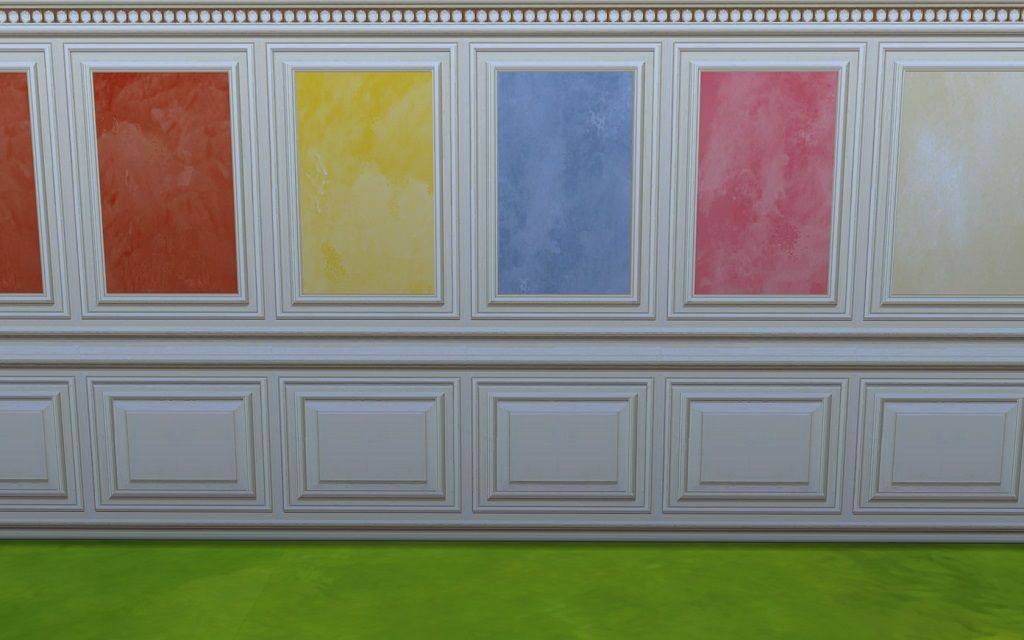
However, on a different, but related issue it seems that the specular maps of the walls will also need to be taken into consideration. The three panels shown here all use an identical diffuse texture, saved with the same settings, but on different original bases. The wood all looks quite different in game despite using the same texture so if you are trying to make seamless panels you need to use the same base wall, not just the same texture.
21st Oct 2014 at 10:59 AM
Last edited by plasticbox : 21st Oct 2014 at 11:10 AM.
Posts: 11,006
Thanks: 422944 in 1121 Posts
Edit: I also still have seams with a wall cloned with S4Studio (using the textures from my very first try), so pretty sure it's got something to do with how the textures are generated (not with anything later in the food chain).
Gonna do some more Paint.net experiments (I finally ran out of Aorta options), then I guess Snaitf and I can draw straws on who tries with Photoshop =P
Stuff for TS2 · TS3 · TS4 | Please do not PM me with technical questions – we have Create forums for that.
In the kingdom of the blind, do as the Romans do.
21st Oct 2014 at 11:34 AM
More downloads by Leesester, BoilingOil and others at Leefish.nl | My Stuff at Leefish.nl | LeeFish RSS | Sims4 News Blog | TumblinLeefish
21st Oct 2014 at 11:38 AM
Posts: 33
Thanks: 788 in 11 Posts
|
Not sure what you mean .. *if* this is an issue with how the images are being saved, the specular will also have seams, just like the diffuse. However since you don't have seams in the first place your specular is fine (just like the rest). If it's an unedited Maxis specular, it'll have no problem anyway. Edit: I also still have seams with a wall cloned with S4Studio (using the textures from my very first try), so pretty sure it's got something to do with how the textures are generated (not with anything later in the food chain). Gonna do some more Paint.net experiments (I finally ran out of Aorta options), then I guess Snaitf and I can draw straws on who tries with Photoshop =P |
What I meant was that the specular maps are attached to the original walls and if edited in S4Studio you can get very different appearances from the same texture depending on the base wall you have used. Unlike with clothing I don't see an easy way to strip out references to the other image components, like the specular maps.
The other interesting point is that when I generated some textures in WallEZ, using the same .dds save settings as the images I used in my China Club wall I got very obvious seams. I will remake those walls in S4Studio and see if the seams remain an issue.
21st Oct 2014 at 11:56 AM
Last edited by plasticbox : 21st Oct 2014 at 12:43 PM.
Posts: 11,006
Thanks: 422944 in 1121 Posts
| What I meant was that the specular maps are attached to the original walls |
They aren't "attached" -- they're referenced in the same way as the diffuse textures. S4S includes the original ones but doesn't give you an option to change them (that's probably why they look "attached" to you), but you can do that in S4PE. For me it worked fine to just replace the texture.
Anyhow the ones I tested with have no bump/spec at all (except for one), so at least for me that isn't the issue.
| The other interesting point is that when I generated some textures in WallEZ, using the same .dds save settings as the images I used in my China Club wall I got very obvious seams. I will remake those walls in S4Studio and see if the seams remain an issue. |
You .. generated textures in WallEZ? Sure you aren't confusing something? Unless I missed a very major point, WallEZ doesn't do any texture generating. It only links everything together to make a package. Or do you mean you generated new textures in PS?
But yeah it might be enlightening if you also do a direct comparison .. at least you have *some* textures that work for you.
In other news, I only managed to produce an exceptionally shitty-looking texture with the tool Lee linked above, but that has about 546378 shiny buttons for mipmapping so it's very likely I just hit the wrong ones (Scaling Filter: Gaussian, Processing: Smoothen). The result .. had seams .. needless to say.
Stuff for TS2 · TS3 · TS4 | Please do not PM me with technical questions – we have Create forums for that.
In the kingdom of the blind, do as the Romans do.
21st Oct 2014 at 12:12 PM
Posts: 1,548
Thanks: 330 in 5 Posts
|
What I meant was that the specular maps are attached to the original walls and if edited in S4Studio you can get very different appearances from the same texture depending on the base wall you have used. Unlike with clothing I don't see an easy way to strip out references to the other image components, like the specular maps. The other interesting point is that when I generated some textures in WallEZ, using the same .dds save settings as the images I used in my China Club wall I got very obvious seams. I will remake those walls in S4Studio and see if the seams remain an issue. |
Hi all,
Since I am a basic user, not sure if my experience could add anything to the fight against this issue...Well, just in case:
I made a panel wall (converted from Sims 2 - originally created by Jsf). Made it with S4Studio. A single package, with several variations and several thumbnails. Just extracted the textures with Homecrafter, then made the required sizes and saved all images as Jpeg, before importing them into Photoshop Elements and converting them to DDS.
Here is the result ingame:
I don't notice any seam between the different panels. But the base is exactly the same for all panels and the middle part has just different colors.
Big thanks to you, guys, who are working hard to solve this issue and make our game beautiful. :lovestruc
21st Oct 2014 at 12:27 PM
Posts: 11,006
Thanks: 422944 in 1121 Posts
Not sure if that kind of thing would be visible on your walls, since they are very light.
The corner piece is my wall, the rest is Maxis -- my graphics are obviously not great, but the Maxis ones are obviously seamless.
Mehrlicht, does your wall have bump/specular maps? Are those the original Maxis ones or your own?
Stuff for TS2 · TS3 · TS4 | Please do not PM me with technical questions – we have Create forums for that.
In the kingdom of the blind, do as the Romans do.
21st Oct 2014 at 1:08 PM
Last edited by count_cosmos : 21st Oct 2014 at 1:52 PM.
Posts: 33
Thanks: 788 in 11 Posts
So, first the texture format used is not the issue as the wall I created using the prexisting Maxis texture does not show the seams, but when I changed the texture it did even though the texture was the same in places where a seam now shows.
21st Oct 2014 at 1:14 PM
Posts: 1,548
Thanks: 330 in 5 Posts
No, the walls on my pic are not maxis, and not mine. They were made for Sims 2 by Jsf @TSR. Jsf really knows how to make a wall... It's why I enjoy converting her work to Sims 3 and now Sims 4.
I have the walls in Sims 2/Downloads and just extract the images with Homecrafter. All images of the above set were originally 256x768 pixels. I just had to make the other sizes and to save the resized images (as Jpeg). Then imported them to Photoshop and converted them to dds, like explained in the S4Studio tutorial: "DXT5 ARGB 8bpp interpolated alpha" - Generate MIP maps".
With the above set everything went fine. I have another one from another Sims 2 creator, with many different textures and I will try to convert it to Sims 4. For now have some work to do (RL). Will come back later.
I know that you'll find a way to solve this "seam" issue.
Thanks for your hard work.
21st Oct 2014 at 1:54 PM
Last edited by plasticbox : 21st Oct 2014 at 2:10 PM.
Posts: 11,006
Thanks: 422944 in 1121 Posts
| Just for a test I exported an existing texture from S4Studio and then saved it in Photoshop and put it back in as a new wall in S4Studio (on a stucco rather than paneled wall). It worked fine and did not show a seam at all. Then I took the same wall texture and duplicated it and split a poster up on it, and used those as the texture on the same wall that worked seamlessly before and made two new walls in the same way. The result was seams and colour change. |
The issue with seams seems to be only between different textures. When you put the same texture next to each other, there are no seams it appears. If you look at the house pictures by Christine11778 the seams are only between "straight wall" and "corner" textures, not everywhere on the wall. I only wonder about that mural by @Bakie .. the one that's up for download has a lot of different textures, obviously, but I don't see any seams on their screenshot -- with that the problem was only with the corner bits it appears.
Also, your stucco walls have different specular and bump maps by the looks of it .. the colour change is surely because of that. Did you change them manually? Like import in S4PE? Or did you not use the same wall as a basis?
Strange that you seem to somehow have managed to convince the game to treat your club walls as "same" =) those must be different textures too, no? They obviously have different motives?
Can you maybe upload your packages here? Of the working wall plus one of the poster ones? It's perfectly possible that I'm on the completely wrong track with the mipmap idea .. maybe there are some other differences.
Stuff for TS2 · TS3 · TS4 | Please do not PM me with technical questions – we have Create forums for that.
In the kingdom of the blind, do as the Romans do.
Who Posted
|
|