 Sign in to Mod The Sims

TS2GridAdjuster V1.2.3 - Change Grid Elevations (Updated June 5, 2010)
Flag Download
Hide Thanks Posts for this thread (Show only feedback)
 17th Sep 2009 at 3:45 PM
Posts: 14,061
Thanks: 38368 in 178 Posts
| I downloaded a house with no foundation, I want to add one. Can this be used for that? |
If you are interested in trying this anyway, I could make the program available to you, along with a rudimentary tutorial. Alternatively, you could attach your lot here and I'll see what I can do for you.
18th Sep 2009 at 6:00 AM
Posts: 34
|
No. You'd also need my (unreleased) LevelAdder program to add a level below the existing ones. Unfortunately, I haven't been able to determine how to (correctly) move objects up when adding a level, so there's a possibility of objects ending up on the wrong level, or at the wrong elevation. If you are interested in trying this anyway, I could make the program available to you, along with a rudimentary tutorial. Alternatively, you could attach your lot here and I'll see what I can do for you. |
I can try out the LevelAdder, I'll even give you feedback if you want it.
18th Sep 2009 at 8:52 PM
Last edited by Mootilda : 18th Sep 2009 at 10:07 PM.
Posts: 14,061
Thanks: 38368 in 178 Posts
http://www.modthesims.info/showthre...074#post2858074
Please post any questions or comments in the MooTools group LevelAdder thread, rather than here. And, yes, I am definitely interested in feedback. Thanks!
17th Jan 2010 at 1:15 AM
Posts: 273
Thanks: 1 in 1 Posts
I don't like the CFE cheat which for curved roofs with floor tiles doesn't make a house weather proof (this is a bad surprise from Seasons I guess).
But truly I hope you'll have time to update and improve your tool. At the moment, unfortunately I'll get along with that terrifying CFE cheat to build modern houses.
Thanks anyway PS : I joined your group for more info here.
17th Jan 2010 at 2:06 AM
Posts: 14,061
Thanks: 38368 in 178 Posts
If you want oddly-sized and -shaped walls to take doors and windows, you'll have to use a non-standard wall definition, such as the unleveled walls at:
http://www.modthesims.info/download.php?t=59793
The GridAdjuster will work with unleveled walls and other non-standard walls as well as with normal walls, foundation walls, etc.
In general, I find that the best option is to create one or two standard floors which have the doors, windows and weather-proofing, then add additional pillars, beams, roofs, etc, which are curved and decorative. If you look at my lots, you'll see that they have no gaps around the doors and windows, and they are all weather proof.
The GridAdjuster doesn't do anything different to the walls and floors than the CFE cheat does. If you find a difference, please let me know.
22nd Jan 2010 at 6:16 AM
Posts: 273
Thanks: 1 in 1 Posts
22nd Jan 2010 at 6:22 AM
Last edited by Mootilda : 22nd Jan 2010 at 6:38 AM.
Posts: 14,061
Thanks: 38368 in 178 Posts
Which thread did you see the pictures on? I've given several different examples of the use of the TS2GridAdjuster. I should be able to give you a picture of any lot with the walls at normal heights, since I usually keep saves of some of the intermediate steps. Alternatively:
An easy way to tell what each level looks like:
- Download the lot in question
- Set the walls to be up (not down or cutaway)
- Go to the lowest level and look at the wall structure
- Move up a level, and look at the wall structure
- etc.
Another easy way to tell what each level looks like:
- Download the lot in question
- Run the GridAdjuster:
- 1) Select a range of the entire lot, all levels
- 2) Set the grid to Flat 0 clicks*, with an additional 16 clicks per level
- Then, run the game and look at the lot... you'll see exactly what I started with.
* If the minimum level on the lot is -1, then you need to either:
A) Don't include level = -1 in your adjustment
OR
B) Set the grid to Flat -16 clicks, rather than Flat 0 clicks, with an additional 16 clicks per level
22nd Jan 2010 at 6:56 AM
Posts: 273
Thanks: 1 in 1 Posts
Unfortunately I think I didn't note down the links to your tutorials but I will search. I know maybe for you and other people all this is a bit easier but teh CFE cheat is already complicated for me , I need to read some tutorials again each time I use this cheat to build ingame - I think I'll get it all right with this.
22nd Jan 2010 at 6:58 AM
Posts: 14,061
Thanks: 38368 in 178 Posts
It's late here, so I'm signing off now, but perhaps tomorrow I could show you a fairly simple house with two flat levels.
 26th May 2010 at 4:06 AM
Posts: 2,627
Thanks: 8603 in 26 Posts
I was just curious about improving split levels with variations in the stage (e.g. a shift downwards instead of upwards, landings for stairs at varying heights, etc.)
I don't mind if you call me "MSD" or something for short.
Tumblr
26th May 2010 at 4:44 AM
Last edited by Mootilda : 7th Jun 2010 at 5:48 PM.
Posts: 14,061
Thanks: 38368 in 178 Posts
| how well does this affect/interact with the OFB stage? I realize that the stage is just a vertical shift upwards and not a separate "level." |
[Update:] Further research confirms this. The game ignores the grid elevations for stages.
30th May 2010 at 4:00 AM
Last edited by Mootilda : 7th Jun 2010 at 5:47 PM.
Posts: 14,061
Thanks: 38368 in 178 Posts
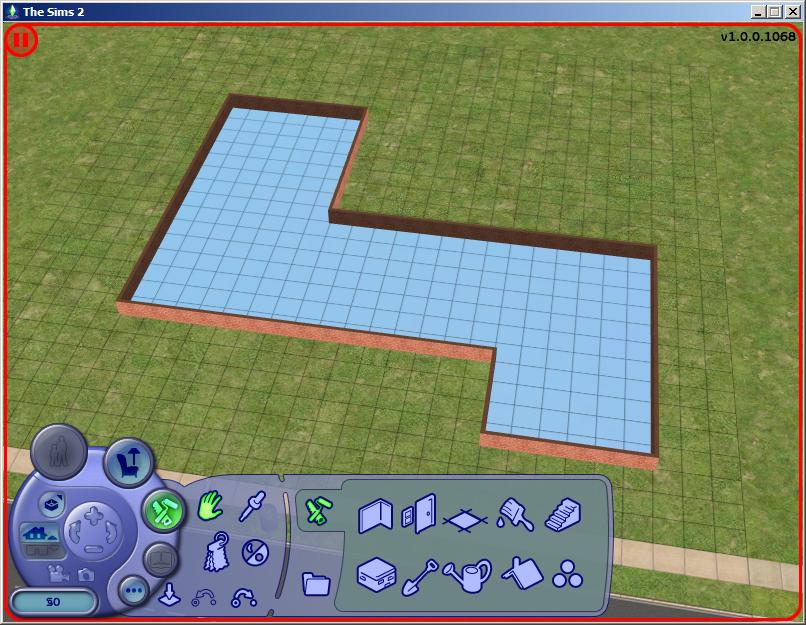
Creating your lot
1. First, build the foundation for your lot. This will become your basement floor.
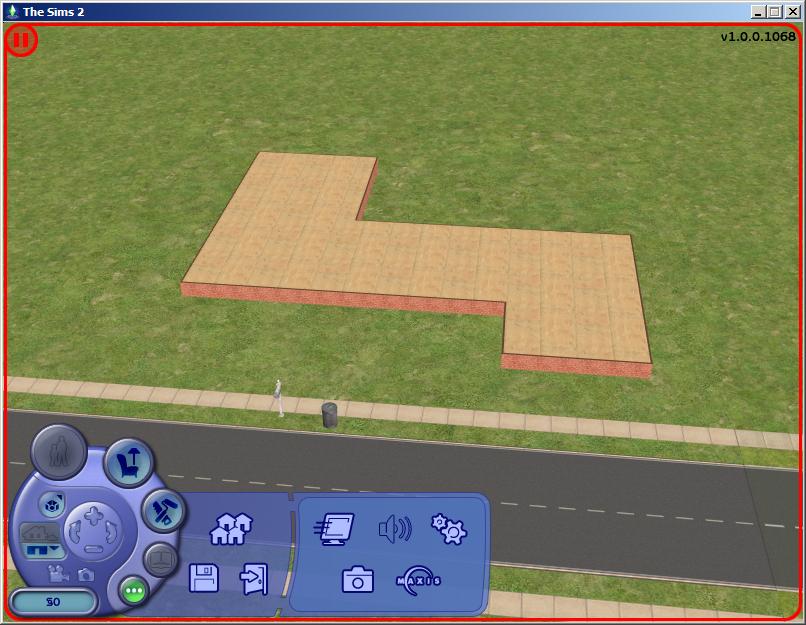
2. This is a good time to count your tiles. You need to count the number of tiles from the front and the number of tiles from the left side of your lot to the walls of your foundation. If your foundation is not rectangular, you will need separate counts for each rectangular section of your foundation.
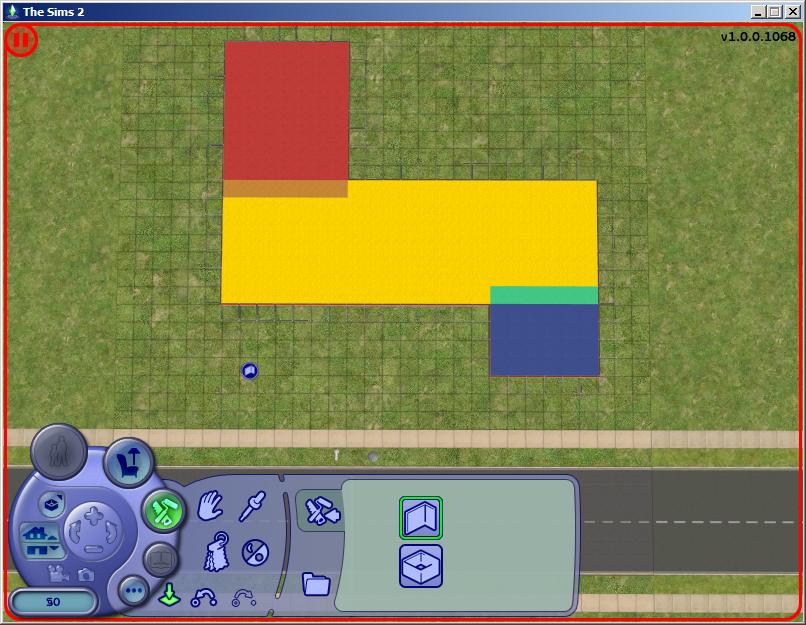
For this sample lot, I start by counting the main area, in yellow, with orange and green overlaps with the other two areas:
Depth 17 - 24
Width 6 - 27
When counting the additional areas, you should always overlap the areas by 1 or more tiles, so that there will not be any break in the basement at these points.
Blue plus Green (overlap):
Depth 13 - 18
Width 21 - 27
Red plus Orange (overlap):
Depth 23 - 32
Width 6 - 13
3. Build walls on top of your foundation. These will become your basement walls.
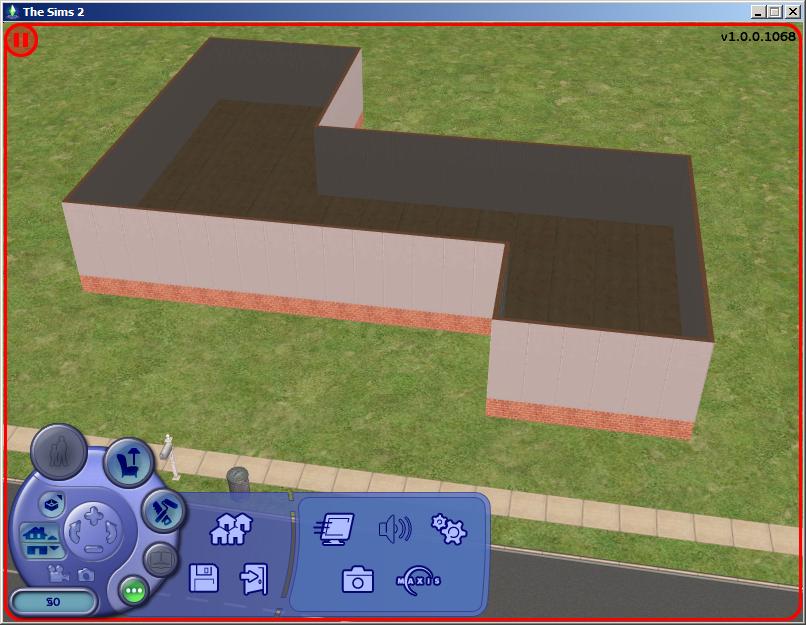
4. Build flooring on top of the walls. This will become the main floor of your house.
You now have enough to proceed, although you can continue building the shell of your house (walls and floors) as much as you want to get the correct size and shape, the right number of rooms, etc. However, be aware that any objects that you place, including furniture, doors and windows, will not be moved down by the GridAdjuster, so it's best to avoid placing them at this time.
There is one exception to this rule: you may find it easier to place landscaping on the ground around the house at this time, rather than waiting until the house has been lowered into the ground.
Now that you have the basic structure of your house, it's time to run the TS2GridAdjuster. See the next post for details.
30th May 2010 at 4:15 AM
Last edited by Mootilda : 6th Jun 2010 at 5:03 AM.
Reason: Use version 1.2.3 or above
Posts: 14,061
Thanks: 38368 in 178 Posts
Running the TS2GridAdjuster
Before you proceed, I recommend that you backup your save game now, just in case.
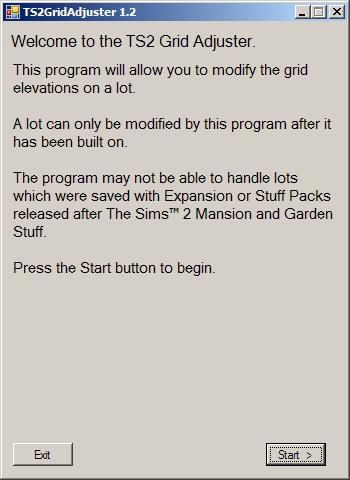
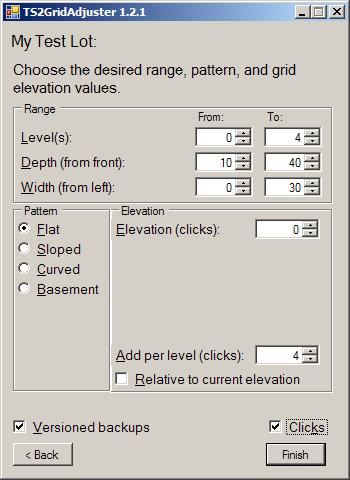
5. Install and run the TS2GridAdjuster V1.2.3 or higher. Click on the Start button to begin.
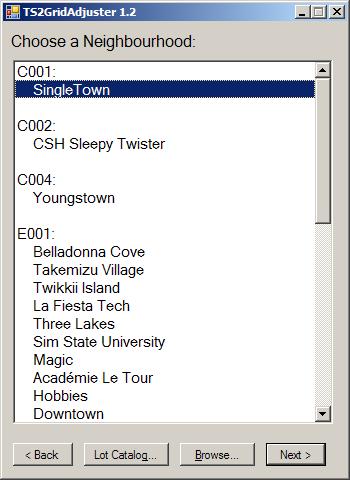
6. Choose your neighborhood on the hood selection screen and then click Next. If your neighborhood is not displayed in the list, click on the Browse button to select your neighborhood package from another location, such as your AnyGameStarter neighborhood.
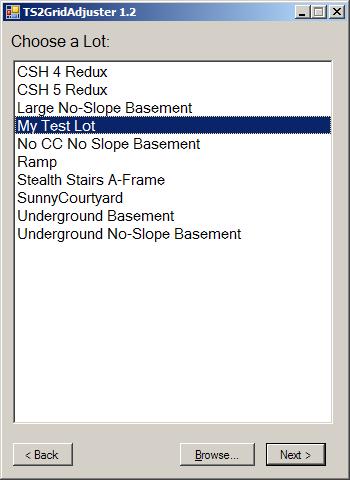
7. Choose your lot from the lot selection screen and then click Next.
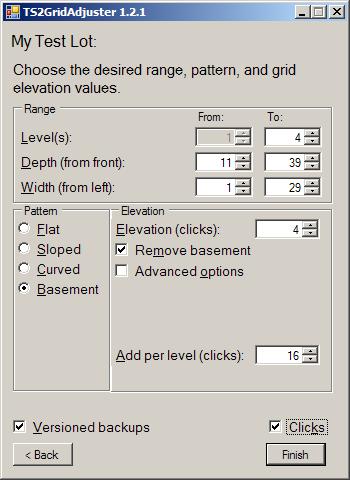
8. Select the Basement pattern in the left pane.

9. Enter the range of the main area in the top pane. These are the values that you counted in step 2.
The default for the basement is 12 clicks below ground, which leaves a standard-height foundation above the ground. However, you can change the Elevation to move the entire house, including the basement, up or down. Just remember that the basement must be below the level of the ground, which is usually at an elevation of 0.
If you are doing multiple sessions, choose Versioned Backups.
Then click Finish.

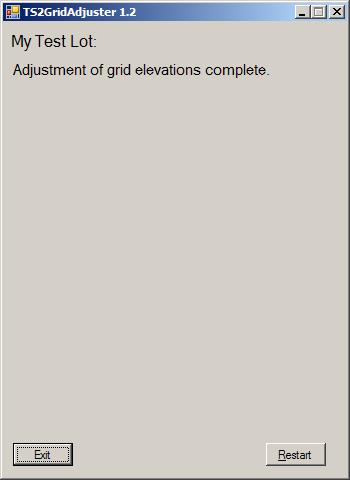
10. You will receive confirmation that the adjustment worked.
The GridAdjuster has handled everything required to make a no-slope basement, including changing the ground and water levels (to ensure that the basement is accessible in the base-game and all EPs), and making the ground invisible (so that you can see underneath the ground to the basement below). As well, it has implemented a workaround that I designed, which resolves several issues that people have had in the past, with lot impostors and the neighborhood terrain.
If your basement is rectangular then click Exit and skip to the next post.
11. For non-rectangular basements, click Restart and select your lot again. Continue with each overlapping section until you are done.


When you're done, click Exit.
30th May 2010 at 4:27 AM
Last edited by Mootilda : 30th May 2010 at 5:28 AM.
Posts: 14,061
Thanks: 38368 in 178 Posts
Finishing Your House
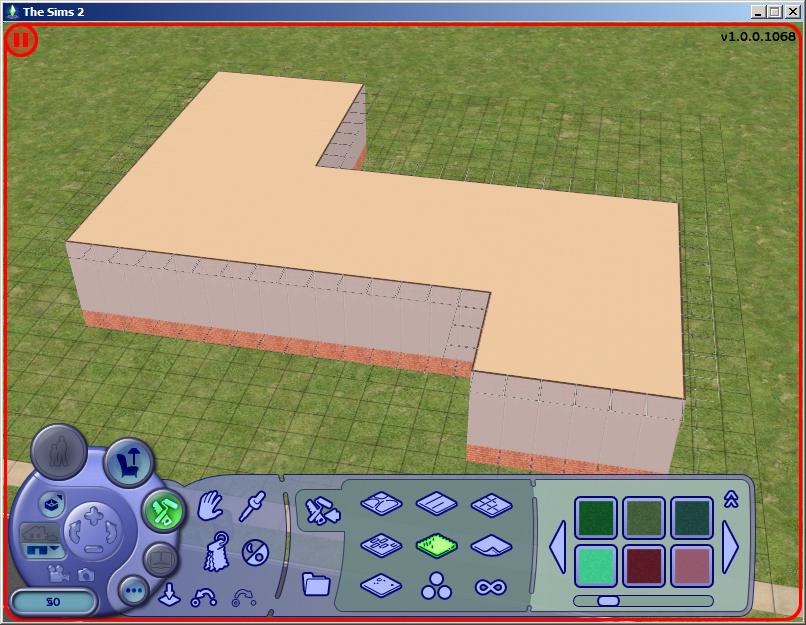
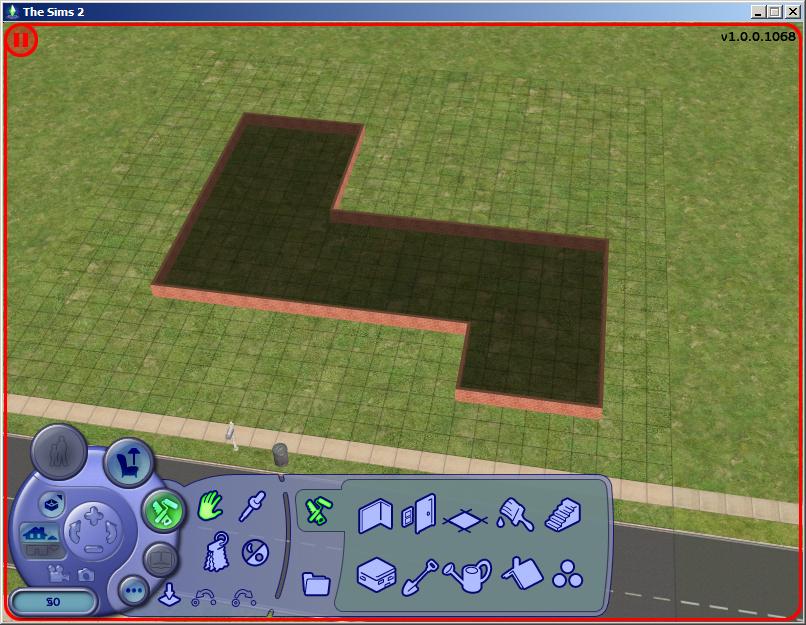
Run the game and edit your lot. You will see that the main floor has been lowered.
Move down a level to see your new no-slope basement.
You can now build on your lot as usual. For example, add flooring, walls, wall coverings, and furniture (see attached pictures).
There are a few caveats:
1) If you place individual pieces of flooring next to the edge on the main floor, you may notice the ground dropping outside. If this happens, undo your action and add flooring in sections (using the <shift> button). Alternatively, you can put in the correct flooring before running the GridAdjuster.
2) You may find it difficult to place things next to the foundation outside on the ground level. If you find this too difficult, you may want to place the items before running the GridAdjuster.
3) You may find it a bit difficult to grab things in the basement, especially in the outside corners. Just move your mouse around and you should be able to find an area where the object is accessible.
4) You may notice small peaks in the grid inside of the basement. This is normal and should not affect your ability to use the basement. These peaks are required to solve several issues with basement lots. They will not be visible during gameplay or if you turn off the grid.
5) The pictures for your lot may seem odd. If this happens to you, you can fix the pictures using this tutorial:
Infobits_-_Changing_Lot_Pictureswiki
30th May 2010 at 4:57 AM
Last edited by Mootilda : 5th Jun 2010 at 2:40 AM.
Posts: 14,061
Thanks: 38368 in 178 Posts
You might be tempted to just restore the standard levels using CFE or the GridAdjuster:
But you'll find that the ground is still invisible and you can't build on it:
To undo everything that the GridAdjuster did when it created your no-slope basement:
A) First, backup your save game.
B) Then, run the TS2GridAdjuster again. Select your neighborhood and lot as you did above, then select the Basement pattern (ie, follow Steps 5 to 8 in Part 2 of the Basement Tutorial).
C) Now, click on the "Remove basement" checkbox. You'll notice that the default elevation changes:
D) Enter the range that you want to change in the top pane. You do not need to be as careful when removing a basement as you were when you added it; in this case, I've just chosen to change the entire lot, excluding the lot edges. However, if sections of your house require different levels, or if your ground or water levels are not flat, then you'll need to choose your range(s) more carefully.
E) The default for the previous basement floor is 4 clicks above ground, a standard-height foundation. However, you can change the Elevation to move the entire house, including the previous basement, up or down. Just remember that the previous basement (level 1) must be above the level of the ground, which is usually at an elevation of 0.
F) Click on Finish to continue.
When you edit the lot in-game, you'll notice that your ground level is visible again.
The GridAdjuster has also restored your ground and water levels, as well as raising the entire house, beginning with the previous basement, to the elevation specified.
30th May 2010 at 4:57 AM
Last edited by Mootilda : 6th Jun 2010 at 6:08 AM.
Posts: 14,061
Thanks: 38368 in 178 Posts
Pattern = "Basement",
Advanced option = "Ground".
In the interim, here are some notes:
- For the base-game, the ground level can interfere with access to objects inside of the basement. Therefore, the ground needs to be dropped inside of the basement so that objects will be accessible. For Mansions and Gardens, that's no longer required. I can't tell you for sure when the restriction was lifted; although I believe that it may be as late as Apartment Life. Even then, the ground level can interfere in some cases.
- To turn off the modification of the ground level, just uncheck the Ground checkbox in the Advanced options. However, you should be aware that this may make your basement unusable. Be sure to test thoroughly before sharing.
- In order to have a no-slope basement, the ground must be high at the outside wall of the basement. Therefore, the ground will have to exist inside the basement for at least one tile around the outside wall. To minimize problems, the TS2GridAdjuster will adjust the ground so that it exists at the correct level outside of the basement, slopes on the outer tile of the basement, then levels off underneath the basement floor. (picture here?) This is the primary "trick" that allows a no-slope basement to exist in the game. This is also the reason that no-slope basements must be at least 2 tiles wide; the ground level needs to slope down from each side. Finally, this is the reason that you should overlap areas when creating a non-rectangular basement; otherwise, the ground level will rise between the two areas.
- The TS2GridAdjuster defaults to a ground level of -175 clicks. I chose this value because it keeps the sloped ground inside of the basement wall itself, minimizing it's impact on the outer tiles of the basement. However, this value only works for basements higher than -16 clicks. For lower basements, such as my multi-level basement, you may need to increase this value. For a basement elevation of -30, I found that a value of -500 was appropriate.
- Need some pictures here which will help you to determine whether the ground level is interfering with your basement.
30th May 2010 at 4:58 AM
Last edited by Mootilda : 6th Jun 2010 at 5:05 AM.
Posts: 14,061
Thanks: 38368 in 178 Posts
Pattern = "Basement",
Advanced option = "Water".
In the interim, here are some notes:
- For the base-game, the water level can interfere with access to objects inside of the basement. Therefore, the water needs to be dropped inside of the basement so that objects will be accessible. For Mansions and Gardens, that's no longer required. I can't tell you for sure when the restriction was lifted; although I believe that it may be as late as Apartment Life. Even then, the water level can interfere in some cases.
- To turn off the modification of the water level, just uncheck the Water checkbox in the Advanced options. However, you should be aware that this may make your basement unusable. Be sure to test thoroughly before sharing.
- To minimize problems, the TS2GridAdjuster will adjust the water level so that it starts to slope one tile outside of the basement, then levels off underneath the basement floor. This means that the pond water will not exist inside of the basement. However, this also means that pond water may not exist on the tile just outside of the basement. (picture here?)
- The TS2GridAdjuster defaults to a water level just underneath the new ground level. This is the minimum change required so that no-slope basements will work for any configuration of EPs and SPs. There will normally be no reason to change this value to anything other than the default; however, the GridAdjuster gives you the ability to change this value, if you want.
- If you use the LotAdjuster to shrink a lot to within one tile of a no-slope basement, it will raise the water level at the edge of the lot. This is required to ensure that pond water doesn't overflow the edge of the lot. However, this means that the tiles at the edge of the basement may now have problems. If this occurs, just run the TS2GridAdjuster again with your original Basement parameters and it will fix the problems.
- There are two types of water in the game. One is the pond water, which the GridAdjuster will change for you. The other is the neighborhood water, which cannot be changed. If you see water in your basement, you've probably placed the lot in a location in the neighborhood which is too close to the neighborhood water level. Try moving the lot to a higher location.
- If you specify a water level which is higher than the ground level, you may find fish in your basement. If this isn't what you want, then be sure that the water level matches the ground level.
2nd Jun 2010 at 1:13 AM
Last edited by Mootilda : 6th Jun 2010 at 1:30 AM.
Posts: 14,061
Thanks: 38368 in 178 Posts
Pattern = "Basement",
Advanced option = "Skip major vertices".
There are two possible problems with basements where the ground level is reduced below a relative elevation of 0:
1) The lot impostor (view of the lot from the neighborhood) may show a "canyon" beside the house, rather than the ground. (picture here?)
2) When you move such a lot, the neighborhood terrain may be deformed. (picture here?)
The solution that I devised for these two problems was to avoid lowering the ground at the major vertices on the lot. You may notice this as "peaks" inside of the basement, when the grid is turned on. (picture here?) However, you will not see "peaks" when the grid is off, or when you are actually playing a family.
This workaround seems to completely resolve both problems without interfering with your sim's use of the basement. However, the GridAdjuster gives you the option to turn off this workaround if you find that it is a problem.
Technical Explanation of Lot Impostor Problem (1):
As far as I can tell, the game creates the appearance of the ground for the lot impostor by extrapolating between major vertices on the lot (ie, the neighborhood vertices). These major vertices occur at every 10 tiles on the lot; which is why your neighborhood says that a lot is 3x3 when it really has 30x30 tiles.
When the ground level for the lot edge is at 0 and the ground level for the next vertex in is lower than 0 (as occurs with a basement), the game just assumes a gradual slope, rather than a sharp slope followed by a level area. This leads to the game assuming that you have a canyon next to your house. (picture here?)
Please note that this problem occurs for both sloped and no-slope basements.
Technical Explanation of Neighborhood Terrain Problem (2):
With some EPs, the neighborhood terrain underneath a lot is deformed by the lot terrain. When you move a lot, the neighborhood terrain may remain deformed. Since the ground level is moved very low underneath a no-slope basement, you can end up with canyons in your neighborhood.
The neighborhood terrain only really exists at the major vertices of your lot, so keeping the major vertices of the lot at a reasonable elevation ensures that the neighborhood terrain can heal itself when a lot is moved.
6th Jun 2010 at 5:11 AM
Posts: 14,061
Thanks: 38368 in 178 Posts
8th Jun 2010 at 4:05 AM
Posts: 2,278
Thanks: 81060 in 118 Posts
This is the first time I've tried to use the GridAdjuster and I'm running into some issues. I'm not sure if I simply can't do what I'm trying to or if I'm just doing it wrong. I hope you don't mind a few questions and thanks in advance for your help--I appreciate it.
What I want:
House built on a 3/4 foundation with attached garage.
What I did:
1. Laid out the foundation including the wall sections for the attached garage.
2. Grid Adjuster:
level 1 to level 1
0 to length
0 to width
clicks 3
3. Finish building attached garage--so far so good. (pic 1)
But when I exit the lot and re-enter the wall heights are changing. The garage walls with the doors are 1 click lower (15 clicks instead of 16) and the wall segment above the doors are 1 click higher (4 clicks instead of 3). I didn't realize what happened at first so I started over a few times and the same thing happened. (pics 2-4)
Sims can still use the garage and I like the overall look of the 3/4 foundation enough to use it anyway--but is there a way to fix it?
If there isn't a way to fix it do you know--or think--there's any harm (other than cosmetic) to using the house as is? I usually upload my lots so I'd hate to mess up anyone's game.
P.S.
The fireplace chimney has a gap because of the 3/4 foundation. It works fine but I thought I'd mention it, again, on the off chance there's a step I can do to fix it. (pic 5)
8th Jun 2010 at 6:24 AM
Last edited by Mootilda : 8th Jun 2010 at 2:52 PM.
Posts: 14,061
Thanks: 38368 in 178 Posts
I wouldn't share the lot in this condition. At the very least, walls which are not exactly 16 clicks high will not be weather-proof. This can also affect the ability to place furniture and sim's ability to use the room. I can't help but believe that the lot can be fixed.
Have you tried running the GridAdjuster to set the elevation of level 1 to 16 clicks in the various places where the problem is occurring?
That's odd about the fireplace. I'm not sure what to suggest. Have you tried taking the fireplace out and putting it in again? How about enclosing it in brick walls?
[Update:]
I've been thinking about this... I assume that you are aware that the game doesn't really like to make walls which are less than 4 clicks high.
Since you set the entire first level to 3 clicks, there must have been some point at which you were trying to create 3-click high walls on the second level from within the game. However the game will not allow you to make 3-click high walls. Instead, when you tried to level the upper walls to 3 clicks above the lower walls, the game would have lowered the lower walls by 1 click in order to make the upper walls 4 clicks high.
If you're going to use the GridAdjuster to get around this 4-click limit, you may have to use it again after doing any in-game leveling.
Does that make sense?
8th Jun 2010 at 7:36 AM
Posts: 2,278
Thanks: 81060 in 118 Posts
This was supposed to be a nice, simple build to get the hang of using the GridAdjuster. I might be able to "detach" the garage and use CFE using the normal foundation size and then just use a slopping wall and a square of dead space in between that just makes it look like they connect--but that's probably not any better. If I figure out a solution I'll be sure to post it but I don't think this house really merits this much effort so I'll probably raise the foundation back up to normal and call it a day.
Thanks again for trying to help and for the tool. Even though it hasn't worked out for me (yet!) I love what you're able to do with your basegame houses--so much so I was lured back after a six month break to try it out.
8th Jun 2010 at 2:51 PM
Last edited by Mootilda : 8th Jun 2010 at 4:09 PM.
Posts: 14,061
Thanks: 38368 in 178 Posts
I have many many lots which have walls which are between 0 and 3 clicks and the game never forces them to 4 clicks unless I use CFE to level an area.
So, your technique was almost correct. There's only one change: use the GridAdjuster, rather than CFE, to level the top floor after raising the lower walls for the garage and doors; this will allow for 3-click walls on the second level.
Actually, there may be another issue: the game may also try to change the wall heights back to 4 clicks if you place individual floor tiles next to a wall. I tend to place flooring over an entire area using the <shift> key, which convinces the game to leave the walls where they are.
Since you used CFE, you now have walls which are 15-clicks high. The GridAdjuster can permanently fix those for you. The game will not adjust the level of walls between exiting and entering a lot.
8th Jun 2010 at 10:24 PM
Last edited by Honeywell : 8th Jun 2010 at 10:38 PM.
Posts: 2,278
Thanks: 81060 in 118 Posts
I used CFE to attach the walls and GridAdjuster to level them. (pic 1) Then I added the doors, saved and re-entered the lot to double check the levels and everything still looks good. (pic 2-3) After reading your post again I went back in to add floor tiles--it was a non-issue for me, the walls stayed at 3 clicks. (pic 4)
It's actually really easy to do and since I like the 3/4 height foundation so much I can see myself using the GridAdjuster all the time just for this.
3/4 Height Foundation w/ Attached Garage
What I did that worked leaving out all the mistakes

1. Laid out the foundation including the wall sections for the attached garage. Used CFE to attach the walls to the foundation but didn't use it to level anything.
2. GridAdjuster:
level 1 to level 1
0 to lot depth
0 to lot width
clicks 3
3. Build the walls including walls for the attached garage. Delete the bottom sections of walls for your garage doors and using CFE replace those walls like normal. Don't use CFE to level the walls--leave them messed up.
4. GridAdjuster:
level 2 to level 3
from 0 to lot depth
from 0 to lot width
clicks 19
That's it--you're done. I think just using steps 2 & 4 on an existing house with an attached garage might work too but I don't have the time to check it out today.
ETA:
I can't believe I typed all that out and forgot to thank you! I really appreciate you taking the time to help me figure out what I was doing wrong.
8th Jun 2010 at 11:03 PM
Posts: 14,061
Thanks: 38368 in 178 Posts
Did you sort out the problem with the fireplace?
|
Page 3 of 7
|