Tutorial: Adding a subset to an object (and making it recolorable)
11 Attachment(s)
TUTORIAL: ADDING A SUBSET TO AN OBJECT (AND MAKING IT RECOLORABLE)
Credit to Numenor for providing most of this information
What you need for this tutorial: - SimPE (latest version) - CEP, latest version (if you add a recolorable subset to an object that originally has none) - Basic knowledge of SimPE and creating a custom object Reasons you may want to add a new subset to an object: - Being able to have both solid and translucent parts in an object that originally only had one mesh subset without having the solid parts "bleed" through. - Having subsets with different materials: one shiny and one matte, for example. - Being able to recolor parts separately. (Note: You can only have a maximum of two recolorable subsets, with the exclusion of slave subsets which are not covered here, to an object, even though you can have more non-recolorable parts.) This tutorial does not cover the routine steps of creating an object, but only adding a new subset. It also does not cover mesh editing for the new subset. You edit the mesh subset like any other mesh in your 3D editing program, and make sure the dimensions and placement of the new subset match the other subset(s). STEP 1: IMPORTING THE MESH SUBSET - Open your object package in SimPE. In Geometric Data Container, import your subset as a separate mesh subset the same way you import any mesh, but give it a new, informative name that separates it from the existing subsets in the package. Don't try to create another Geometric Data Container, but rather import the subset to an existing one.If you're adding a subset made of glass, for example, then name it "glass". Just make sure never to use the underscore when naming the mesh (so, no window_glass). For this tutorial, I'm adding a separate subset called "fabric" to a dining chair that previously has a subset called "wood". After you've imported the new subset, click Commit. 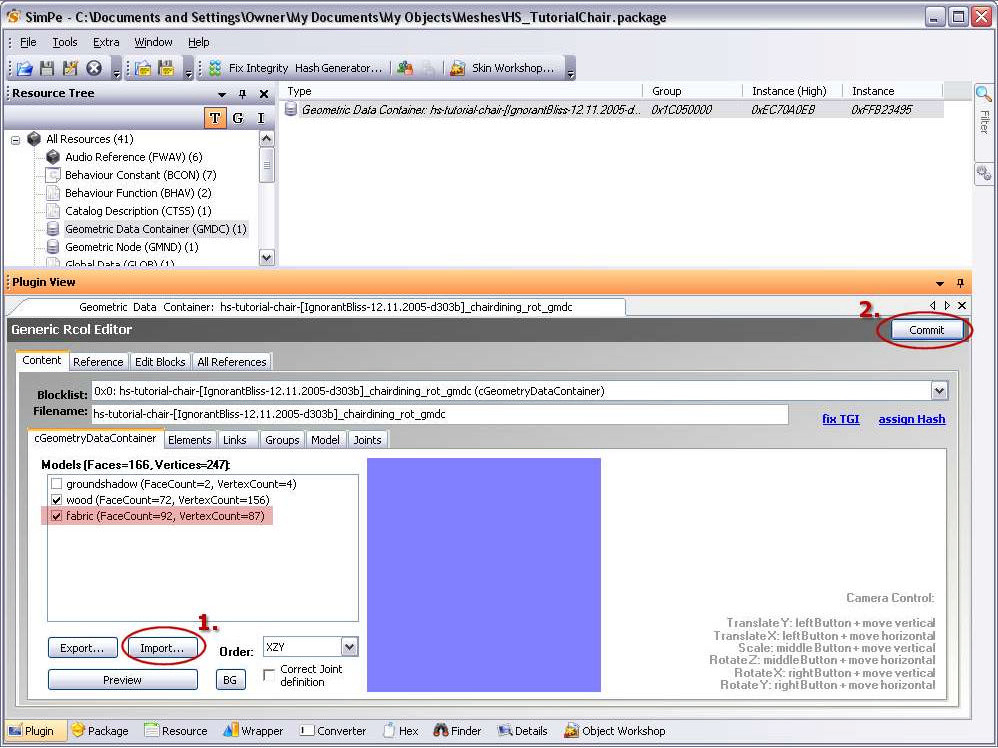 STEP 2: ADDING A TEXTURE IMAGE (OPTIONAL) - This step is only necessary if your new subset needs its own, new texture. The other options are to either use an existing texture in the package (this will be explained later on), or to have no texture for the subset at all (as with untextured glass, for example). - The easiest way of adding a new texture image is to clone a Texture Image file already in the package. (As an alternative, you can also Add one that's been extracted from another package.) - To clone, right-click on an existing Texture Image file in the package (but not the shadow ones), and choose Clone. A new file will appear on the list. - Rename the texture image file, but leave the txtr-extension untouched. Edit only the end of the filename (as highlighted in the screenshot) to fit your texture. In the example I changed the "cherry" of the original wood texture name to "lavender" for the fabric subset.
- Import your new texture image and click Commit. 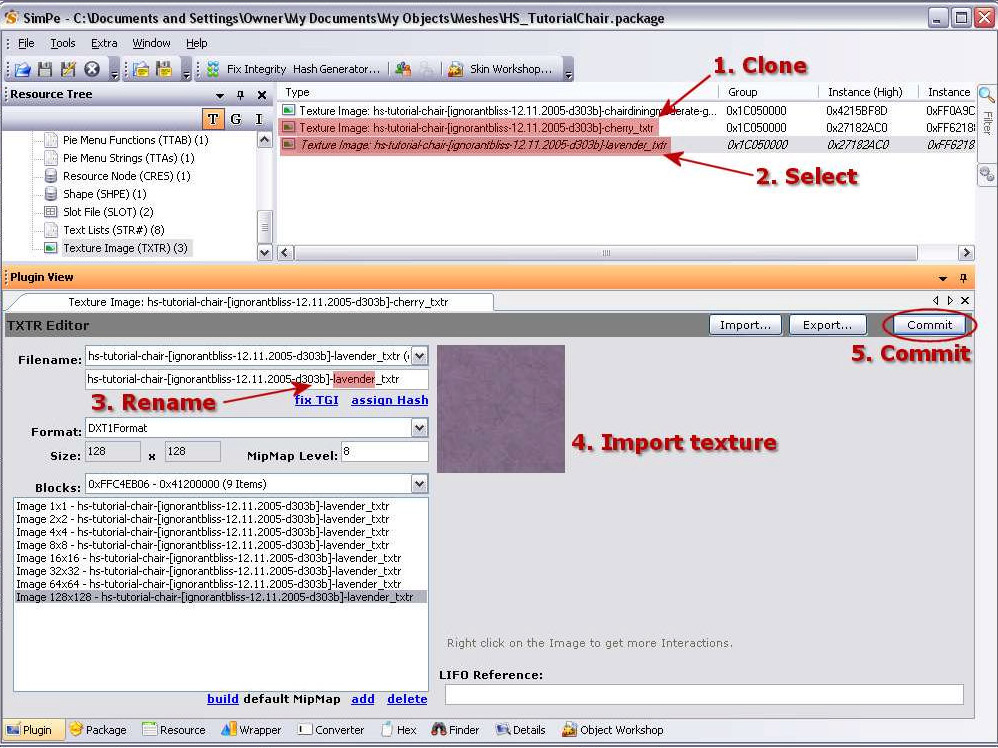 STEP 3: ADDING A MATERIAL DEFINITION - Your new subset needs its own Material Definition. You can either clone a Material Definition file already in the package, or extract one from another package and add it to this one. - To clone, right-click on an existing Material Definition in the package (but not the shadow ones), and choose Clone. A new file will appear at end of the list of Material Definitions. - Click on the new Material Definition and rename it in the Filename box. The word after the first underscore should be the name of the new subset from step 1 ("fabric" in the example), and the word after that should be the name you gave to the texture in step 2 ("lavender" in the example). If your subset has no texture, you only need the subset name in the filename. If your subset uses the same texture as the subset whose Material Definition you cloned, you can leave it as it is and only change the subset name. - If, instead of cloning, you Add a Material Definition extracted from another package, like you may want to do when you add a glass subset, for example, rename the whole filename to match the others in the package, and the last part of the name as explained above.
- Then, if your subset has a new texture, in the Properties tab, click on the line called "stdMatBaseTextureName". This points to the Texture Image that you added for the subset, and you have to make the value match the Texture Image filename (plus the ##0x1C050000! prefix and minus the _txtr suffix). If you cloned a Material Definition, you will only need to change the end of the file name (from "cherry" to "lavender" in the example). Edit the name in the Value box on the right. Click Commit. - If your subset uses the same texture as the one you cloned the Material Definition from, you can leave the texture references as they are. If your subset has no texture at all, then you can skip this part also.
- Click on the File List tab. 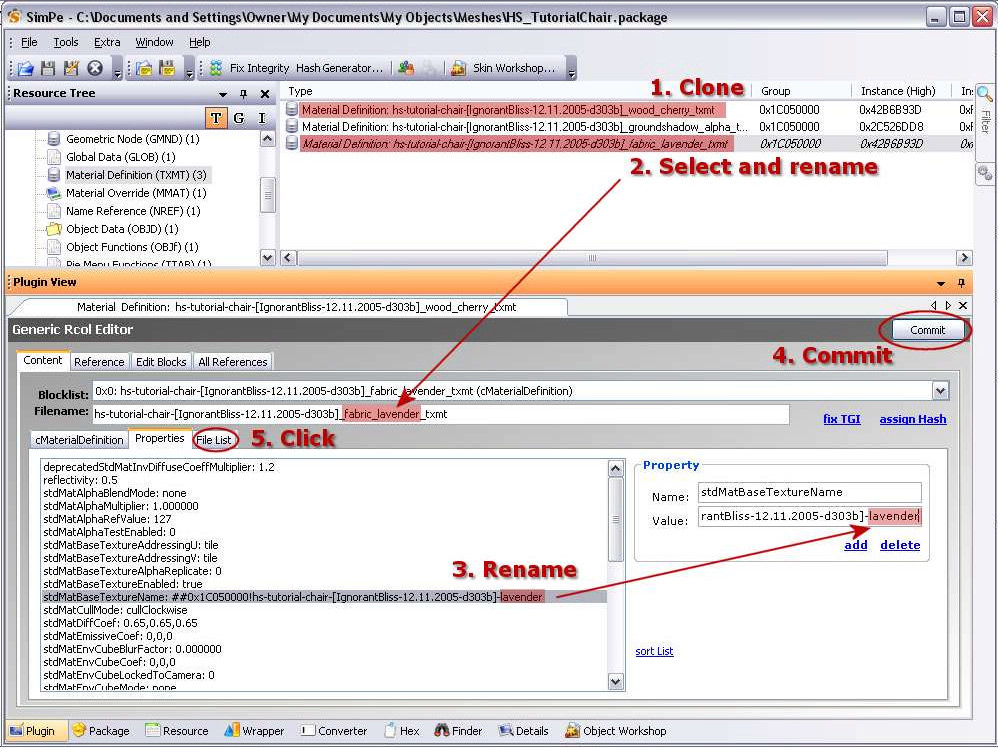 - In the File List, the name on the list has to match the texture name reference in the "stdMatBaseTextureName" value in the properties (so, the Texture Image name plus the ##0x1C050000! prefix and minus the _txtr suffix). Click on the file name, edit it in the Filename box on the right and click Commit. 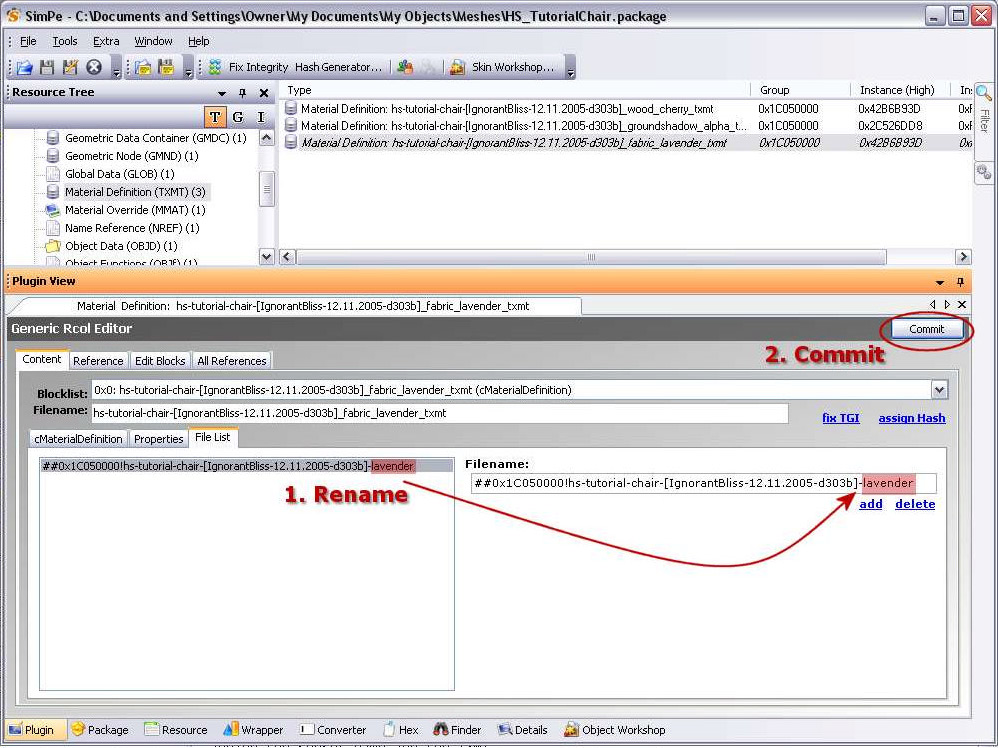 STEP 4: EDITING THE SHAPE - Open the Shape, and the Parts tab under the Content tab. - You will have to add a new entry for your subset and make it point to the right Material Definition. To do this, click Add, then click on the new line that appears on the list (with just a colon : at this point) to make it active. - To the box called Subset Name, enter your subset's name ("fabric" in the example), and to the box called Material Definition file, enter the name of the Material Definition file name you created in the previous step, but without the _txmt suffix, and with the ##0x1C050000! prefix ("##0x1C050000!hs-tutorial-chair-[IgnorantBliss-12.11.2005-d303b]_fabric_lavender" in the example) - IMPORTANT! Perform a "Fix Integrity" and save the package.  If you don't need your new subset to be recolorable, you're done. You can test your object in the game to make sure it works correctly. If you want to make it recolorable, continue with the tutorial to step 5 and forward. (Note that an object can only have two recolorable subsets at most! If your object already has two, you can't add another one.) STEP 5: EDITING THE GEOMETRIC NODE - Open the Geometric Node and, on the pulldown list for the Blocklist, select the line called "tsDesignModeEnabled". - In the cExtension tab, on the list called Items are listed the recolorable subsets of the object. (If there already are two, you can't add a third one.) To add another one, click on Add, then click on the new line on the list to make it active, and write the name of your new subset ("fabric" in the example) to the Name box, and click Commit.  STEP 6: ADDING A MATERIAL OVERRIDE - Open the existing Material Override file, right-click on it and choose Clone. The new one will appear at the end of the list. Open the new one. - Click on the line called "family" and open up the Hash Generator (under Tools -> Object Tools). Check the GUID option, then copy and paste the Hash Value to the Value box for the "family". Click Commit. Close Hash Generator. 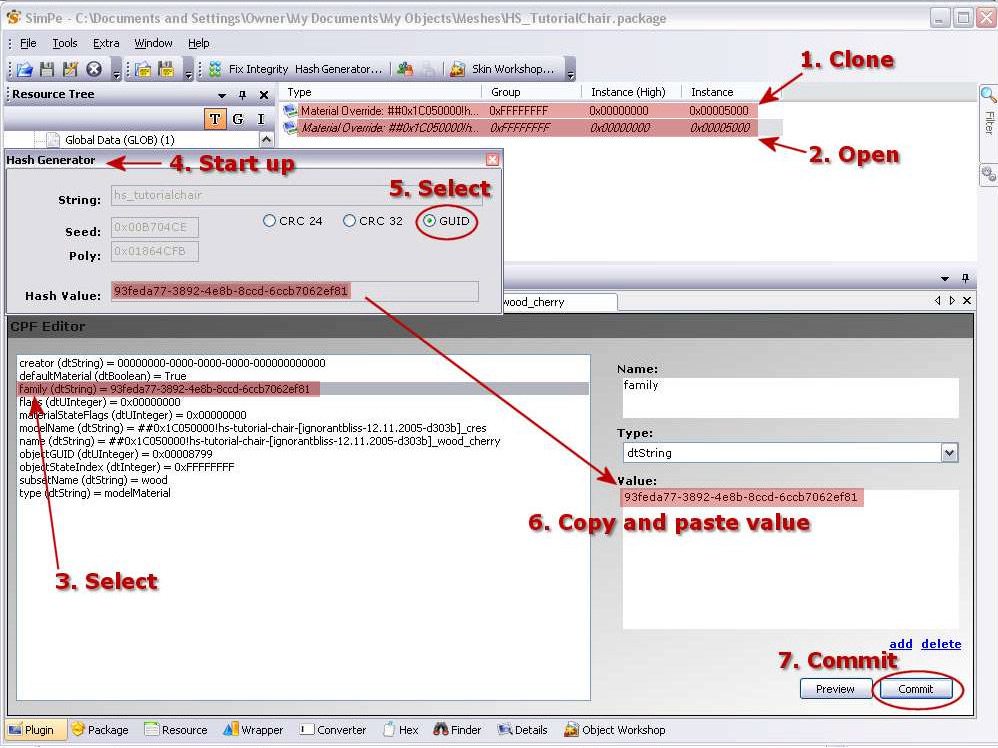 - Click the line called "name" on the list, and edit the Value in the box on the right to match the Material Definition filename of your new subset (plus the ##0x1C050000! prefix and minus the _txmt suffix). Click Commit. 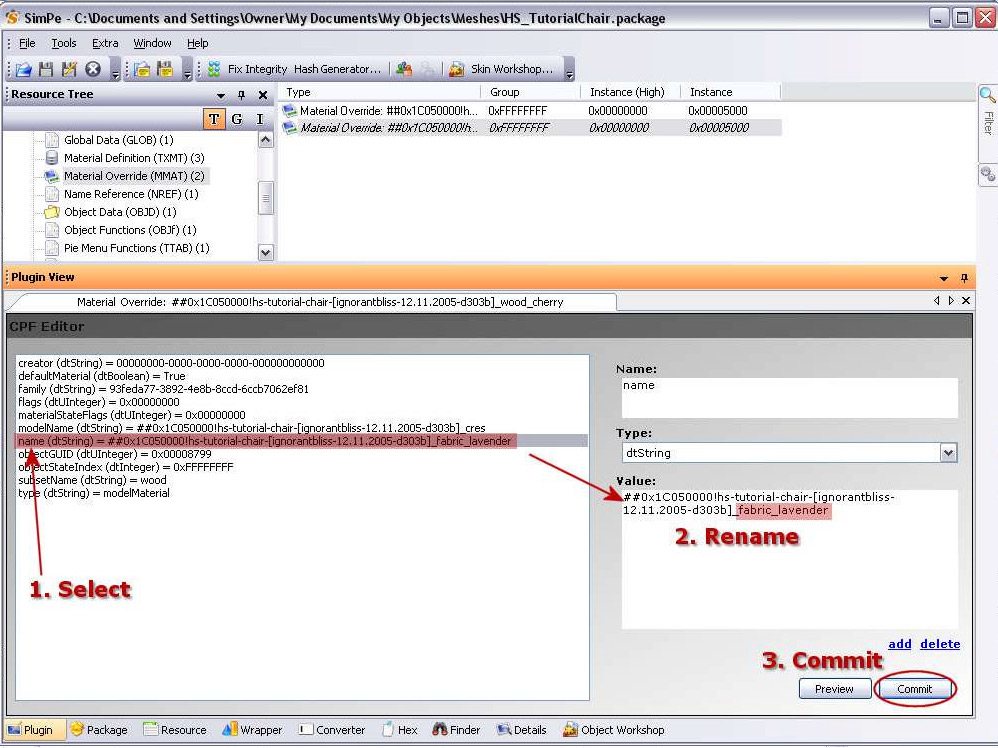 - Click on the line called "subsetName" on the list, and rename its value to be the name of your new subset. Click Commit.  - IMPORTANT! Perform a "Fix Integrity" and save the package. Now your new subset should also be recolorable! Try recoloring it with Object Workshop and put it into your game! ------------------------------------------------------------------------------------- OTHER USEFUL RESOURCES Object Creation Workshop and Repair Center Invisible and flashing blue custom objects: Check List - Beginner Level - by Numenor Recolouring object with Object Workshop - Beginner Level - by Numenor Enabling transparency on textures - Beginner level - by Mike190870 Understanding the TXTR and the MipMaps - Intermediate Level - by JWoods ------------------------------------------------------------------------------------- ---------- Tutorials:Adding_a_subset_to_an_object_and_making_it_recolorablewiki |
Good job! After so many requests, I guess that this tutorial will be extremely useful for many users.
(Thread moved to the Tutorial forum) |
I just wanted to say thank you SOOOOOOO much for pulling all this info together in a tutorial - it's exactly what I needed!! (probably just my vision but I couldn't find the "thanks" button even though I can see you've been thanked??) Great Job!
|
The "Thanks" button has been moved near the "Quote" one, in the Tutorial forum.
|
And "thank you" Numenor for that info!! :wave: My screen doesn't fit the window right and I never would have seen the button without scrolling all the way over to the right. Alot of work goes into these tutorials and I always like to say thanks - to bad it won't let you say thanks more than once because I'm really, really, really thankful for most all of them.
|
Quote: Originally posted by Little_Tx_Mama
One thanks is enough, I appreciate it :D. Yeah, I figured the large screenshots might be a problem for smaller screen resolutions. If people find the horizontal scrolling to be too annoying, I will have to remake the screenshots. Resizing the current ones doesn't work very well, the small text goes blurry. |
A suggestion: create a thumbnail version of each screenshot (reducing them by 50%) and edit the in-text links with the following syntax:
[_URL=http://.....MainImage.jpg_][_IMG_]http://....Thumbnail.jpg[_/IMG_][_/URL_] (Obviously, remove the underscores when using this syntax  ) ) |
Thanks for the tip, I did that, hopefully it's now more pleasant to view with smaller screen resolutions
. |
Thank you so much! I'm starting to play with transparancies so this will definitely come in handy!
|
Thanks IgnorantBliss for the tutorial. This is what I was exactly looking for!!
And thanks for all your other hint's and tip's. They have come in very handy!! Great JOB! Regards Simnuts |
Hi IgnorantBliss!
Just wanted to let you know that I went through your tutorial. WORKS GREAT!!!! Easy to follow instructions, only went through it once, and my object worked perfectly!! Thanks again!! |
Quote: Originally posted by simnuts101
That's great news! I'm glad to hear it's easy to follow, since it's only the second tutorial I've ever written . |
Thanks....
Thanks for this tutorial....I did it. My little project became a reality with help from this tutorial :salute:
(I wasent able to find the thanks button either...hmmm :banghead: ) Line |
In the Tutorial forum, the "Thanks" button is located at the ond of the Post #1, near the "Quote" one.
|
Just like to say thanks for the tutorial, you saved my computers life, as it was nearly going out the window! luckily my new meshed object finally works! ^.^
|
Quote: Originally posted by krusty
 Well, I'm certainly glad to hear I helped save a life! Well, I'm certainly glad to hear I helped save a life! |
IgnorantBliss: You're a blessing!!! You've done a great job here. I've not followed it yet, plan to this week but I'm notoriously late, fair warning. I do however have my subscription set up with this thread as that will assist my memory and encouragement.
This is definitely something I hope to be able to do! I've needed it several times and just wound up picking through objects until I found one that seemed closest in ALL ways.. Of course you know what this means? More object repair lol. Maybe not. I try to work it out myself first. It also means maybe some nice new stuff Thank you much! xts |
I do have a new (for me at least) question. But first, clicking that thanks button was just not enough. I am so pleased to be able to do this. I added some colored glass to a bed frame and I love the result. Thank you. Thank you. Thank you.
I was wondering if I added more than one material definition could my object have a choice of colors for the glass? Not the bed of course but objects that only have one other color choice. |
Quote: Originally posted by Mage
Yes. If you add the glass subset like advised in the tutorial, but don't add any texture to it (you could copy the material definition from a glass part of another object, like a window), then go through the last part (last 2 steps) of the tutorial about making the subset recolorable, the glass should be recolorable without a texture. You will notice that the Material Override points to the Material Definition, not a texture, so it's the Material Definition that matters. |
Obviously, if the object (like the bed that Mage mentioned) already has two recolourable subsets, no colour options are allowed for a third subset.
|
1 Attachment(s)
Me again. I am having fun. But.
I made a dresser from the "Anti-Quaint-ed" Armoire. I didn't exactly add a subset I changed the material definition of the "drawerhandle" subset so that it is now blue glass, no texture. In the original the drawer handle uses the same texture as the main armoir, so it did not have a second color option. I thought by following your steps 5 and 6 I could make this subset be recolorable, but after doing it three times without success I'm starting to suspect there is something wrong with that premise. I could make the drawer handle back into the handle and add another subset for my recolorable glass, I guess? Or could I delete the drawerhandle subset and add the glass. Or just rename it? Ok, obviously I'm clueless and need expert advice. I'm including the object and the recolor I tried to make, in case you want to see it. Thanks. |
Mage, I will take a look at your package as soon as I can, but it's going to be a few more hours since I'm doing a nightmarish 24-hour shift at work
. Will report back to package fixing duty tomorrow :salute: |
Oh boy, that sounds quite demanding. You'll need a long sleep when you get home. I am in no hurry. Thanks.
|
Mage, I think the problem is an incorrect subset name both in GMND and MMAT. The name of the handle subset is armoirequaint_drawerhandle, not just drawerhandle. That subset name needs to go into the Design Mode Enabled list in GMND and also the subset name in the MMAT for the handle. Since that subset name by Maxis has the dreaded underscore in it, the other alternative is to change the subset names in the Geometric Data Container and Shape just drawerhandle and leave the aforementioned (GMND and MMAT) names as they are, since they would then match the GMDC and Shape again.
(I just tried the latter suggestion myself, and when I choose to recolor that armoire mesh now, it gives me the option for two subsets .) |
Did you get any sleep yet? The reason I ask is that it's 7:00 am here and I didn't expect to hear from you already.
I do kind of remember seeing the armoirequaint_drawerhandle. I'll try your suggestion right away. Thanks. |
| All times are GMT +1. The time now is 8:46 PM. |
Powered by: vBulletin Version 3.0.14 · Copyright ©2000 - 2024, Jelsoft Enterprises Ltd.
 This tutorial is also provided in PDF format. To view it, we strongly suggest to download the
  Hint: If you clone the texture image from a solid subset to a subset that is partially transparent, you will have to change the Format to DXT3 from DXT1 upon importing a texture that uses alpha for transparency, because DXT1 doesn't support alphas.