 Sign in to Mod The Sims
- Site Map >
- Modding and Creation >
- Sims 3 Creation >
- CAS Parts >
- my cc has weird textures on it and it clips where it doesn't in TSR workshop
- Site Map >
- Modding and Creation >
- Sims 3 Creation >
- CAS Parts >
- my cc has weird textures on it and it clips where it doesn't in TSR workshop
#1
 31st Dec 2023 at 6:05 AM
31st Dec 2023 at 6:05 AM
Posts: 45
my cc has weird textures on it and it clips where it doesn't in TSR workshop
It has weird textures on it and it clips where it doesn't in workshop 
https://www.mediafire.com/file/on36..._my_cc.rar/file
Advertisement
#2
31st Dec 2023 at 6:42 AM
31st Dec 2023 at 6:42 AM
Posts: 484
Thanks: 10 in 2 Posts
What clone/donor hair did you use to create these? I've never seen hairs with Bone Delta (BOND) resources, which these have and could be moving the mesh in unwanted ways unless you implemented them yourself.
Otherwise it is likely bone assignment/morph issues causing the clipping.
The texture shadowing can be from missing or leftover clone textures, or mismatched GEOM texture data.
Not sure how to fix that in TSRW, but because these are single-mesh hairs (unlike hats with visible hair) you can always export the parts and reassemble them in DABOOBS. They wont be CASTable, but if you include every single texture the tool asks for, it will eliminate this issue.
Otherwise, my hat-hair tutorial won't be released for a while so we may have to wait for those more familiar with TSRW to weigh in.
Scribe of tutorials. Oracle of questions at NRaas. Blog staller at thecardinalsims. Feel free to @ me for input on any TS3/TS4 modding questions.
#3
31st Dec 2023 at 2:02 PM
31st Dec 2023 at 2:02 PM
Posts: 45
Quote: Originally posted by CardinalSims
|
What clone/donor hair did you use to create these? I've never seen hairs with Bone Delta (BOND) resources, which these have and could be moving the mesh in unwanted ways unless you implemented them yourself. Otherwise it is likely bone assignment/morph issues causing the clipping. The texture shadowing can be from missing or leftover clone textures, or mismatched GEOM texture data. Not sure how to fix that in TSRW, but because these are single-mesh hairs (unlike hats with visible hair) you can always export the parts and reassemble them in DABOOBS. They wont be CASTable, but if you include every single texture the tool asks for, it will eliminate this issue. Otherwise, my hat-hair tutorial won't be released for a while so we may have to wait for those more familiar with TSRW to weigh in. |
I used the hot dog hat from seasons. Also i have no idea what u mean about exporting parts and reassembling them or them being 'CASTable' lol, im a new cc maker
#4
31st Dec 2023 at 7:44 PM
Last edited by LadySmoks : 31st Dec 2023 at 8:01 PM.
31st Dec 2023 at 7:44 PM
Last edited by LadySmoks : 31st Dec 2023 at 8:01 PM.
Posts: 865
Quote: Originally posted by Karuttiae
| I used the hot dog hat from seasons. |
That may be part of your problem. I took a look, and it appears that you transferred bones from the donor to your mesh. For whatever reason EA had, they used 23 bones on the hotdog hat, most of which are unnecessary. Using MTK to transfer bones will be impossible, because of the folds in the hats. You will need to hand paint the mesh. As I see it, you only need 6 bones. head new, spine 2, left and right clavicle and left and right cheek. Maybe, with head dome. I do not know if @CardinalSims tutorial covers painting, but there are several on Youtube, if it does not. Once you understand the basics, I can help a bit more with that.
Making morphs is another small project. You will need to combine several .wsos. 1st, open EA af bra, or nude top and export the .wsos. Next, open make up> af> face. Export all .wsos for just L0 (I guess). Use MTK> TSRW Tools> FrankenMesh, and combine all of the head .wsos (yes, 3 at one time, then combine that one to the last head part. Then combine that to the bra/ nude top. IGNORE any warning pop ups about morph matching and number of bones. Use this new combination .wso only for morphing your hat. It won't work to transfer bones. There may actually be an EA hair that might work, but you would need to dif thru them, unless CardinalSims knows of one that might work.
As for texture shadows, you must replace texture images in the TSRW mesh tab. Click the mesh tab and open the drop down next to "very high level of detail". Open the first LOD. You see "Materials". Move the pointer to the right and click. 3 dots show. Click the dots. New window. Click right of the first image. Now click Edit. New window. Top right, click Browse. New window. Click each line until you find your texture, then done. You do not need to replace both alpha and diffuse maps. Replace one, and TSRW auto replaces the other. Repeat this for the specular. For the normals map, you need to make one and import it. If you do not replace the normals map, the old map will leave shading on your project. I do not have time to go over making a normals map right now. One way to cheat, is to open a shoe in TSRW. Most EA shoes use a small 8 x 8, non texured normals map. Export that, then import it to your project. Once the normals map is in the project, it will show in the Browse list. You should set mesh textures for all LODs. Yes... a PITA!
Also, @CardinalSims you may wish to think of this project more as a normal hair and be able to help more than I. The "hat" completely replaces the hair, and is not hair with a hat on top. I looked at both TSRW and s3oc, and both list BONDs. Why EA has BONDs for the hotdog hat, is anyone's guess! They might do it with other masks, or the llama head too?
Shiny, happy people make me puke!
#5
31st Dec 2023 at 11:26 PM
31st Dec 2023 at 11:26 PM
Posts: 484
Thanks: 10 in 2 Posts
I can't seem to get manual bone assignments to behave themselves when I do so in Blender, so I definitely hand off that one to more specific tutorials on the subject.
You may be able to combine a couple EA meshes to start with until you're confident doing that, though.
I do make my morphs manually though, so that is always an option and is less intimidating than it seems! I cover it here if you skip the LOD section, and you can freely use that method after you've done 99% of everything else in TSRW. The morphs get injected right into the package with MTK.
What I referred to before was that you could use the program I linked (Delphy's Barbershop, known as DABOOBS) to assemble these hairs for you instead of TSRW, but it requires the meshes loose in GEOM format rather than .obj or .wso. You can export the GEOM out of the packages you already made if you wanted to skip all the steps involved in exporting them out of Blender again.
Then you just open that program and it guides you through all the steps. It usually isn't used for hats because the program can't make 2-group hairs (one group for the hat, one group for the hair), which isn't an issue with your items because they have no hair showing.
CASTable refers to something being compatible with Create a Style, where you can recolour and apply patterns to things. That won't be available by default if you use DABOOBS, but if you get the hair working and otherwise looking the way you want I could guide you through the steps to adding that functionality.
If any/all of that is confusing, feel free to skip it and continue as normal The alternatives will be there as needed.
You may be able to combine a couple EA meshes to start with until you're confident doing that, though.
I do make my morphs manually though, so that is always an option and is less intimidating than it seems! I cover it here if you skip the LOD section, and you can freely use that method after you've done 99% of everything else in TSRW. The morphs get injected right into the package with MTK.
What I referred to before was that you could use the program I linked (Delphy's Barbershop, known as DABOOBS) to assemble these hairs for you instead of TSRW, but it requires the meshes loose in GEOM format rather than .obj or .wso. You can export the GEOM out of the packages you already made if you wanted to skip all the steps involved in exporting them out of Blender again.
Then you just open that program and it guides you through all the steps. It usually isn't used for hats because the program can't make 2-group hairs (one group for the hat, one group for the hair), which isn't an issue with your items because they have no hair showing.
CASTable refers to something being compatible with Create a Style, where you can recolour and apply patterns to things. That won't be available by default if you use DABOOBS, but if you get the hair working and otherwise looking the way you want I could guide you through the steps to adding that functionality.
If any/all of that is confusing, feel free to skip it and continue as normal
 The alternatives will be there as needed.
#6
1st Jan 2024 at 6:36 PM
1st Jan 2024 at 6:36 PM
Posts: 865
Quote: Originally posted by CardinalSims
|
I can't seem to get manual bone assignments to behave themselves when I do so in Blender, so I definitely hand off that one to more specific tutorials on the subject. You may be able to combine a couple EA meshes to start with until you're confident doing that, though. I do make my morphs manually though, so that is always an option and is less intimidating than it seems! I cover it here if you skip the LOD section, and you can freely use that method after you've done 99% of everything else in TSRW. The morphs get injected right into the package with MTK. What I referred to before was that you could use the program I linked (Delphy's Barbershop, known as DABOOBS) to assemble these hairs for you instead of TSRW, but it requires the meshes loose in GEOM format rather than .obj or .wso. You can export the GEOM out of the packages you already made if you wanted to skip all the steps involved in exporting them out of Blender again. Then you just open that program and it guides you through all the steps. It usually isn't used for hats because the program can't make 2-group hairs (one group for the hat, one group for the hair), which isn't an issue with your items because they have no hair showing. CASTable refers to something being compatible with Create a Style, where you can recolour and apply patterns to things. That won't be available by default if you use DABOOBS, but if you get the hair working and otherwise looking the way you want I could guide you through the steps to adding that functionality. If any/all of that is confusing, feel free to skip it and continue as normal The alternatives will be there as needed.
|
Yea, too often Blender bone painting can be a PITA. I'm having an oddball problem with a Newsea hair that I am adding bones and morphs to. Something is blowing up L1 or 2 (whichever is used in portrait panel thumbnail). Naturally, everything looks fine in Blender, AND in TSRW, but that thumbnails tells otherwise. I'll figure it sooner or later.
Using the "mannequin" usually works for morphs, since it will tend to push the hair vertices along with body morphs, including the cheek bones in the OP's case. I do not use it often. I have a different method of manually adjusting, or making morphs... But I went thru your tutorial and your method looks good, IF a person is more skilled than I, with sculpt tool. )))
@Karuttiae There is another, similar thread from you, with similar issues, to similar hair/ hat...
https://modthesims.info/showthread.php?t=681108
Shiny, happy people make me puke!
#7
1st Jan 2024 at 6:47 PM
1st Jan 2024 at 6:47 PM
Posts: 45
Thank you, ill get to it right away. I do still have another problem which is in this post, if you wanna check it out: https://modthesims.info/showthread....881#post5928881
#8
1st Jan 2024 at 10:24 PM
1st Jan 2024 at 10:24 PM
Posts: 865
Quote: Originally posted by Karuttiae
| Thank you, ill get to it right away. I do still have another problem which is in this post, if you wanna check it out: https://modthesims.info/showthread....881#post5928881 |
To repeat, you most likely will never be able to use bone transfer, from an EA mesh to your meshes.
First, it looks as you are using Marvelous Designer, which may be the greatest dress designing program for pretty meshes that won't work in TS3. It works to create topology, and in doing so, will create faces at odd shapes, sizes and angles, which are poor conduits for TS3 bone structure in general. If you reduce an MD mesh, those faces become more distorted. The other issue is the way the material folds. Bone transfer is a projection, and everything in the meshes is at odd angles from the projecting donor mesh.
If you study a few tutorials on bone weight painting, I can help you, but will not make it for you. It is possible to get the meshes to work... more or less, but they won't be perfect.
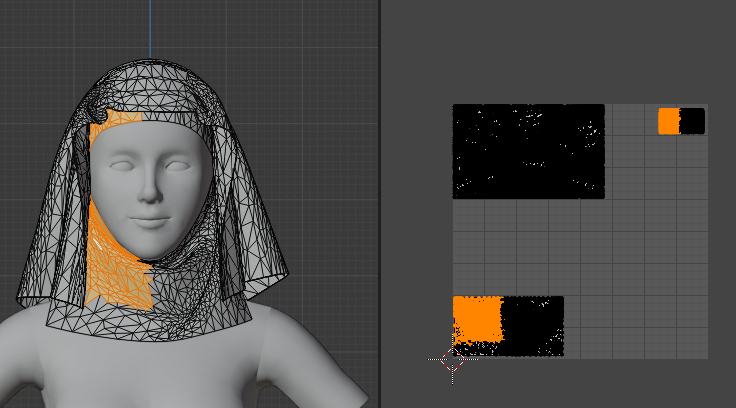
Places where you see black, are again because of bone weights. You have a doubled mesh. Both must have the same vertex positions, weight and morphs, or they will clip.
Shiny, happy people make me puke!
#9
1st Jan 2024 at 11:31 PM
1st Jan 2024 at 11:31 PM
Posts: 484
Thanks: 10 in 2 Posts
Quote: Originally posted by LadySmoks
|
Yea, too often Blender bone painting can be a PITA. I'm having an oddball problem with a Newsea hair that I am adding bones and morphs to. Something is blowing up L1 or 2 (whichever is used in portrait panel thumbnail). Naturally, everything looks fine in Blender, AND in TSRW, but that thumbnails tells otherwise. I'll figure it sooner or later. https://modthesims.info/showthread.php?t=681108 |
Copying the LOD0 bones to L1 and L2 doesn't fix it? It's safe to pull them right out with S3PE and import them back in for changes like that.
Not to derail OP's topic, but while it's been brought up- I've recently been trying to do manual bones in Blender for a full body outfit and it just explodes. MTK's Bone Scan will say the bone weights are too high and 'fix' it, but the fixed version will explode in exactly the same way

So far I'm having to live with this texture deforming on the arm:
As it turns into a polygon hating valkyrie if I even just try to adjust the weight paint instead of redoing it entirely:
Assuming it's the bones causing that issue to begin with at all, but the outfit doesn't have morphs and looks fine in Blender and CTU so I couldn't imagine what else.
#10
2nd Jan 2024 at 4:50 AM
Last edited by LadySmoks : 2nd Jan 2024 at 9:09 PM.
2nd Jan 2024 at 4:50 AM
Last edited by LadySmoks : 2nd Jan 2024 at 9:09 PM.
Posts: 865
Quote: Originally posted by CardinalSims
|
Copying the LOD0 bones to L1 and L2 doesn't fix it? It's safe to pull them right out with S3PE and import them back in for changes like that. Not to derail OP's topic, but while it's been brought up- I've recently been trying to do manual bones in Blender for a full body outfit and it just explodes. MTK's Bone Scan will say the bone weights are too high and 'fix' it, but the fixed version will explode in exactly the same way So far I'm having to live with this texture deforming on the arm: As it turns into a polygon hating valkyrie if I even just try to adjust the weight paint instead of redoing it entirely: Assuming it's the bones causing that issue to begin with at all, but the outfit doesn't have morphs and looks fine in Blender and CTU so I couldn't imagine what else. |
I thought I tried transferring L0 weights, but will try it again.
OK... so it is an outfit for a Sim, not Plumbot? For the texture, it looks as some vertices did not split at a seam properly. Which version do you use?
Generally, I do MTK bone transfer first, then paint to fix certain things. For your project, I would suggest using a plumbot. They actually have fewer bones, and are like quantized, instead of smooth transitions. Another issue could be total vertices count for all LODs, but it does look more like bone weights. Fingers are always an issue. Between bone weighting and rig alignment, I cut off the hands and use TS3, but you can't for this.
What happens to fingers is that during a bone transfer, just a tiny bit of bleed over from one finger to the next. You may have correct total weight, but it could be .990 of what you need, and .010 from the next finger and things go wonky.
Again, I would look at a plumbot arm. Several use fingers and may be easier to align your mesh to, to transfer bones? Worst case is to separate each finger, transfer bones, then put the hand back together.
Shiny, happy people make me puke!
#11
2nd Jan 2024 at 8:16 AM
2nd Jan 2024 at 8:16 AM
Posts: 484
Thanks: 10 in 2 Posts
Quote: Originally posted by LadySmoks
| OK... so it is an outfit for a Sim, not Plumbot? For the texture, it looks as some vertices did not split at a seam properly. |
It is for a Simbot, the ones from Ambitions rather than ITF, which for most intents and purposes are an invisible sim wearing an outfit.
The mesh itself is partly the original Simbot, partly an armour ripped from World of Warcraft. The bones were copied from an EA full length dress and everything works well except for the arm distortion. The gauntlets are large and the bicep bone bleeds onto them quite a bit.
I also thought it looked a bit like when merged vertices distort a UV, but I didn't make any changes like that to the mesh + the GEOM looks fine back in Blender.
I'll try using the bones from the original Simbot outfit, as it is also in segments. It's just a trick getting it to play well with the skirt bones.
Last case scenario, I reinstall ITF to pull the Plumbots. Thank you for the suggestion.
Scribe of tutorials. Oracle of questions at NRaas. Blog staller at thecardinalsims. Feel free to @ me for input on any TS3/TS4 modding questions.
#12
2nd Jan 2024 at 2:56 PM
2nd Jan 2024 at 2:56 PM
Posts: 865
Quote: Originally posted by CardinalSims
|
It is for a Simbot, the ones from Ambitions rather than ITF, which for most intents and purposes are an invisible sim wearing an outfit. The mesh itself is partly the original Simbot, partly an armour ripped from World of Warcraft. The bones were copied from an EA full length dress and everything works well except for the arm distortion. The gauntlets are large and the bicep bone bleeds onto them quite a bit. I also thought it looked a bit like when merged vertices distort a UV, but I didn't make any changes like that to the mesh + the GEOM looks fine back in Blender. I'll try using the bones from the original Simbot outfit, as it is also in segments. It's just a trick getting it to play well with the skirt bones. Last case scenario, I reinstall ITF to pull the Plumbots. Thank you for the suggestion. |
Honestly never looked at the Simbot mesh, but would imagine it similar construction to plumbot, which I am very familiar with. A trick for bones is to use shrink/ flatten, to proportionately shrink the donor mesh so it is inside of the receiving mesh. Export, and use that in MTK.
You cannot transfer bones from a dress to legs, or legs to dress. Bone weights are vastly different. You must split the mesh into parts. Remove the dress part from the mesh and export it, and the separated legs. Use a leg donor for the legs, and a dress donor for the dress part. Import and join. It is an involved process, that includes adding an armature to the mesh, posing it and touch up painting weights. It's kinda what I do.
You may want to PM me on this, or open a new thread.
Also, if you wish, send me your mesh to look at.
Shiny, happy people make me puke!
#13
3rd Jan 2024 at 7:44 AM
3rd Jan 2024 at 7:44 AM
Posts: 45
How do i make painting verticles easier in blender? how do i make the color visible in edit mode, so i know which ones already have the bones on them?
(ps: I tried making a new mesh but its just too hard. I decided to just decimate the mesh and modify it so theres no "secret folds", I know its not perfect but I work with what Ive got)
(ps: I tried making a new mesh but its just too hard. I decided to just decimate the mesh and modify it so theres no "secret folds", I know its not perfect but I work with what Ive got)
#14
3rd Jan 2024 at 2:55 PM
3rd Jan 2024 at 2:55 PM
Posts: 865
Quote: Originally posted by Karuttiae
|
How do i make painting verticles easier in blender? how do i make the color visible in edit mode, so i know which ones already have the bones on them? (ps: I tried making a new mesh but its just too hard. I decided to just decimate the mesh and modify it so theres no "secret folds", I know its not perfect but I work with what Ive got) |
You do not need to reduce the mesh. What you first need to do, is create a reference mesh, by removing all back faces. Import your mesh and turn on face orientation. Hover the pointer over the inside and press "L", then "X", delete faces. Your mesh, it appears to be one entire UV section, so you can delete that way also.
@CardinaSims may do things differently, so it will be whichever way works best for you!
On this mesh, start with 2 basic bones... headnew and spine2. Delete all of those unnecessary bones.
This will never work.
You should make a mannequin, so you can see where your mesh fits the Sim!
I will use gradient brush in linear to first paint the entire head full red on the head new bone. Then click Weights> normalize all. Be sure the box is checked to lock active group.
Then, I drag from bottom up on a slight angle for spine2, and normalize all.
I have to take my son to the doctor, but this is a good start for you to practice, and I will continue later.

Shiny, happy people make me puke!
#15
3rd Jan 2024 at 5:39 PM
3rd Jan 2024 at 5:39 PM
Posts: 865
Quote: Originally posted by A-FROM-THE-SOUTH
|
@LadySmoks - How is your understanding so comprehensive across all things cc - I see you everywhere helping everyone and I just want t know is it time in the field that gave you this wealth of knowledge or do you work in 3d industries? I don't know the term for it Sorry for just barging in like this but I was curious to know |
I am far from knowing ALL things! But, what I do know, is a combination of having an excellent mentor in JoshQ, and just experimenting a lot, and searching for answers in many tutorials and some of the older threads here on MTS. Often, I think of something that I want in my game. If I cannot find it, I try to make it and research tutorials on the subject. I take apart packages that others have made (even EA), and look inside. That was how I found the shiney Plumbot shader numbers, which are not in geom editor tool. Never be afraid to fail. For every minor success, I have folder after folder of... "learning experiences"!

Shiny, happy people make me puke!
#16
3rd Jan 2024 at 6:33 PM
3rd Jan 2024 at 6:33 PM
Posts: 865
OK, part 2...
Once you have the mesh with two bones, you are ready to add a few more. FYI, the two bones I showed, are actually all the bones that many hair creators will use. It's okay, for short "pixie" style hair, but long hair with no breast, neck, spine1 bones or morphs, is ignoring a lot!
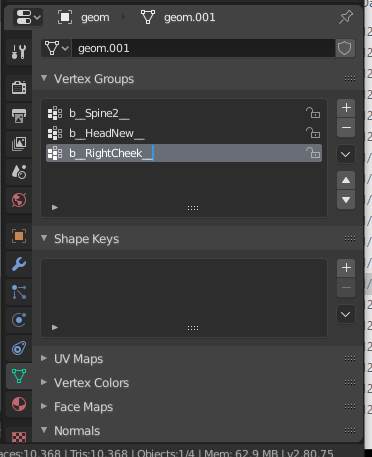
For this next part, we need to mask the areas being painted, so not to run over to where we do not want. We will add both cheek bones, one at a time. It is easier to use the UV because of how it is laid out. In edit mode, select the right cheek area, go to weight paint mode and click the mask button.
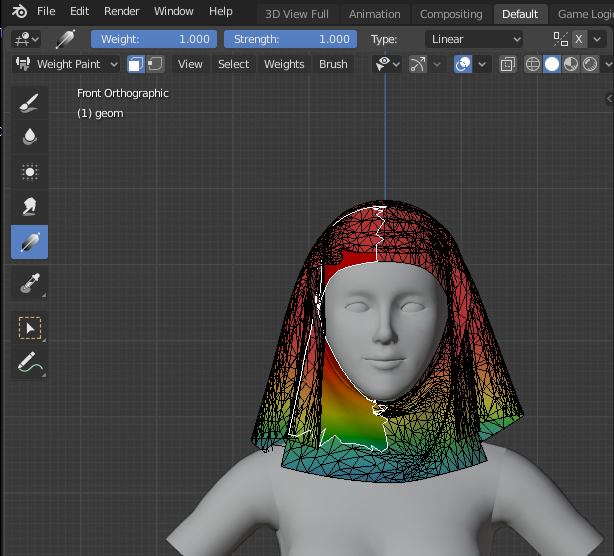
The mannequin is useful for proper spelling and under scores and capitalization when manually adding bone names to the list! In vertex groups, click the + sign. Double click the new Group, and type in the new bone name, and enter.
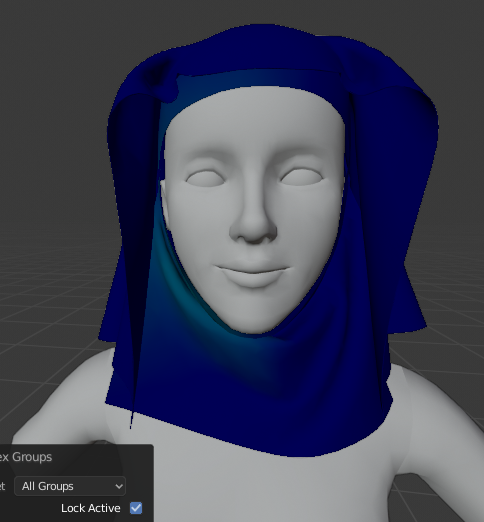
You can add the left cheek bone also, since you are here. But be certain to select right cheek, since that is what is masked off!!! I will go to object mode, select the mannequin, then hold shift and select the hat. When returning to weight paint, the outline of the face is seen.
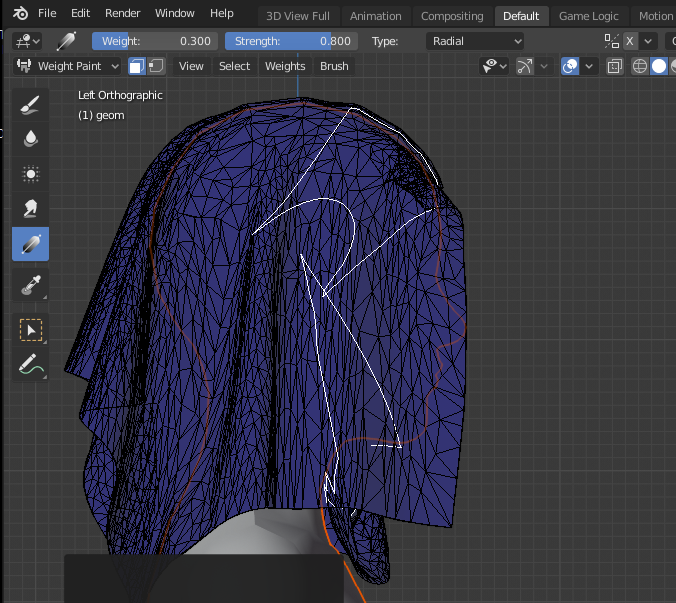
I initially set bone weight to .300 and strength to .800, and Type set as radial. It should be close to what is needed. Using gradient brush, start between the nose and upper lip, and drag almost to the back of the head. Use Weights> Smooth with setting in the pic, then normalize all.
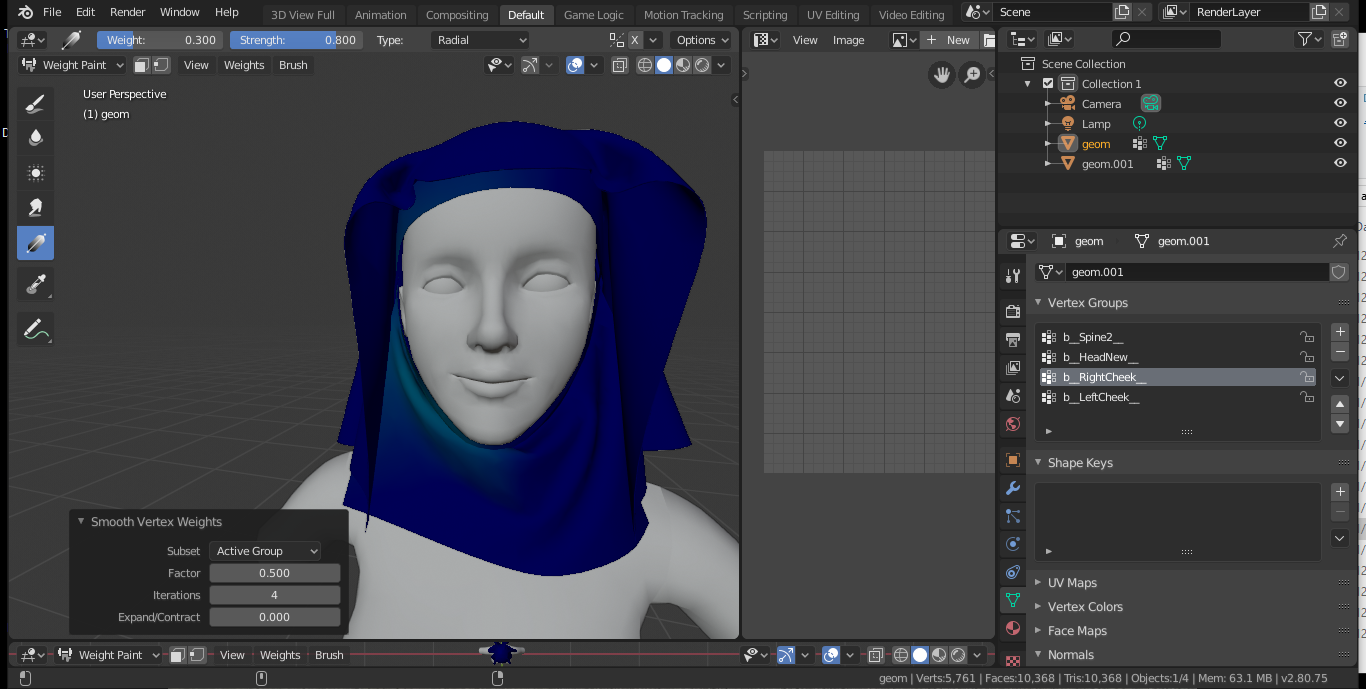
At this point, repeat for the left cheek. Next, I will do clavicles, but give you time to try what I showed you so far... and I have some stuff to do. )
Shiny, happy people make me puke!
Once you have the mesh with two bones, you are ready to add a few more. FYI, the two bones I showed, are actually all the bones that many hair creators will use. It's okay, for short "pixie" style hair, but long hair with no breast, neck, spine1 bones or morphs, is ignoring a lot!
For this next part, we need to mask the areas being painted, so not to run over to where we do not want. We will add both cheek bones, one at a time. It is easier to use the UV because of how it is laid out. In edit mode, select the right cheek area, go to weight paint mode and click the mask button.
The mannequin is useful for proper spelling and under scores and capitalization when manually adding bone names to the list! In vertex groups, click the + sign. Double click the new Group, and type in the new bone name, and enter.
You can add the left cheek bone also, since you are here. But be certain to select right cheek, since that is what is masked off!!! I will go to object mode, select the mannequin, then hold shift and select the hat. When returning to weight paint, the outline of the face is seen.
I initially set bone weight to .300 and strength to .800, and Type set as radial. It should be close to what is needed. Using gradient brush, start between the nose and upper lip, and drag almost to the back of the head. Use Weights> Smooth with setting in the pic, then normalize all.
At this point, repeat for the left cheek. Next, I will do clavicles, but give you time to try what I showed you so far... and I have some stuff to do. )
Shiny, happy people make me puke!
#17
3rd Jan 2024 at 10:59 PM
3rd Jan 2024 at 10:59 PM
Posts: 45
That was very useful!! the tutorial followed up with pics was really helpful. Well, i've followed it, and the bones arent being exported properly.  They're being exported seperately from the mesh. Maybe it's the way i exported it? i did export > .obj and i turned on selected only, turned on object groups along with vertex groups. Blender 4.0.1 btw. I get it that the verticles were exported seperately bcz i checked it off in the menu like that, but even if i dont check it, the mesh is empty of bones.
Here's my blender file https://www.mediafire.com/file/n559...ning.blend/file
While we are here, you could tell me if i'm generally picking up what ur putting down...
 They're being exported seperately from the mesh. Maybe it's the way i exported it? i did export > .obj and i turned on selected only, turned on object groups along with vertex groups. Blender 4.0.1 btw. I get it that the verticles were exported seperately bcz i checked it off in the menu like that, but even if i dont check it, the mesh is empty of bones.
Here's my blender file https://www.mediafire.com/file/n559...ning.blend/file
While we are here, you could tell me if i'm generally picking up what ur putting down...
#18
3rd Jan 2024 at 11:07 PM
3rd Jan 2024 at 11:07 PM
Posts: 865
Quote: Originally posted by Karuttiae
|
That was very useful!! the tutorial followed up with pics was really helpful. Well, i've followed it, and the bones arent being exported properly. They're being exported seperately from the mesh. Maybe it's the way i exported it? i did export > .obj and i turned on selected only, turned on object groups along with vertex groups. Blender 4.0.1 btw. I get it that the verticles were exported seperately bcz i checked it off in the menu like that, but even if i dont check it, the mesh is empty of bones. Here's my blender file https://www.mediafire.com/file/n559...ning.blend/file While we are here, you could tell me if i'm generally picking up what ur putting down...
|
I use Blender 2.80, and sometimes 2.93. You need to export as geom to retain bones. Since I don't use 4.0x, I have no clue if Smug Tomato's tools work with that version. Also, forgot to mention, but if it does not export, go to Weights> Limit Totals, then export. 2.80 has seam auto split. 2.9x, it's manual, follow Smug's instructions.
Shiny, happy people make me puke!
#19
3rd Jan 2024 at 11:57 PM
3rd Jan 2024 at 11:57 PM
Posts: 45
Quote: Originally posted by LadySmoks
| I use Blender 2.80, and sometimes 2.93. You need to export as geom to retain bones. Since I don't use 4.0x, I have no clue if Smug Tomato's tools work with that version. Also, forgot to mention, but if it does not export, go to Weights> Limit Totals, then export. 2.80 has seam auto split. 2.9x, it's manual, follow Smug's instructions. |
I tried exporting it both in 2.80 and 4.0 and it says "selected object is not a valid sims 3 geom"
#20
4th Jan 2024 at 1:18 AM
4th Jan 2024 at 1:18 AM
Posts: 865
Quote: Originally posted by Karuttiae
| I tried exporting it both in 2.80 and 4.0 and it says "selected object is not a valid sims 3 geom" |
I am not sure why your Blender file is so big, but it crashed both 2.80 and 2.93, so I cannot even look at your work. I do not recall ever seeing the error message you get. All you need is the new bone mesh that you are painting in your file. Delete everything else, and export just the bone reference geom.
Question, you imported a geom to work on, yes? Not an object???
Shiny, happy people make me puke!
#21
4th Jan 2024 at 1:26 AM
4th Jan 2024 at 1:26 AM
Posts: 45
Quote: Originally posted by LadySmoks
|
I am not sure why your Blender file is so big, but it crashed both 2.80 and 2.93, so I cannot even look at your work. I do not recall ever seeing the error message you get. All you need is the new bone mesh that you are painting in your file. Delete everything else, and export just the bone reference geom. Question, you imported a geom to work on, yes? Not an object??? |
Oh yeah no the file i sent u was for 4.0, i just imported it into 2.80 and tried again. It crashes cuz its the wrong version
and um...yeah...about that....
My excuse is there is that i thought it was supposed to be an obj... but i don't have a geom to import, the mesh is obj
#22
4th Jan 2024 at 2:53 AM
4th Jan 2024 at 2:53 AM
Posts: 865
Quote: Originally posted by Karuttiae
|
Oh yeah no the file i sent u was for 4.0, i just imported it into 2.80 and tried again. It crashes cuz its the wrong version and um...yeah...about that.... My excuse is there is that i thought it was supposed to be an obj... but i don't have a geom to import, the mesh is obj |
Yea, Blender wasn't good about opening files made on newer versions. Apparently, 4.0 is very different. I will mention it to JoshQ, since I know he is experimenting with 4.0.
Anyway, bones are carried by the geom. You need Smug Tomato's geom tools for whichever version you have. It is different for 2.8x from 2.9x, and not sure beyond that.
I almost always import as geom, and always as geom for custom bones. I will often export as .obj, AND geom. Objects usually give a cleaner mesh, but again, geoms hold bones. I just convert the object to geom, and assign my custom bones.
Since you have a package, just pull the geom from that. Import the geom to Blender 2.80, remove the backfaces, and clean all of those unnecessary bones as I showed. You are only making a bone weight reference. You will transfer bone weights from what you are making now, to the other geom for L1.
Shiny, happy people make me puke!
#23
4th Jan 2024 at 3:26 AM
4th Jan 2024 at 3:26 AM
Posts: 45
Quote: Originally posted by LadySmoks
| I almost always import as geom, and always as geom for custom bones. I will often export as .obj, AND geom. Objects usually give a cleaner mesh, but again, geoms hold bones. I just convert the object to geom, and assign my custom bones. |
Oh my gosh i completely forgot milkshape can totally convert obj -> geom. Yeah sorry about that, i thought WesHowe's plugins didnt work so i gave up
#24
4th Jan 2024 at 5:08 AM
4th Jan 2024 at 5:08 AM
Posts: 45
ummm yeah nevermind, converting in milkshape didnt work (i'm in blender 2.80 now)
#25
4th Jan 2024 at 5:29 AM
4th Jan 2024 at 5:29 AM
Posts: 484
Thanks: 10 in 2 Posts
You need to transfer data under the GEOM Tools options from an existing GEOM to the new mesh (select the GEOM first, then shift click the new mesh, then click Transfer GEOM Data), then select just the new mesh and click 'Recalculate IDs' before exporting.
It can also throw that error if the mesh isn't selected in Object Mode.
Edit: GEOM Tools also currently corrupts the Material data of hair meshes, but it is fixable.
Scribe of tutorials. Oracle of questions at NRaas. Blog staller at thecardinalsims. Feel free to @ me for input on any TS3/TS4 modding questions.
Who Posted
|
|