 Sign in to Mod The Sims
- Site Map >
- Modding and Creation >
- Sims 3 Creation >
- CAS Parts >
- Looking for a tutorial on creating custom facial hair
- Site Map >
- Modding and Creation >
- Sims 3 Creation >
- CAS Parts >
- Looking for a tutorial on creating custom facial hair
Replies: 10 (Who?), Viewed: 651 times.
#1
 8th Jan 2024 at 4:15 AM
8th Jan 2024 at 4:15 AM
Posts: 6
Also, I'm kind of new to creating my own cc; I've tried in the past but never really got into it, until a week ago when I started looking for a facial hair for a sim I'm trying to make and couldn't find it. It seems simple to make the facial hair and that's the only thing I want to make but I'm not sure.
However, I'm sure I need a lot of programs too to pull this off.
Is there anywhere I can find a tutorial? Any help would be appreciated! :D
Advertisement
#2
8th Jan 2024 at 5:39 AM
8th Jan 2024 at 5:39 AM
Posts: 484
Thanks: 10 in 2 Posts
From what I can see, facial hair is functionally very similar to regular hair. Which is good news really, because that means you can rely pretty heavily on hair tutorials for the basics- of which I've written a bunch.
The general concept of combining two would involve fitting both textures onto one image- how well they do that will vary from piece to piece. For example, if they're a face overlay (a texture that appears directly on the skin) they'll already be arranged in a way that can be combined effortlessly in an image editor. Parts with meshes will be a little more complicated, because you'll have to resize them to fit on one image together and then move the UVs of the mesh to be in the new location.
You could get it done with Blender, the Sims 3 GEOM plugin for it, S3OC, MeshToolKit, S3PE, Delphy's SimGeom Editor and your image editor of preference (either GIMP or Photoshop). Which may seem like a lot of stuff, but you get used to it.
Being so similar to hair, I'd be glad to help with each step of the process.
Scribe of tutorials. Oracle of questions at NRaas. Blog staller at thecardinalsims. Feel free to @ me for input on any TS3/TS4 modding questions.
#3
9th Jan 2024 at 2:54 AM
9th Jan 2024 at 2:54 AM
Posts: 6
Thanks so much. I'm looking at the tutorial now and started the project. The only thing I'm not sure about at the moment is how to import the facial hair that I want to work with to Blender. I have completed the first step, which was creating the reference template.
#4
9th Jan 2024 at 3:20 AM
9th Jan 2024 at 3:20 AM
Posts: 484
Thanks: 10 in 2 Posts
You'll need SmugTomato's GEOM plugin: https://modthesims.info/d/656413/bl...r-2-8x-3-x.html
If you open the package for the existing facial hair in S3PE, you will see a few GEOM resources. The one with 'LOD0' in the name is the one you want (if it's CC that has no resource names, you export all of them and it will probably be the one with the highest file size).
Right click, Export > To file on that GEOM. The file created can then be imported into Blender using that plugin.
Scribe of tutorials. Oracle of questions at NRaas. Blog staller at thecardinalsims. Feel free to @ me for input on any TS3/TS4 modding questions.
#5
10th Jan 2024 at 10:47 PM
10th Jan 2024 at 10:47 PM
Posts: 6
Quote: Originally posted by CardinalSims
|
You'll need SmugTomato's GEOM plugin: https://modthesims.info/d/656413/bl...r-2-8x-3-x.html If you open the package for the existing facial hair in S3PE, you will see a few GEOM resources. The one with 'LOD0' in the name is the one you want (if it's CC that has no resource names, you export all of them and it will probably be the one with the highest file size). Right click, Export > To file on that GEOM. The file created can then be imported into Blender using that plugin. |
I think I get it now. I have created the EA clone for the mustache (It is called the soulpatch), converted a sims3 pack into a package file and opened them in s3pe. Neither has the GEOM. Could it be that it's not really a mesh because both are flat on the face (with no 3 dimensional aspects)?
#6
11th Jan 2024 at 12:17 AM
11th Jan 2024 at 12:17 AM
Posts: 484
Thanks: 10 in 2 Posts
Yes, that is the face overlay type that I referred to. Which makes this much simpler, because it's just a matter of combining the textures 
You'll want to clone the EA beard with 'Deep Clone' ticked in S3OC, otherwise it doesn't grab all of the textures. Select the control and diffuse IMG (they have _co and _d in the resource name), right click and Export > To file. The specular (_s) was blank for the one I looked at, but you can grab that too if yours is different.
Get the same set from the CC beard.
Open each pair (diffuse of EA + diffuse of CC, etc) in an image editor. For the diffuse, the transparency means you should be able to easily cut and paste the entire image onto the CC texture to combine them. The exact keys to do that will vary between programs though, so let me know what you're using if you can't seem to get that to work. ie. Shift + Ctrl + V is handy for pasting in the exact same coordinates in PS, not sure if GIMP has the same shortcut. This one needs to be saved as DTX5.
Then for the control, there will be a tab called Channels that you can switch to. You should be able to CTRL click each RGB channel to select only the white part, copy, and paste onto the same channel of the new image. Repeating for any/all channels that have white. This will also vary a little- that's off the top of my head the way it works in Photoshop, but I can open up GIMP to double check the hotkeys if need be. This one can be saved as DTX1 or higher.
Then you just right click > Replace the textures in the clone package, and rename the CASP if you want.
#7
13th Jan 2024 at 2:51 AM
13th Jan 2024 at 2:51 AM
Posts: 6
Quote: Originally posted by CardinalSims
|
Yes, that is the face overlay type that I referred to. Which makes this much simpler, because it's just a matter of combining the textures You'll want to clone the EA beard with 'Deep Clone' ticked in S3OC, otherwise it doesn't grab all of the textures. Select the control and diffuse IMG (they have _co and _d in the resource name), right click and Export > To file. The specular (_s) was blank for the one I looked at, but you can grab that too if yours is different. Get the same set from the CC beard. Open each pair (diffuse of EA + diffuse of CC, etc) in an image editor. For the diffuse, the transparency means you should be able to easily cut and paste the entire image onto the CC texture to combine them. The exact keys to do that will vary between programs though, so let me know what you're using if you can't seem to get that to work. ie. Shift + Ctrl + V is handy for pasting in the exact same coordinates in PS, not sure if GIMP has the same shortcut. This one needs to be saved as DTX5. Then for the control, there will be a tab called Channels that you can switch to. You should be able to CTRL click each RGB channel to select only the white part, copy, and paste onto the same channel of the new image. Repeating for any/all channels that have white. This will also vary a little- that's off the top of my head the way it works in Photoshop, but I can open up GIMP to double check the hotkeys if need be. This one can be saved as DTX1 or higher. Then you just right click > Replace the textures in the clone package, and rename the CASP if you want. |
I followed those steps to the best of my ability. I am using GIMP to create the image, however I'm stumped at the part where I make the file to edit. I opened S3PE And that's where I am lost at. I tried exporting the _IMG to file and editing with GIMP. Am I doing something wrong? Because When I finished editing, I exported to a different file type (I couldn't find DTX1) and then tried to replace in S3PE but it wasn't an acceptable file. I'm very new to this lol. I only have experience in using image editors for other artwork. I attached a photo. You've been extremely helpful :D
#8
13th Jan 2024 at 4:29 AM
13th Jan 2024 at 4:29 AM
Posts: 484
Thanks: 10 in 2 Posts
I missed the detail that DTX1/5 are options for the file type .dds, that's my bad!
The _IMG textures should import out as .dds, which GIMP can open without any addons. I booted it up to find some of the equivalent tools, because it varies more than I thought.
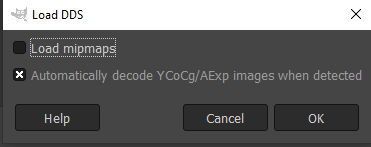
When opening a .dds for the first time, you'll want to uncheck Load Mipmaps:
To select the diffuse (the greyscale/white texture), right click the layer in the bottom right-hand panel and click Alpha to Selection.

CTRL C to copy. Then on the image to be combined with, it's CTRL ALT V to 'paste in place' (exactly where it was before).
File > Export, name the file and change the extension to .dds if it isn't already.
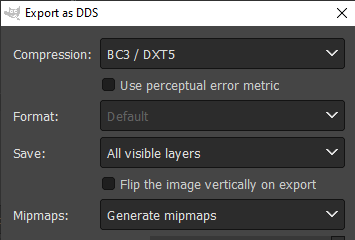
Then click Export, some DDS options should appear. They should be set to the following:
For the control (black and RGB texture), in the Channels tab right click then select Channel to Selection:
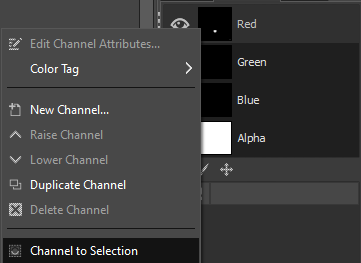
Copy, switch to second control and CTRL ALT V (in regular Layers is fine). You'd repeat for each channel if it used more, but the soulpatch only uses red- which makes it nice and easy to copy over.
Repeat the File > Export, but DXT1 instead. This looked fine on my test, but you can use higher than 1 if you find the image is low quality.
Hopefully I didn't miss anything!
The _IMG textures should import out as .dds, which GIMP can open without any addons. I booted it up to find some of the equivalent tools, because it varies more than I thought.
When opening a .dds for the first time, you'll want to uncheck Load Mipmaps:
To select the diffuse (the greyscale/white texture), right click the layer in the bottom right-hand panel and click Alpha to Selection.
CTRL C to copy. Then on the image to be combined with, it's CTRL ALT V to 'paste in place' (exactly where it was before).
File > Export, name the file and change the extension to .dds if it isn't already.
Then click Export, some DDS options should appear. They should be set to the following:
For the control (black and RGB texture), in the Channels tab right click then select Channel to Selection:
Copy, switch to second control and CTRL ALT V (in regular Layers is fine). You'd repeat for each channel if it used more, but the soulpatch only uses red- which makes it nice and easy to copy over.
Repeat the File > Export, but DXT1 instead. This looked fine on my test, but you can use higher than 1 if you find the image is low quality.
Hopefully I didn't miss anything!
#9
17th Jan 2024 at 5:18 AM
17th Jan 2024 at 5:18 AM
Posts: 6
Do I have to do the same for the red image?
#10
17th Jan 2024 at 5:56 AM
17th Jan 2024 at 5:56 AM
Posts: 484
Thanks: 10 in 2 Posts
That's the 'control', depending on how many channels an item has it can have red, blue, and/or green parts. The last screenshot and following instructions are for that one.
Unless there's something else important in the package you have?
Unless there's something else important in the package you have?
#11
22nd Jan 2024 at 2:13 AM
22nd Jan 2024 at 2:13 AM
Posts: 6
Thanks to you, I figured it out! I did everything as you said to, now I'm going to test it in my game. I really appreciate it! :D
Who Posted
|
|