View Single Post in: Making coastal elevation changes stick when moving/packaging BV beach lots
#2
 5th Jun 2016 at 2:19 PM
5th Jun 2016 at 2:19 PM
Posts: 2,359
Thanks: 583 in 3 Posts
This tutorial can be followed by anyone who wishes to keep their fancy shore lines fancy even after sharing the lot with others. However, I'm curious to know where exactly are the coastal elevation values stored, so I'll be posting to this thread if I find any additional info.
In this tutorial, I'll be transferring a beach lot from Bluewater Village (neighborhood N001) to Riverblossom Hills' Downtown (subhood of neighborhood N002).
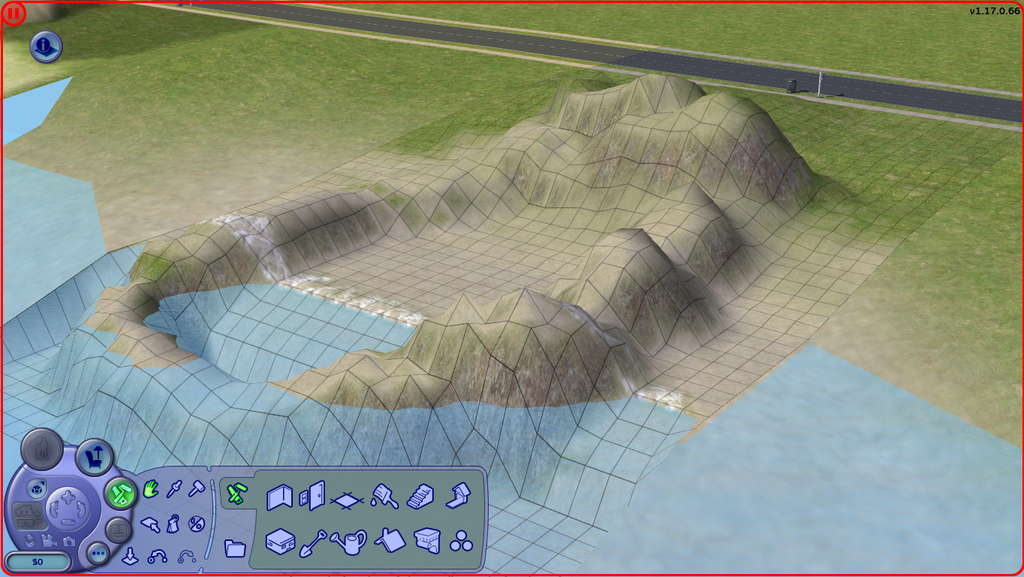
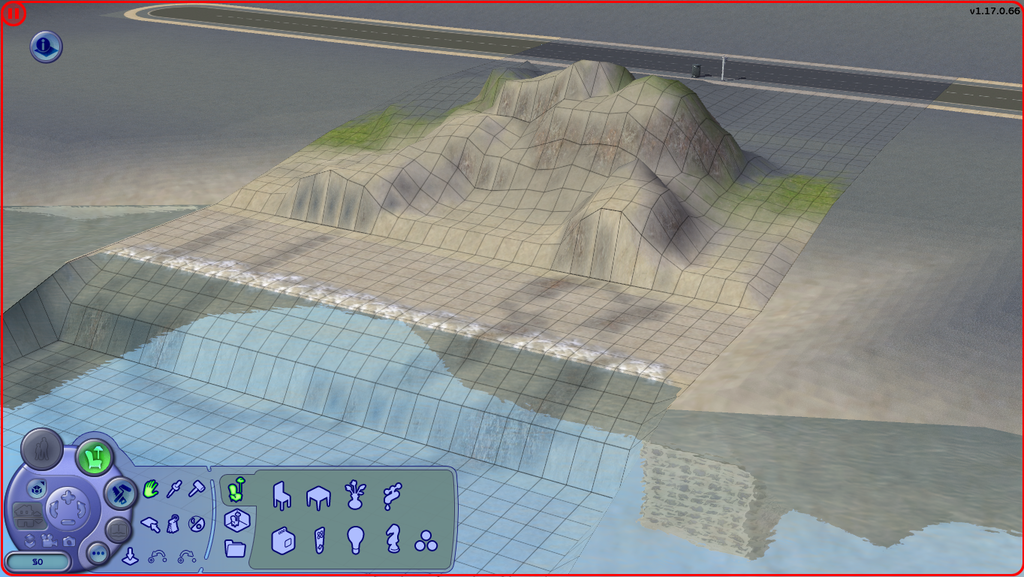
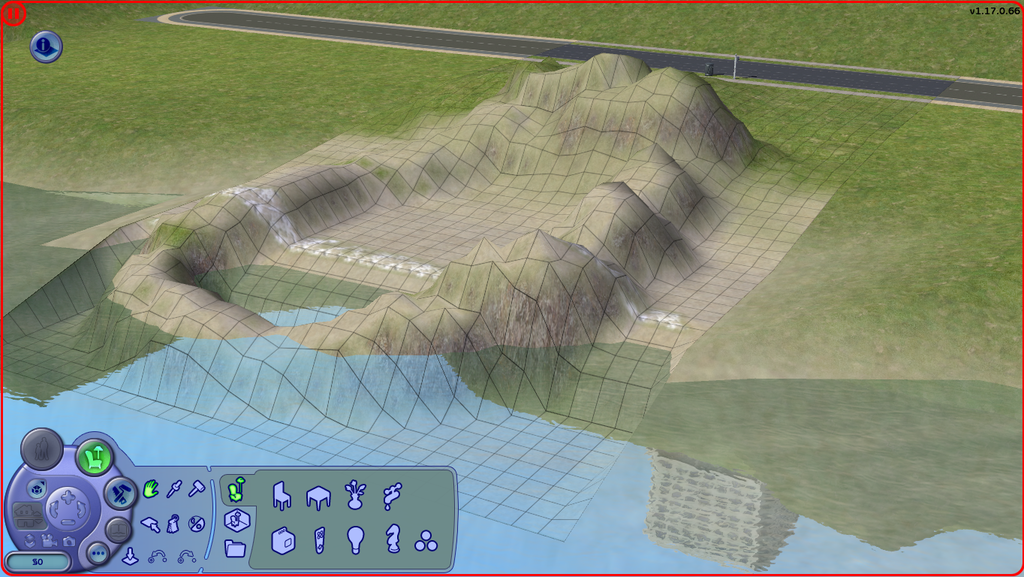
1) Create your beach lot. I'll be naming mine Bluewater Cove. Make desired terrain structures on the beach. Save the lot, and exit the game.
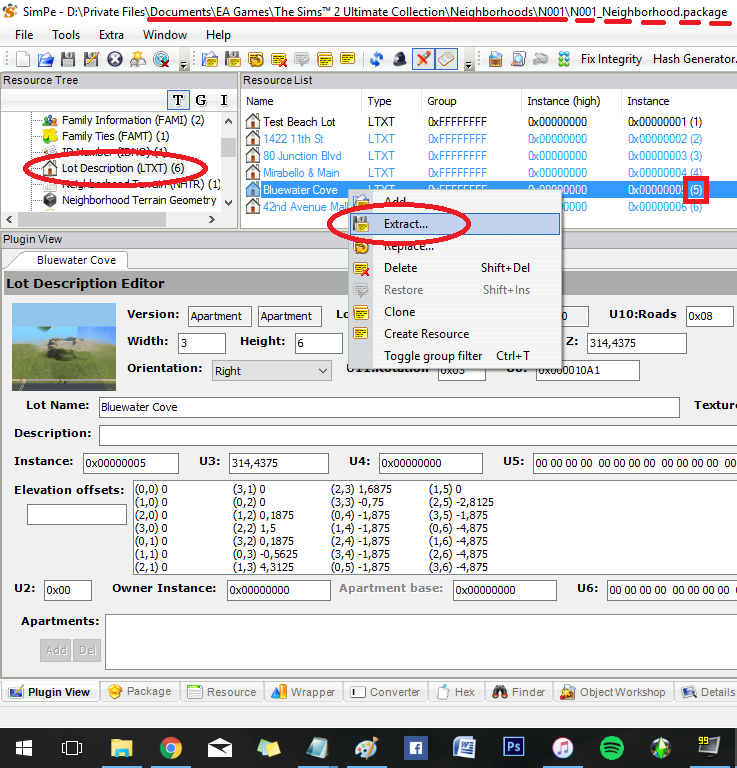
2) Open SimPE, and open the package of the hood your beach lot is in. In my case, I built Bluewater Cove in the regular neighborhood, so I'd open N001_Neighborhood; if you built your lot downtown, open N001_Downtown001, etc.
Next, click on Lot Description (LTXT) from the Resource Tree and find your lot by its name on the Resource List. Take note of its instance number, specifically, the number in (parentheses). In my case, the number is 5.
Right-click on the LTXT of your lot and select Extract (put it on your desktop).
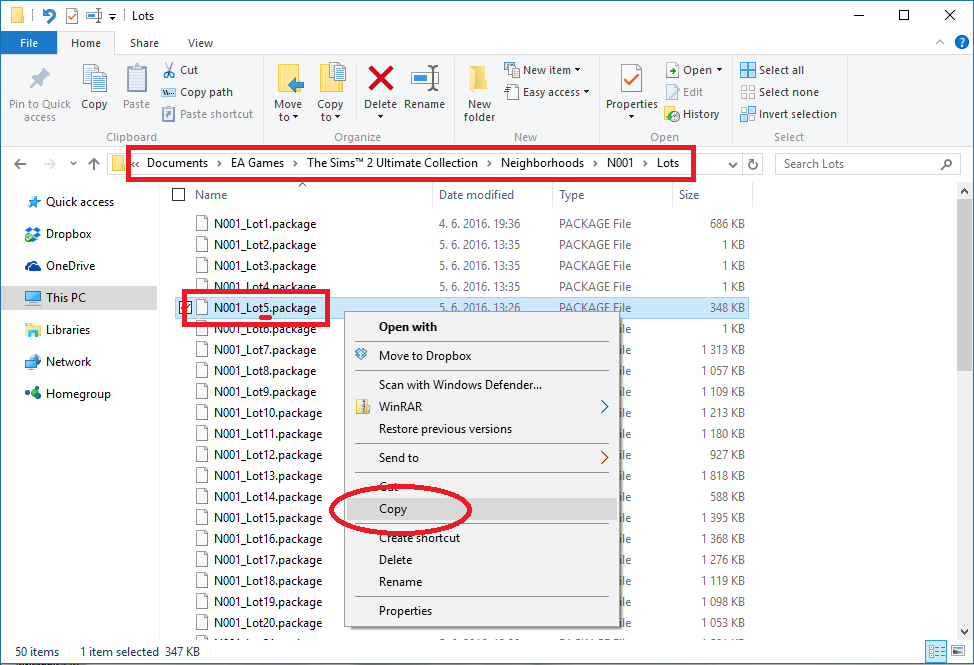
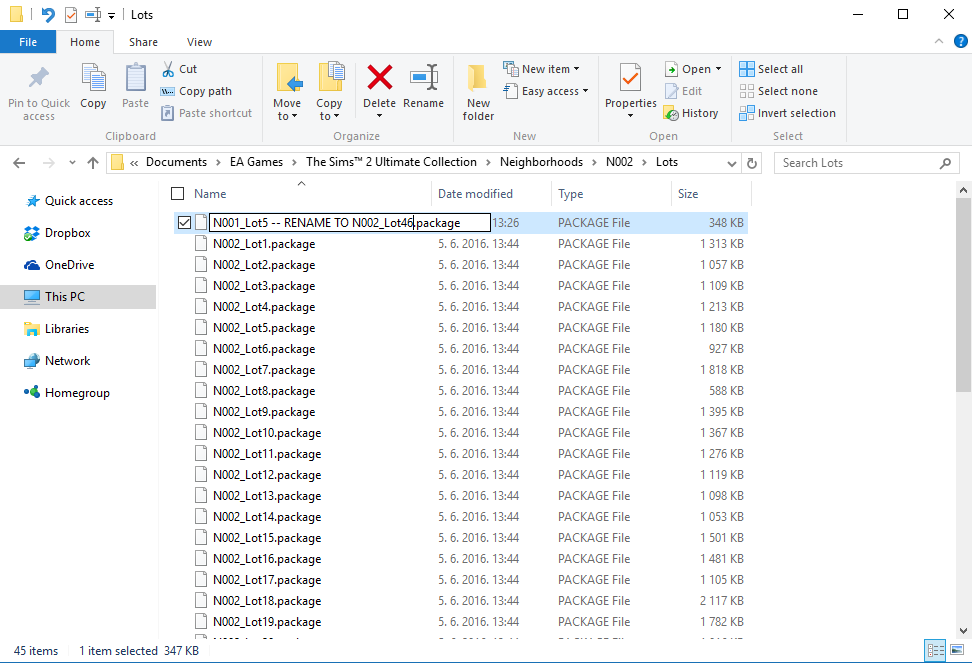
3) Go to Documents\EA Games\The Sims 2\Neighborhoods\N001\Lots, and find the lot with the number you noted down in step 2. In my case, the package I need is labeled N001_Lot5.package. Copy that package to the desktop.
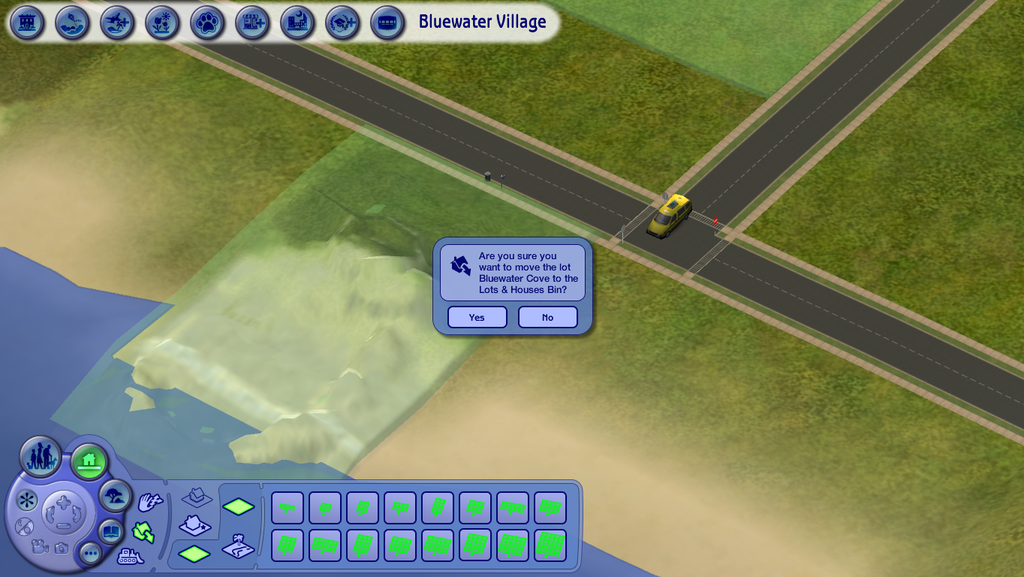
4) Open the game. From here, you can either move the lot to the Lots & Houses bin for moving it across your own neighborhoods, or you can choose to package it to a file for sharing with others. (Once you package it, you need to quit the game, run the Clean Installer on the file, and install it. Then it will show up in the Lots & Houses bin.)
5) Users who have downloaded a beach lot with a fancy shore line should start following the tutorial from here. Place the lot down in the world, and rename it if you wish. For the sake of this tutorial, I renamed the lot from Bluewater Cove to Riverblossom Cove.
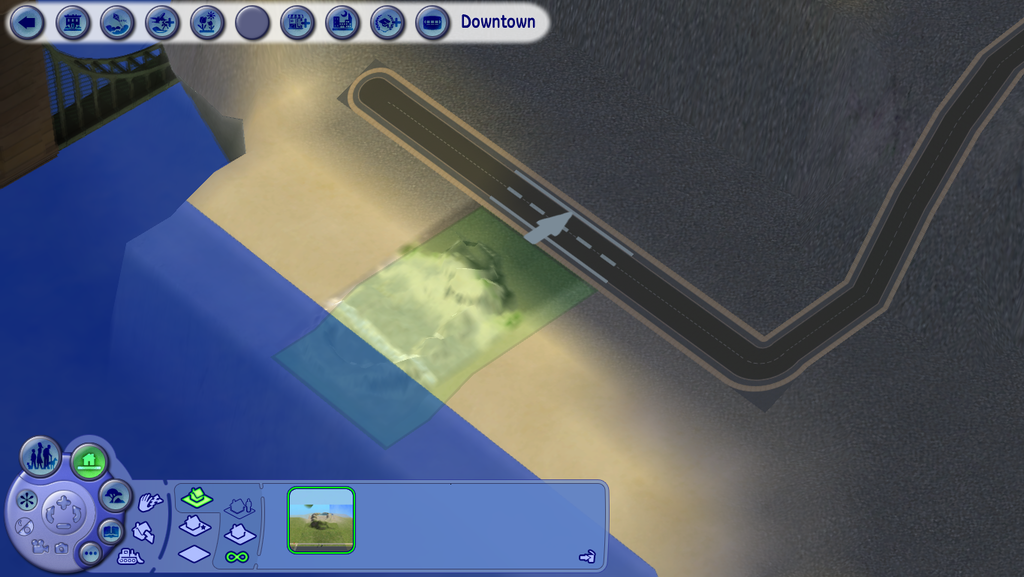
6) Load the lot. The coast should look flat and dull, as seen on a default beach lot. Save the lot, and quit the game.
7) Open SimPE, and open the hood package your newly placed lot is in. In my case, it's located in Riverblossom Hills Downtown, so I'll be opening N002_Downtown001.
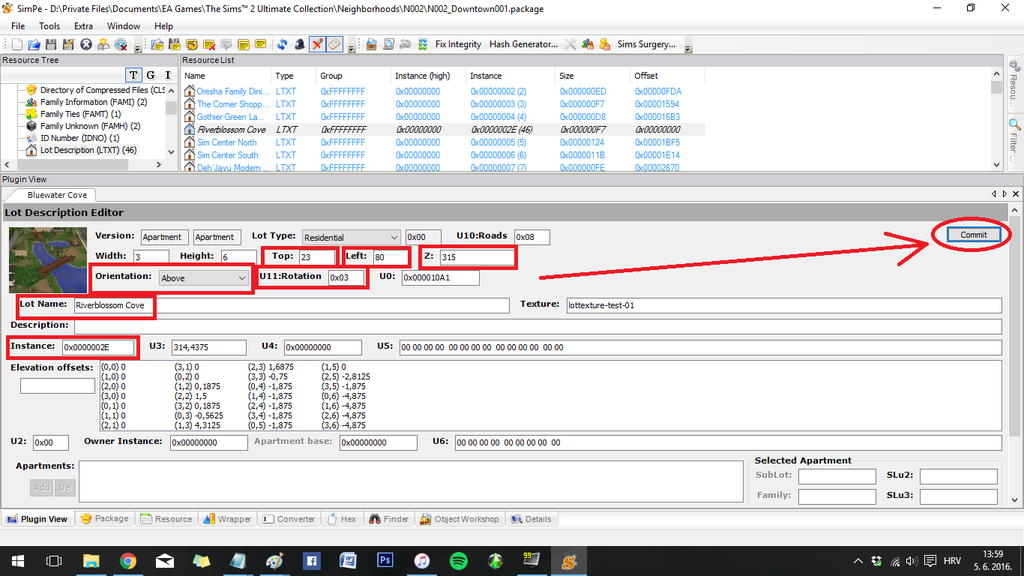
Find the Lot Description of the newly placed lot (Riverblossom Cove). Click on it, and make sure you're in plugin view (bottom bar of the window). Take note of the following values: Top, Left, Z, Orientation, U11:Rotation, Lot Name, and Instance.
Also, take a separate note of the number in the (parentheses) next to the instance number in Resource List. In my case, it's 46.

8) Delete the LTXT of Riverblossom Hills by right-clicking on its LTXT and selecting Delete.
9) Right click on any LTXT, and click Add. Find the extracted XML of the LTXT you extracted in step 2, and add it.
10) Update the values of the newly added LTXT. Change its Top, Left, Z, Orientation, U11:Rotation, Lot Name, and Instance values with the values you noted down in step 7. Then hit Commit on the far right side.
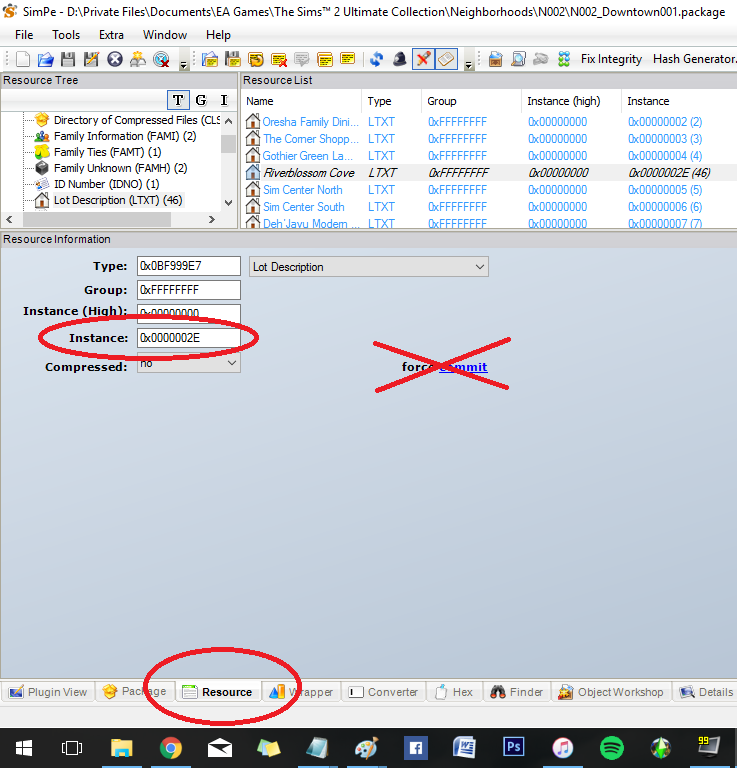
11) On the bottom bar, select Resource. Change the instance number to the same instance value you noted in step 7. Yes; you need to replace two same instance values.
Do not hit force commit; instead, just click on the Plugin View from the bottom bar.
Save the file, and close SimPE.
12) Go to Documents\EA Games\The Sims 2\Neighborhoods\N002\Lots, and find the lot with the number you found in (parentheses) from step 7. I'm looking for the file N002_Lot46.package. Delete the file.

13) Move the N001_Lot5.package file from your desktop to the N002\Lots folder. Rename the file so that the neighborhood number prefix matches the neighborhood you've moved the lot to (this doesn't apply to those who moved the lot across a single neighborhood and its own subhoods), and that the lot number reflects the new number from (parentheses) from step 7.
I'll be renaming my lot from N001_Lot5.package to N002_Lot46.package.
14) You're done. Load the game, and load your lot.
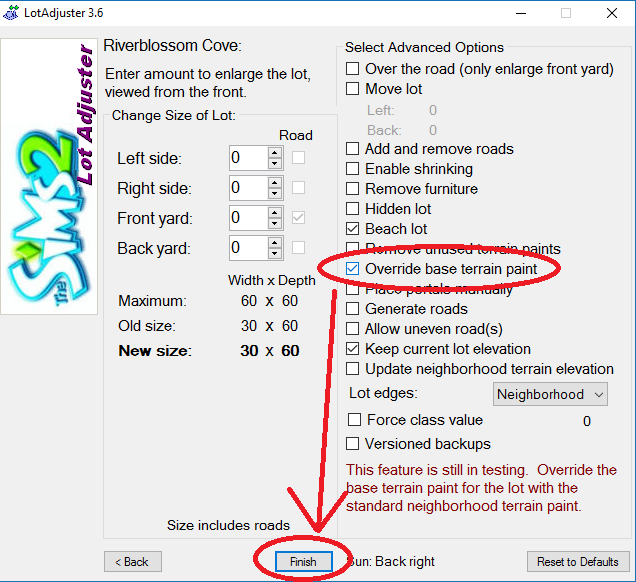
NOTE: If you've transferred the lot to a different terrain type, i.e. from a lush (grass) terrain to a concrete terrain, you'll notice that the lot skirt (terrain surrounding the lot) and base lot terrain still show the old terrain texture (grass instead of concrete). To fix it, download LotAdjuster, run it, select the neighborhood (or appropriate subhood) your lot is in, select your lot from the list, click the Advanced button and tick Override base terrain paint. Then hit Finish, and you're done - both lot terrain and lot skirt should now have the appropriate terrain type.
======================================
As a lot creator, if you create a beach lot and make changes to the coast terrain (and wish for the changes to appear in users' games when they download the lot), you should include the following in your download thread:
*It might also be ok to exclude the .sims2pack file, and install the lot manually into a neighborhood. I haven't tested it, but I do not guarantee that the neighborhood won't blow up - I'm not sure if the lot index is updated if we just add an element (the new lot) to the list (of already existing lots), as opposed to following this tutorial and therefore making the game itself add another element to the list, the way the game is used to adding lots.
2) Open SimPE, and open the package of the hood your beach lot is in. In my case, I built Bluewater Cove in the regular neighborhood, so I'd open N001_Neighborhood; if you built your lot downtown, open N001_Downtown001, etc.
Next, click on Lot Description (LTXT) from the Resource Tree and find your lot by its name on the Resource List. Take note of its instance number, specifically, the number in (parentheses). In my case, the number is 5.
Right-click on the LTXT of your lot and select Extract (put it on your desktop).
3) Go to Documents\EA Games\The Sims 2\Neighborhoods\N001\Lots, and find the lot with the number you noted down in step 2. In my case, the package I need is labeled N001_Lot5.package. Copy that package to the desktop.
4) Open the game. From here, you can either move the lot to the Lots & Houses bin for moving it across your own neighborhoods, or you can choose to package it to a file for sharing with others. (Once you package it, you need to quit the game, run the Clean Installer on the file, and install it. Then it will show up in the Lots & Houses bin.)
5) Users who have downloaded a beach lot with a fancy shore line should start following the tutorial from here. Place the lot down in the world, and rename it if you wish. For the sake of this tutorial, I renamed the lot from Bluewater Cove to Riverblossom Cove.
6) Load the lot. The coast should look flat and dull, as seen on a default beach lot. Save the lot, and quit the game.
7) Open SimPE, and open the hood package your newly placed lot is in. In my case, it's located in Riverblossom Hills Downtown, so I'll be opening N002_Downtown001.
Find the Lot Description of the newly placed lot (Riverblossom Cove). Click on it, and make sure you're in plugin view (bottom bar of the window). Take note of the following values: Top, Left, Z, Orientation, U11:Rotation, Lot Name, and Instance.
Also, take a separate note of the number in the (parentheses) next to the instance number in Resource List. In my case, it's 46.
8) Delete the LTXT of Riverblossom Hills by right-clicking on its LTXT and selecting Delete.
9) Right click on any LTXT, and click Add. Find the extracted XML of the LTXT you extracted in step 2, and add it.
10) Update the values of the newly added LTXT. Change its Top, Left, Z, Orientation, U11:Rotation, Lot Name, and Instance values with the values you noted down in step 7. Then hit Commit on the far right side.
11) On the bottom bar, select Resource. Change the instance number to the same instance value you noted in step 7. Yes; you need to replace two same instance values.
Do not hit force commit; instead, just click on the Plugin View from the bottom bar.
Save the file, and close SimPE.
12) Go to Documents\EA Games\The Sims 2\Neighborhoods\N002\Lots, and find the lot with the number you found in (parentheses) from step 7. I'm looking for the file N002_Lot46.package. Delete the file.
13) Move the N001_Lot5.package file from your desktop to the N002\Lots folder. Rename the file so that the neighborhood number prefix matches the neighborhood you've moved the lot to (this doesn't apply to those who moved the lot across a single neighborhood and its own subhoods), and that the lot number reflects the new number from (parentheses) from step 7.
I'll be renaming my lot from N001_Lot5.package to N002_Lot46.package.
14) You're done. Load the game, and load your lot.
NOTE: If you've transferred the lot to a different terrain type, i.e. from a lush (grass) terrain to a concrete terrain, you'll notice that the lot skirt (terrain surrounding the lot) and base lot terrain still show the old terrain texture (grass instead of concrete). To fix it, download LotAdjuster, run it, select the neighborhood (or appropriate subhood) your lot is in, select your lot from the list, click the Advanced button and tick Override base terrain paint. Then hit Finish, and you're done - both lot terrain and lot skirt should now have the appropriate terrain type.
======================================
As a lot creator, if you create a beach lot and make changes to the coast terrain (and wish for the changes to appear in users' games when they download the lot), you should include the following in your download thread:
- .sims2pack - the lot itself,
- the lot package (in tutorial referred to as N001_Lot5.package),
- LTXT data.
*It might also be ok to exclude the .sims2pack file, and install the lot manually into a neighborhood. I haven't tested it, but I do not guarantee that the neighborhood won't blow up - I'm not sure if the lot index is updated if we just add an element (the new lot) to the list (of already existing lots), as opposed to following this tutorial and therefore making the game itself add another element to the list, the way the game is used to adding lots.
Jonain päivänä mä toivon, että pääsen käymään Suomessa – ja heti perillä unohdan kaiken, mitä oon oppinut suomen kielestä, ja sanon vaan 'kahvia'.☕
DJ. who?