- Site Map >
- Modding and Creation >
- Sims 2 Creation >
- Tutorials >
- Bodyshop - Faylen's Skinning Tutorial 1 - Basic Clothing Recolor
- Site Map >
- Modding and Creation >
- Sims 2 Creation >
- Tutorials >
- Bodyshop - Faylen's Skinning Tutorial 1 - Basic Clothing Recolor
#1
 6th Jul 2006 at 10:42 PM
Last edited by leefish : 20th Dec 2013 at 10:21 AM.
Posts: 921
Thanks: 5724 in 61 Posts
See Tutorial:Faylen%27s_Skinning_Tutorial_1_-_Basic_Clothing_Recolor_-_wiki_versionwiki
Welcome to skinning! This is a tutorial on the most basic of techniques, recoloring. However, it will introduce you to the tools you will need for all skinning techniques, and the basic steps involved for creating any new Body Shop items. We focus on clothes, but the same tools and techniques apply to skins, hair, makeup, and accessories, all of which are contained in, and modified with, Body Shop. This tutorial, I think, is an improvement on my original part one tutorial .
What you will need for this tutorial is quite simple. Body Shop, which comes with your game, and any image editing program. (I am using PhotoShop CS version 7, but you don't have to!) If you need help finding these, go to the Skinning FAQs thread - there are links to various image programs and instructions on finding Body Shop, plus lots of other helpful information. In fact, go read that thread anyway. Most of the questions that aren't asnwered in specific tutorials are answered there.
Ready? Step One is to open up Body Shop. We're going to recolor an outfit, so from the opening screen, we click "Create Parts".

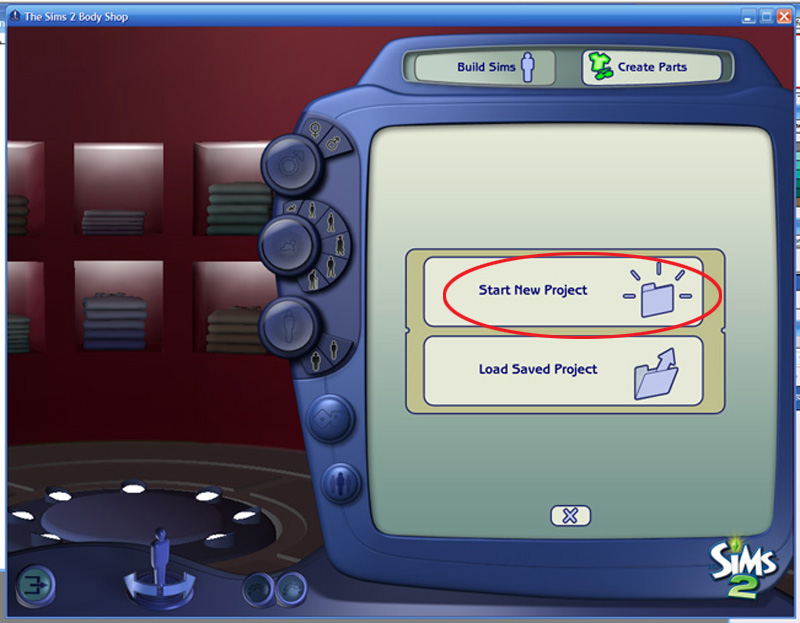
As you can see, you now have two choices - Start New Project, which is what we're going to do, or Load Saved Project. Body Shop saves your works in progress until you delete them, so don't be afraid to step back, close up body shop, and come back to something later if you run into any frustration. Since this is the first thing we're doing, though, we're going straight to clicking on "Start New Project".
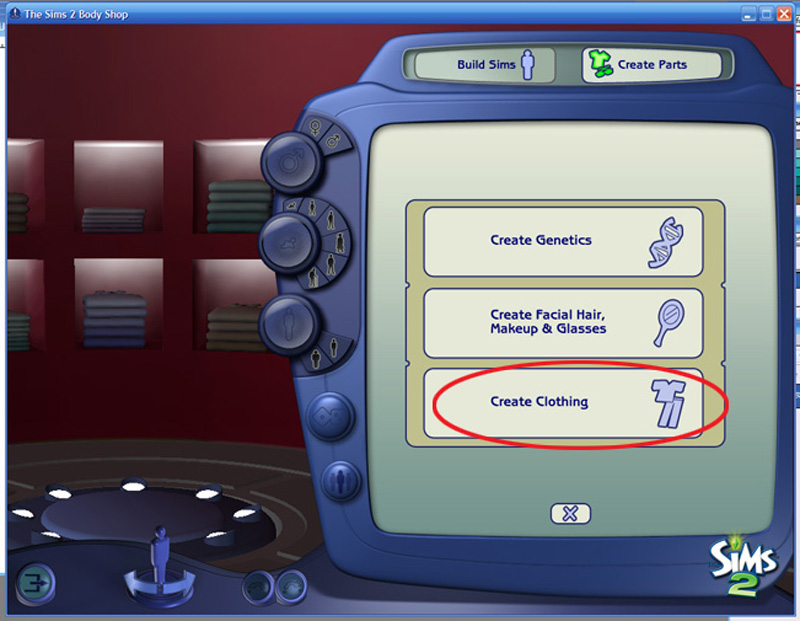
The next screen you see is giving you the choice of what type of item you want to modify. Genetics is skintone, hair, and eyes - the stuff your sims can inherit from their parents. Facial Hair, Makeup, and Glasses is just what it says it is. Body Shop gives you a lot of ways to customize your sims - but for this tutorial we're going to do clothing, so we're clicking on "Create Clothing".
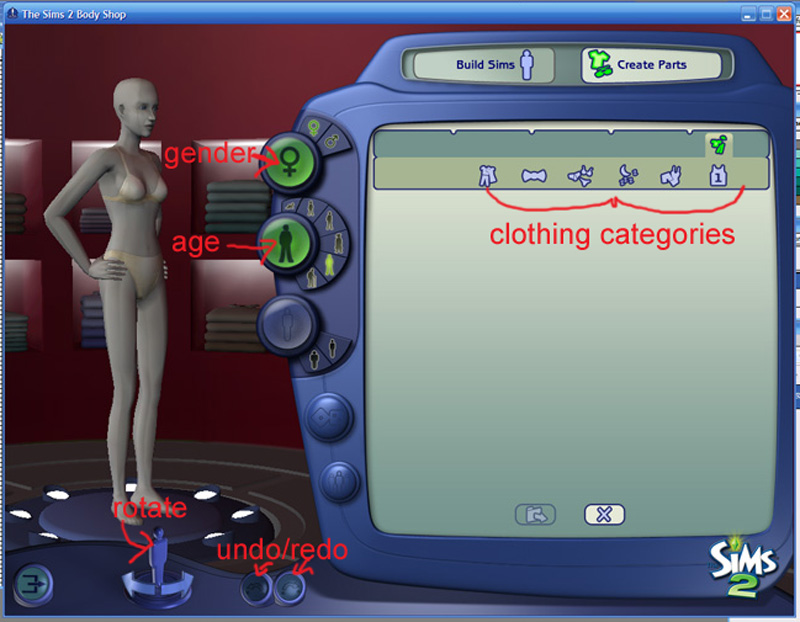
After you've selected "Create Clothing", Body Shop automatically pops up the adult female mannequin, but you don't have to stick to that, thank goodness! You can click on either of the two gender selections, and any of the age categories, then choose the clothing category you want to recolor. The rotate button moves the mannequin around on the stand, and undo or redo buttons take you backwards or forwards a step at a time if you want to . . .go a step backwards or forwards. Anyway, I'm going to stick with the default mannequin and select "Everyday", the leftmost clothing category.
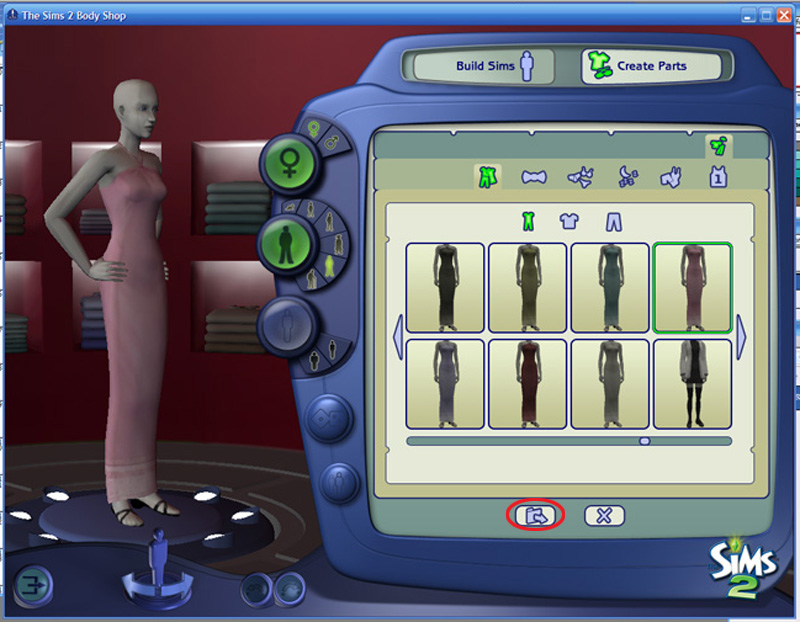
This brings up the entire catalogue of Everyday clothes for the Adult Female sim. Pick the outfit you want to recolor, and then click the Export button, circled in red in the picture.
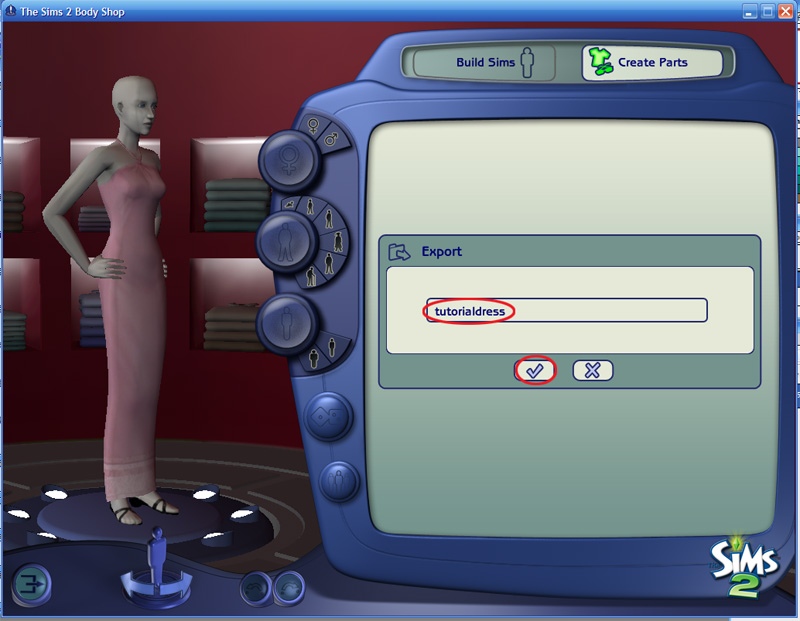
This brings up the screen you see here. Give your project a name, something that will make it easy to find. This is especially important if you end up with a lot of open projects, and it also becomes part of the filename in Saved Sims once you're all done - so if you have a lot of custom content in general, it's good to keep it easy to find. You can't have spaces or punctuation, but numbers are OK. After you name your project, click the checkmark button.
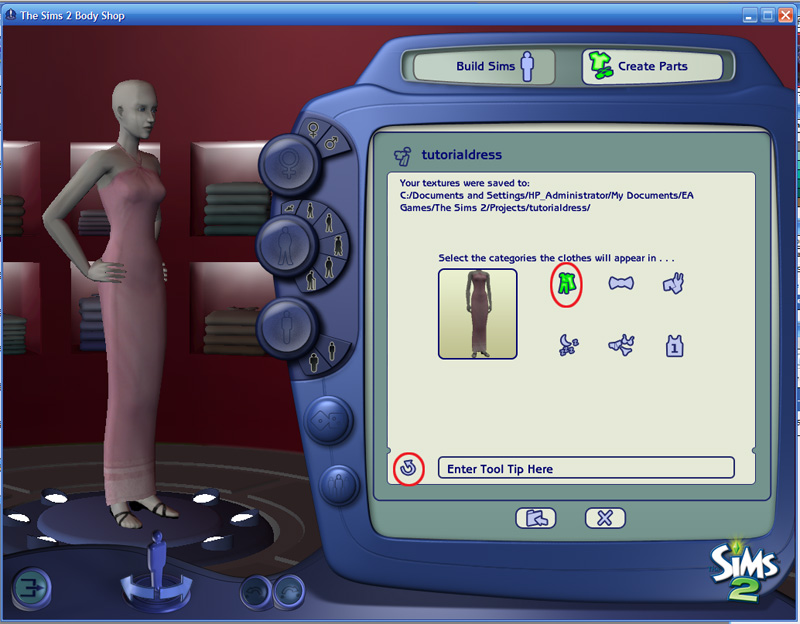
This is the screen that you'll see until you're all done. Note that the "Everyday" icon is highlighted, but all the other clothing categories show up as well. With few exceptions, you can actually save clothing to any category you want, (athletic wear is only full outfits, for example, can't be just a top or bottom) and as many categories as you want, just by clicking on additional categories. The circular arrow button circled on the bottom left is the refresh button. This is what you click every time you change something on the outfit, so you can see how it will look on the sim.
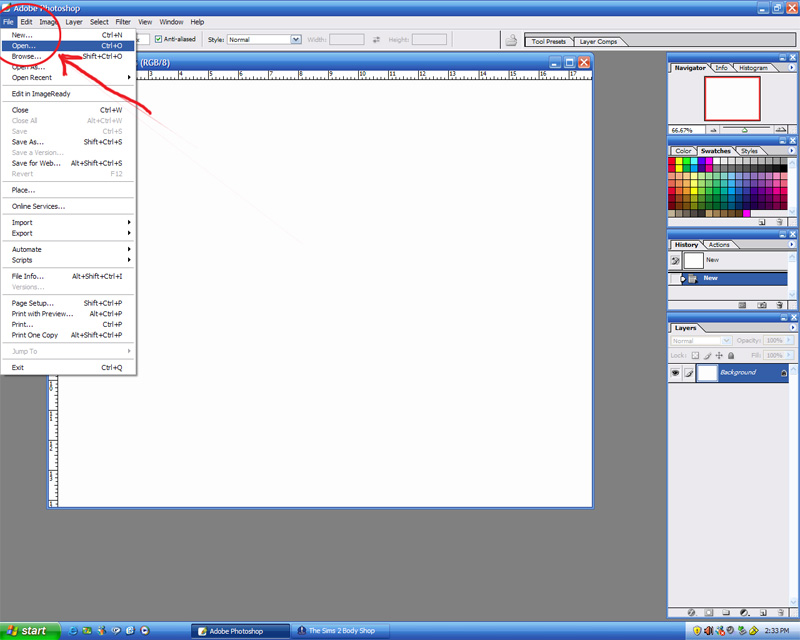
Now it's time to open up your image program. As I said before, I'm using PhotoShop, so the screens I show here will be from that, but your image program will have equivalent steps. From PhotoShop, I've selected File>Open.
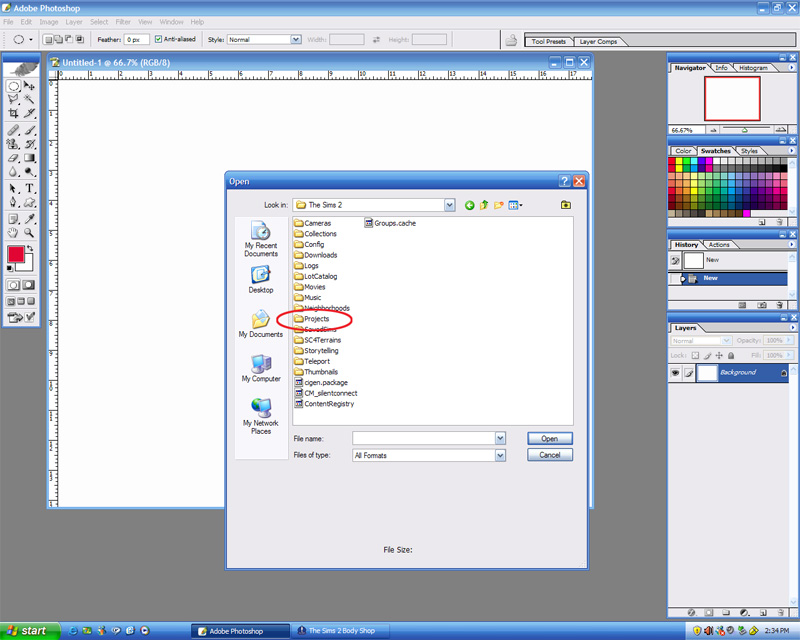
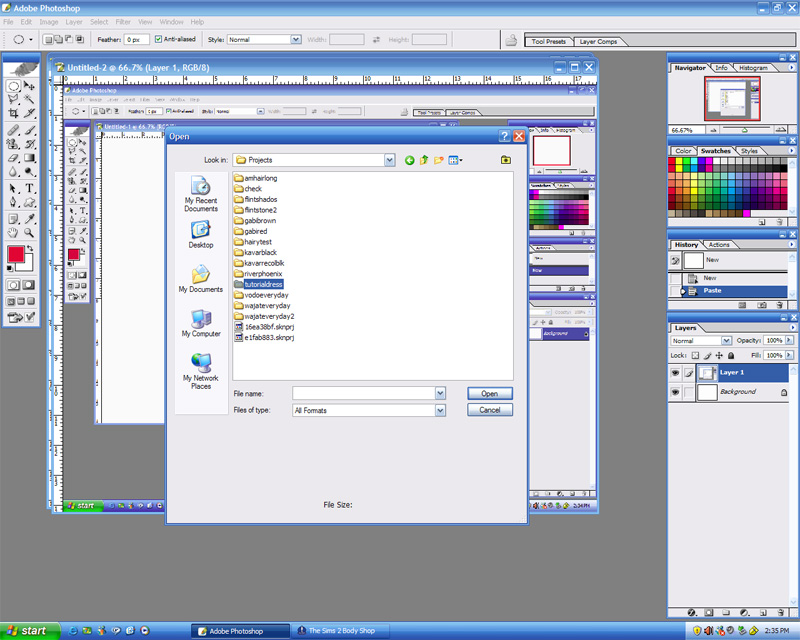
I've skipped a few steps here because they're pretty self-explanatory in writing. Each popup box you get, just double click to get to the next subfolder. You'll see "My Documents" first. Select "EA Games" In that box, select "The Sims 2", and that will give you the box shown here. Select "Projects".
And here you can see "tutorialdress". Double click and open that up.
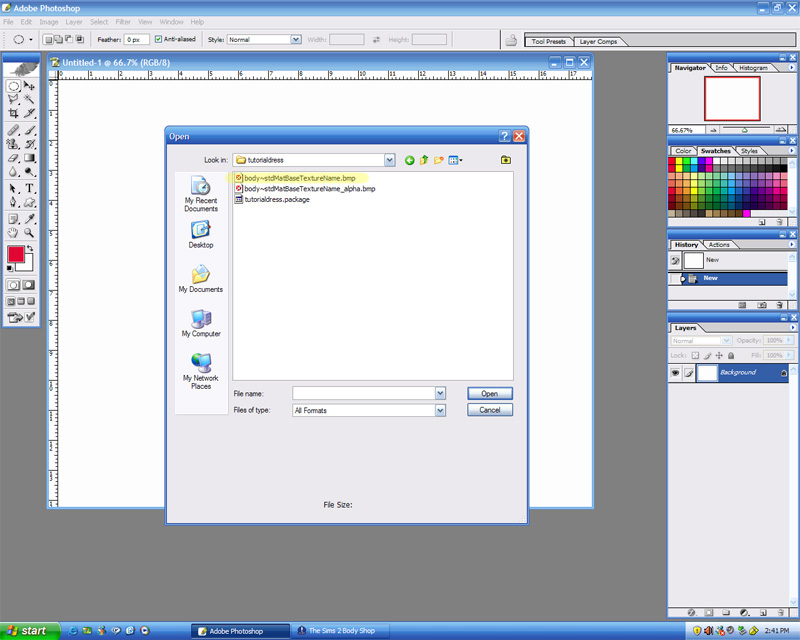
The file we're going to modify is the texture file. It's at the top, and I've highlighted it for you. Your average clothing file will have only the two basic files - the texture.bmp, and the alpha.bmp. (Some will have a file called "NormalMap.texture.bmp", which is your bumpmap. You can read more about that in the Forums later on, it's not something we're going to touch here, because all we're changing is the color, but if you selected a different outfit than the one I did, you might see it.) The texture file is the colored part of the outfit - the fabric the garment is made of, if you will. The alpha is a black and white file that controls what part of the texture appears on the sim. If you want to know more about how the various files work, go to Skinning From The Inside Out.
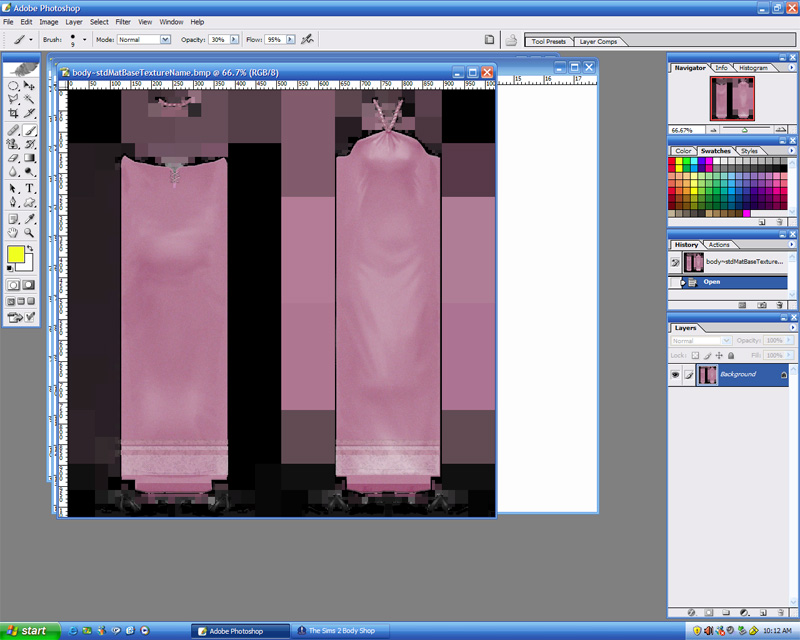
When we open the texture file, this is what we get. The color, patterns, shadows and highlights of that particular outfit are all painted on a flat image!
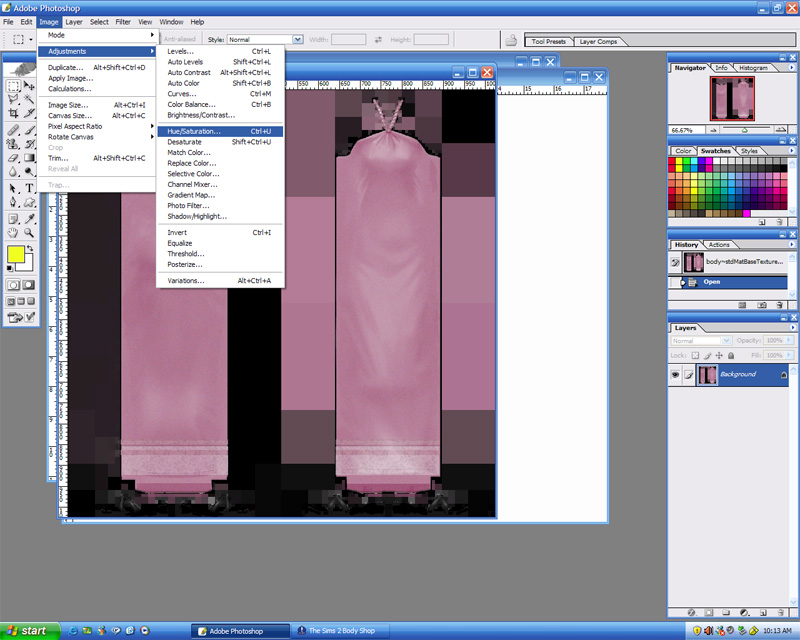
In PhotoShop, our recoloring tools are located on the "Image" menu. From that, we're going to select "Adjustments", and from that, "Hue/Saturation". Again, this is something you can do from any image program, get familiar with the one you decide to use. Hue and Saturation are basic tools.
In Photoshop, the first box we get has sliders, but these don't give us as many options as the box we get when we click on "Colorize".
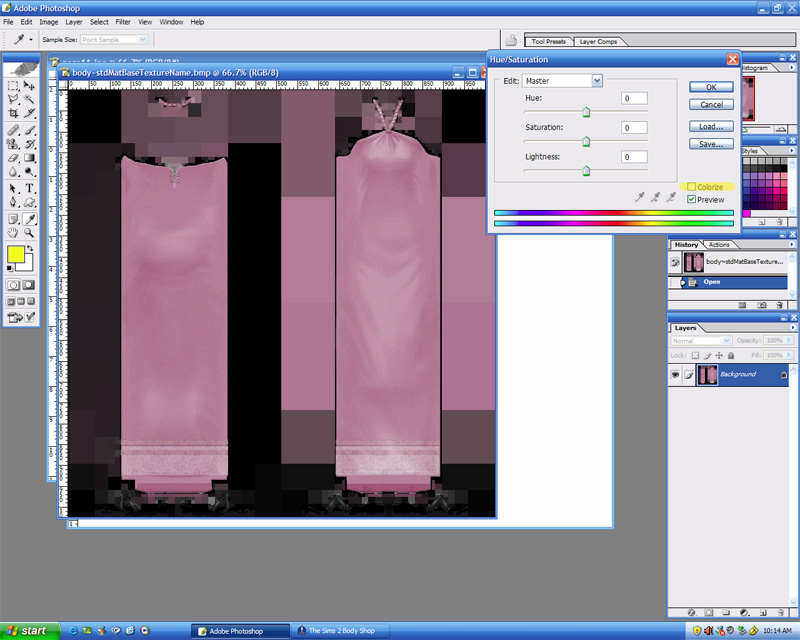
Here's where we get to have fun. Using the Hue, Saturation, and Lightness sliders, we get all kinds of options. I've selected a bold and daring departure from the pale purple - pale pink! OK, not daring, but you can see the difference. Take note, though - this changes the color of EVERYTHING. Your sim now has matching shoes and dress!
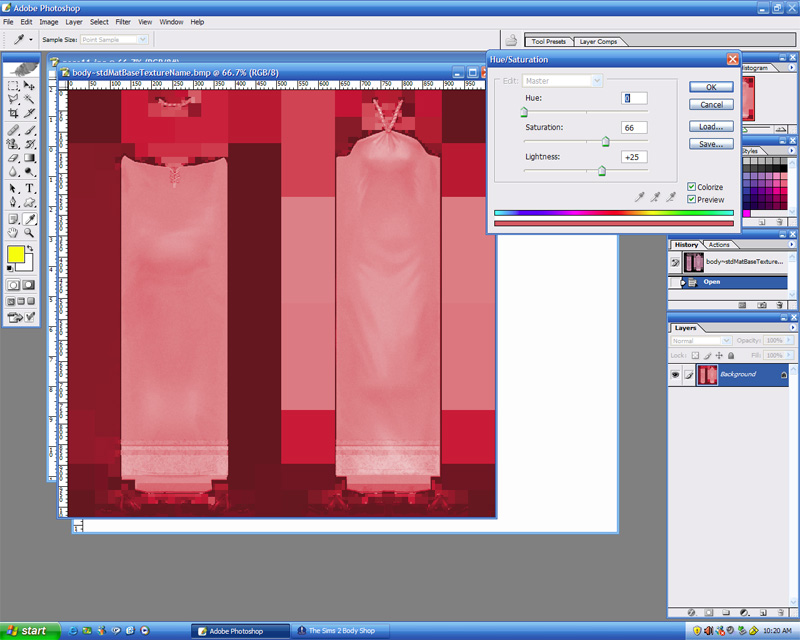
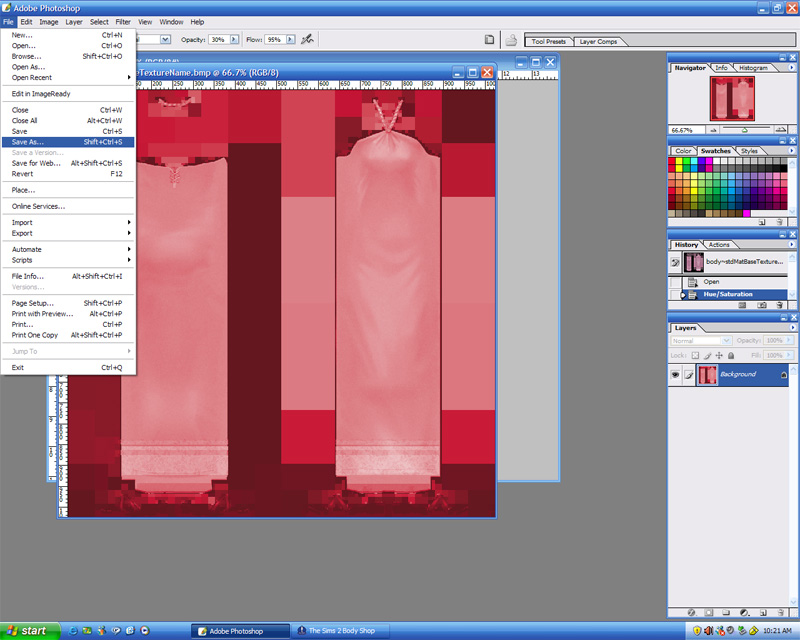
THIS PART IS IMPORTANT! Perhaps you noticed that the file we opened up had .bmp at the end. All your Body Shop files are bitmaps, which is what that .bmp indicates, and if you simply select "Save", PhotoShop will save your file as a photoshop document, or .psd file, which won't work. In addition, PhotoShop will add "copy" to the filename before that extension, which creates an additional, unrelated file, and won't change the outfit in Body Shop. So look again. . .we're clicking File>Save As.
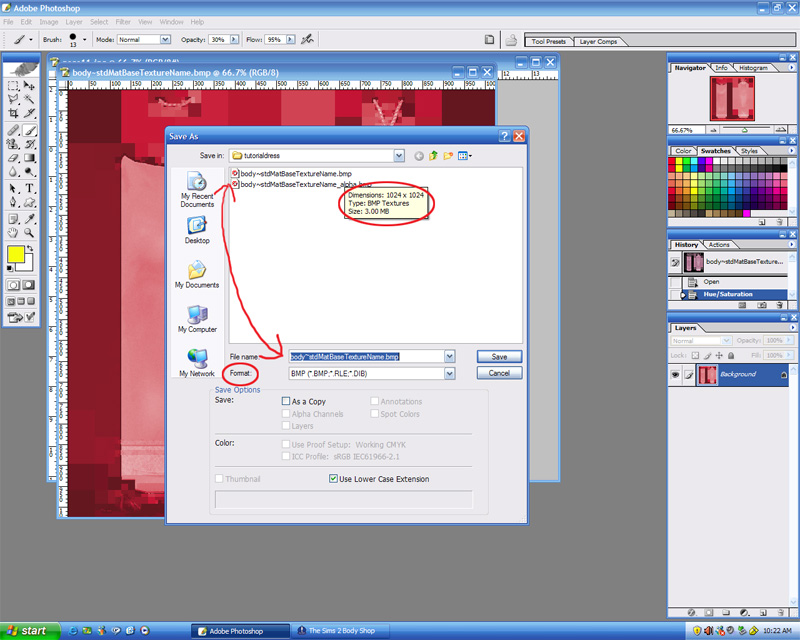
That brings up this lovely box. As you can see, what we're aiming for is the highlighted blue File Name to match the existing texture file name. Plus, I've circled the "Format" line, and you can see that there's a little down arrow to the right of the format name box, which will give you a dropdown where you can select ".bmp" if the extension is automatically changed by your program. (Also, as a point of information, I circled the Details box that pops up when you mouse over the filename at the top, just to let you know that each clothing texture file needs to be 1024X1024 pixels - that's something you'll want to know later if you start doing more involved image changes.)
Hit Enter, or click the Save button, and you get this little warning box, because you're now overwriting the old texture file with the one you changed. Hit Enter, or click OK.
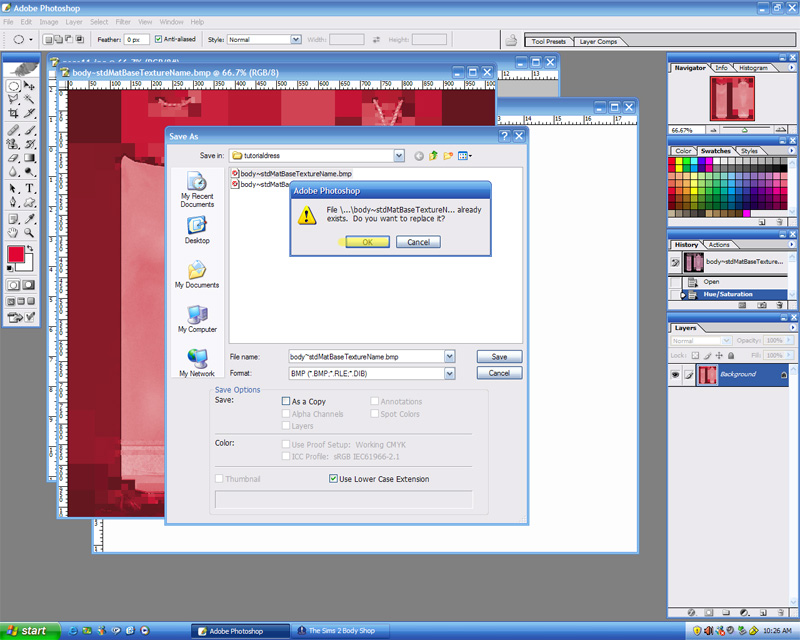
You don't need to change any of the options in this box - just hit Enter or click OK.

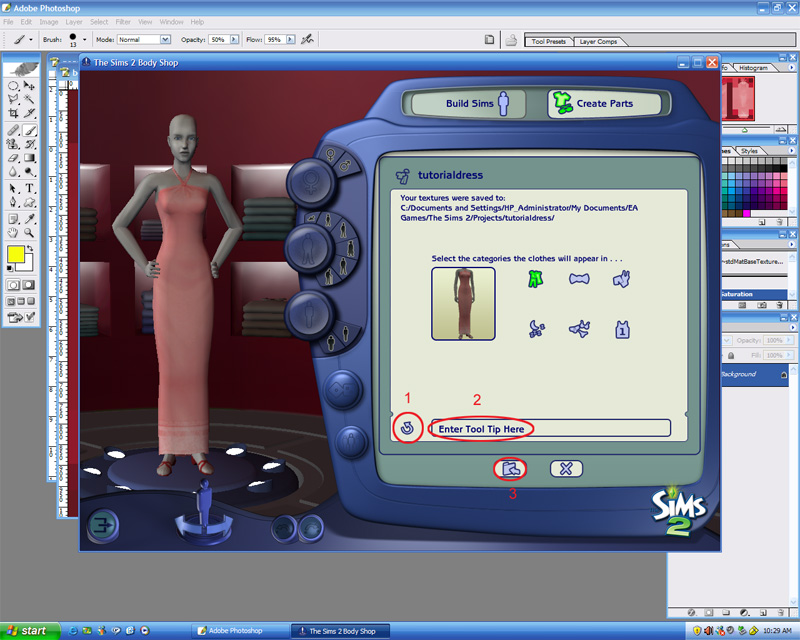
Switch back to Body Shop, hit the Refresh button (1) to see how your outfit has changed. If you like it, give it a name (2), which will show up in Body Shop and Create a Sim when you mouse over the thumbnail of your creation. Finally, click on Import to Game (3), which puts the new outfit into your game. At this point, you can find it in both your Projects folder (and you can delete it if you're done with it) and in Saved Sims (with extra alphanumeric stuff tacked onto the front of it!)
Advertisement
Test Subject
#2
 7th Jul 2006 at 3:58 PM
Posts: 10
Hi, I've followed all the rules and now i go to save in photoshop and it my other files don't come up and down at the bottom it will only let me see psd* files and won't let me change please help!
Test Subject
#3
 8th Jul 2006 at 2:32 AM
Posts: 1
how do i get "PHOTOSHOP"???
Burntoast
~Love me...
...Praise me~
Teehee! O_o
Burntoast
~Love me...
...Praise me~
Teehee! O_o
Test Subject
#4
 8th Jul 2006 at 8:22 PM
Posts: 1
how do u make the sims helllllooo i dont no how to
Test Subject
#5
 8th Jul 2006 at 11:43 PM
Posts: 1
am i screwed if i dont have photoshop?
#6
 9th Jul 2006 at 12:44 AM
Posts: 921
Thanks: 5724 in 61 Posts
Every single one of these questions is answered in the thread. I redesigned the tutorial specifically because this type of question kept coming up, so that they would be answered pre-emptively. Don't just skip through stuff, read and look at the images. Everything is there.
"Living well is the best revenge. . ." George Bernard Shaw
"Living well is the best revenge. . ." George Bernard Shaw
Test Subject
#7
 9th Jul 2006 at 6:46 AM
Posts: 4
what do you do when you don;t have Body Shop?? I went to the Ea Files then the sims2 folder and found no body shop!!! what do I do next?
#8
 9th Jul 2006 at 6:50 AM
Body Shop is included if you have the game installed. Start - Programs - EA Games - The Sims 2** - The Sims 2 Body Shop
** If you have expansions installed choose the entry for the -newest- expansion you have installed. Not the latest installed (if you bought them out of order of release), but the newest expansion.
my simblr (sometimes nsfw)
“Dude, suckin’ at something is the first step to being sorta good at something.”
Panquecas, panquecas e mais panquecas.
Test Subject
#9
 9th Jul 2006 at 7:07 AM
Posts: 4
oh so it only comes in the expansion. see I only the sims 2 at time. but will be getting the university soon, so will that help it?
#10
 9th Jul 2006 at 7:11 AM
No, it doesn't only come in the expansion: it comes with the game. However, if you HAVE an expansion installed, you need to use the shortcut for the newest expansion installed. Otherwise just use the shortcut under "The Sims 2". Body Shop is updated for expansions and it creates a new submenu under "EA Games" for each expansion, each with a shortcut to Body Shop. If you just have the base game, no expansions, run Start - Programs - EA Games - The Sims 2 - The Sims 2 Body Shop.
my simblr (sometimes nsfw)
“Dude, suckin’ at something is the first step to being sorta good at something.”
Panquecas, panquecas e mais panquecas.
my simblr (sometimes nsfw)
“Dude, suckin’ at something is the first step to being sorta good at something.”
Panquecas, panquecas e mais panquecas.
Test Subject
#11
 9th Jul 2006 at 7:14 AM
Posts: 4
yeah!! found it, bad news when I click on it iget this message,
direct3d returned an error: d3derr invalidcall
will now termiate the program!!!
direct3d returned an error: d3derr invalidcall
will now termiate the program!!!
#12
 9th Jul 2006 at 7:20 AM
Then don't get University: get Nightlife or Open for Business. There's more info on that in the Game Help section under the Graphics Cards/Graphics Drivers FAQ but basically you either need a newer expansion or a new graphics card. Expansions are cheaper. 
my simblr (sometimes nsfw)
“Dude, suckin’ at something is the first step to being sorta good at something.”
Panquecas, panquecas e mais panquecas.
my simblr (sometimes nsfw)
“Dude, suckin’ at something is the first step to being sorta good at something.”
Panquecas, panquecas e mais panquecas.
Test Subject
#13
 9th Jul 2006 at 7:23 AM
Posts: 4
oh, ok thank you. You've been a really!! big help, thanks. 

#14
 9th Jul 2006 at 12:18 PM
Posts: 1
Thanks!! it was a great tutorial ,it was a really a great help for me ^__^
#15
 9th Jul 2006 at 7:36 PM
Posts: 921
Thanks: 5724 in 61 Posts
Hey, HP - those answers are in the Skinning FAQs thread, too. No good deed goes unpunished.
"Living well is the best revenge. . ." George Bernard Shaw
"Living well is the best revenge. . ." George Bernard Shaw
Test Subject
#16
 11th Jul 2006 at 3:37 AM
Posts: 1
How do I get PHOTOSHOP. Please answer I already read the thread I just cant find it
#17
 11th Jul 2006 at 3:44 AM
Well, ya can't have been reading too carefully, Cloudo, because that's answered in the beginning of the tutorial... 
my simblr (sometimes nsfw)
“Dude, suckin’ at something is the first step to being sorta good at something.”
Panquecas, panquecas e mais panquecas.
my simblr (sometimes nsfw)
“Dude, suckin’ at something is the first step to being sorta good at something.”
Panquecas, panquecas e mais panquecas.
Test Subject
#18
 14th Jul 2006 at 5:33 PM
Posts: 1
Cool
cool I will try that 
#19
 14th Jul 2006 at 11:39 PM
Great Tut I mastered everthing my clothes recolors are looking awesome thanks for this

Lab Assistant
#20
 15th Jul 2006 at 6:26 PM
Posts: 103
Thanks a lot for the tutorial! it's so great! Thank you!
#21
 15th Jul 2006 at 11:18 PM
Posts: 9
Thanks: 6 in 1 Posts
Just followed this tutorial, it's very simple which is just as well for me cos I have no patience. Found it very easy to follow and hopefully i'll soon be uploading stuff to mts2.
Thank you

Thank you

Lab Assistant
#22
 16th Jul 2006 at 3:17 PM
Posts: 57
Thank you so much for this easy to understand tutorial. Even I can do it...I recolored my first clothes!! *Happy Dance* You are the best!!!! *hugz*
Test Subject
#23
 16th Jul 2006 at 7:26 PM
Posts: 1
uum i dont have "photoshop".....will "piture it" work?
#24
 17th Jul 2006 at 1:57 AM
Posts: 921
Thanks: 5724 in 61 Posts
I'm not familiar with picture it, but the key as to whether an image program will work well for skinning is mostly its ability (or inability) to handle layers. The Skinning FAQs thread has links to programs that do.
"Living well is the best revenge. . ." George Bernard Shaw
"Living well is the best revenge. . ." George Bernard Shaw
Test Subject
#25
 20th Jul 2006 at 7:20 PM
Posts: 3
have just done my first ever recolours!!!!!!!!
They're a bit naff but am sure i will get better. got a bit cocky and put motifs on them all...hehe
Thank you very much for your tutorial!
They're a bit naff but am sure i will get better. got a bit cocky and put motifs on them all...hehe
Thank you very much for your tutorial!
Who Posted
|
|

 Sign in to Mod The Sims