- Site Map >
- Modding and Creation >
- Sims 4 Creation >
- Tutorials >
- General Modding - TS4: Custom TV Channels
- Site Map >
- Modding and Creation >
- Sims 4 Creation >
- Tutorials >
- General Modding - TS4: Custom TV Channels
#1
 10th Sep 2014 at 7:49 PM
Last edited by justJones : 6th May 2018 at 11:07 PM.
Posts: 57
Thanks: 3155 in 4 Posts
INTRODUCTION:
This Tutorial handles with the subject: The Sims 4 - Custom TV Channels
This Tutorial handles with the subject: The Sims 4 - Custom TV Channels
My work
- Things I've done
- Found the right codecs and tools to prepare custom Video files.
- Replace existing Video files.
- Edit the Playlist of each TV Channel. (See Tutorial Part 2 )
- Things I will do soon
- Create New TV Channel.
- Save complete Tutorial as PDF for offline viewing.
- PDF translation into german.
- Preparing Custom Videos and Import using Package File
- Editing TV Channels' Playlist and Import using Package File
- Create custom TV Channels and Import using Package File
- Reserved
- Current Achievements
- Changelog
TUTORIAL PART 1:
Preparing Custom Videos and Import using Package File
Preparing Custom Videos and Import using Package File
Requirements
- S4PE (Download from github.com - I use release v0.1d): This tool is needed for working with the packages.
- VP6 Video Codec from On2 Technologies (Download from marc.simon999.free.fr): This is the Video Codec for Sims 4 Movies.
- VirtualDub (Download from Sourceforge.net): I've used version 1.10.4 (stable) (x86) and with it we will create the right movie files.
- ffdshow (Download from Sourceforge.net): This tool expands the supported video codecs for the input video file in VirtualDub.
Not essential, but I need it to open AVI files with XVID codec (e.g. files converted by FreeStudio). Simply try to open the video you want to use in Sims 4, if it doesn't work, install ffdshow. - Generic Stream Creator (Download from ppmsite.com): This tool creates the right Audio Codec, but it has no UI, it's a command-line tool.
- UI for Generic Stream Creator by Siberian GRemlin (Download from ppmsite.com): This is a simple to use GUI for the tool above.
- VP6 Converter by Siberian GRemlin (Version 0.05 from ppmsite.com or Version 0.08 from planetcnc.ru): This tool merges the Video and Audio stream to the final Video file.
- VLC MediaPlayer (Download from videolan.org ): Not necessary, but it is more comfortable with it, because it supports much more codecs than the Windows Media Player.
- FreeStudio (Download from dvdvideosoft.com ): Not necessary, but with it you can simply resize and convert your custom video file.
Install and configure required Tools
- Prepare your Workspace
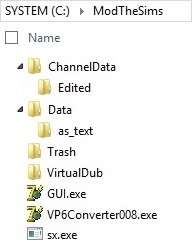
For a better overview, I recommend a small folder structure.
First, go to your (C:\)-drive and create a folder named ModTheSims.zip and in it folders named "ChannelData">"Edited", "Data">"as_text", "Trash" and "VirtualDub".
It looks something like this (the files came later):
Then download all tools from the requirements list and do the following:- Extract the "sx.exe" from the "SoundExchange30101.rar"to "C:\ModTheSims".
- Extract the "GUI.exe" from the "SoundExchange30101_GUI.rar"to "C:\ModTheSims".
- Extract the "VP6Converter005.exe" from the "VP6_Builder.rar"to "C:\ModTheSims".
- Extract the content of the "VirtualDub-1.10.4.zip" to "C:\ModTheSims\VirtualDub".
- Install Software and Codecs
Download and install the VP6 Codec by double-clicking on the downloaded "vp6_vfw_codec.exe". The installation wizard is very simple and the installation path can be the given one or somewhere you like.
To seperate the install instructions and the main tutorial for preparing your video, I will now explain how to install FFDShow.
As I've said, it's not essential. If your prefered video files have a supported codec by VirtualDub, you can skip this installation. Otherwise install FFDShow by the following steps:- Double click on the downloaded "ffdshow_rev4531_20140628.exe".
- Select your language and on main wizard click "Next".
- Now scroll down the list of the available components, activate the VirtualDub PlugIn and click "Next".
- Select your speaker configuration (I've used 2.0) and click "Next".
- Paste in your prefered install path (I've used the given one) and click "Next".
- Click "Install" and when it's finished be sure to uncheck all suggestions, because we don't need to configure FFDShow.
Working with VirtualDub
- Open your Video file
Before you can begin, you need to make sure that you have an VP6 compatible video resolution and some other params (see the list).
The width has to be a multiple of 32 and the height a multiple of 16. So I decided to use the same as the original tv channel videos: 256x144 Pixel.
To resize your video file, simply use tools like the component of FreeStudio: Free MP4 Video Converter (Download from www.dvdvideosoft.com).
Load your file into the tool, select "AVI" in Preset and on the right side, click on the magic wand.
In the appearing window, you need to set the following video parameters:- Container: AVI
- Video-Codec: MPEG4
- Frames per Second: 15
- Bit rate: As input file
- Width: <Multiple of 32> (e.g. 256)
- Height: <Multiple of 16> (e.g. 144)
- Format: MP3
- Sampling Rate: 48000 Hz
- Channels: Stereo
- Bit rate: 320 Kbits/s
Well, start VirtualDub by double clicking on "VirtualDub.exe" inside the "VirtualDub" folder.
Open your Custom Video by clicking on "File", "Open video file ..." and select your video. If an error with unsupported video codecs appears, install the FFDShow.
I recommend to use an AVI video file, because this worked for me. I've not tried to use other files.
- Convert the VBR to CBR
After you've checked the error with unsupported video codec, another warning popup will appear:
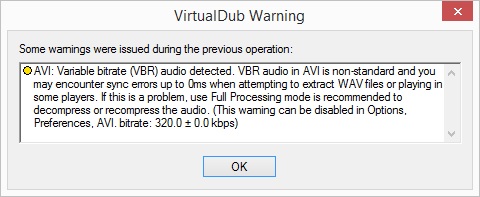
This means, that the AVI has a variable bit rate in audio stream. That's not supported by the game and will crash it, if the movie will be played in succession.
So we need a constant bit rate.
First, click "OK" and go to "Audio" and activate "Full processing mode" by clicking on it.
Open "Audio" menu again and select "Compression...". Make sure that "<No compression (PCM)>" is highlighted, then click on "OK".
Select "File", "Save WAV" and name it "TempAudioStream.wav".
After you created the temporary WAV, go to "Audio" and click on "Audio from other file ...". Select the "TempAudioStream.wav" and click "OK".
Return to the "Audio" menu, click on "Compression ..." and select "MPEG Layer-3". On the left side select "320 kBit/s, 48.000 Hz, Stereo 40KB/s" and click "OK".
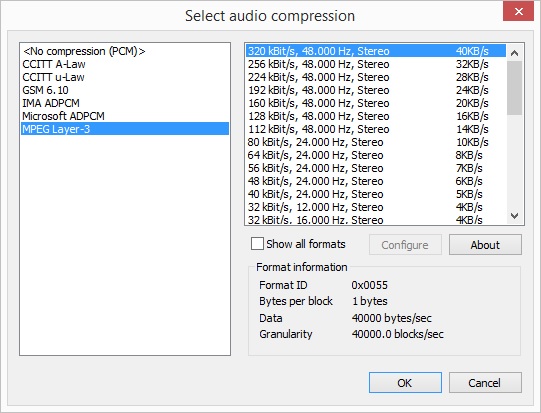
Before you save the CBR video file, go to "Video" and make sure that "Direct stream copy" is activated. In the same way, check in "Audio" that "Full processing mode" is still activated".
Now save the file by clicking "File", "Save as Avi ...", name it "CBRVideo.avi".
Then please completely close VirtualDub to reset all settings from above.
To clear your workspace, move the follwing files into the "Trash" folder:- All video files excluding "CBRVideo.avi".
- All WAV files.
- "GUI.exe"
- "VP6Converter005.exe"
- "sx.exe"
- "CBRVideo.avi"
- Set the right video codec and export necessary files
Now start a new instance of VirtualDub, click on "File", "Open video file ..." and select "CBRVideo.avi". The VBR-warning popup should not appear.
Click on "Video", "Compression...", select "VP60 Simple Profile" and click "OK".
And make sure, that in the "Audio" menu "Direct stream copy" and "Stream 1" in "Source audio" is activated.
After that, click on "File", "Save as Avi ...", name it "VP6Video.avi" and save it into the same folder as "GUI.exe" and "VP6Converter008.exe" (It should be the folder "ModTheSims").
Right after that, click on "File", "Save WAVE ..." and save it as "AudioStream.wav".
Exit VideoDub.
To clear your workspace, move the "CBRVideo.avi" file into the "Trash" folder.
So now, you have the following files in the "ModTheSims" folder:- "GUI.exe"
- "VP6Converter005.exe"
- "sx.exe"
- "VP6Video.avi"
- "AudioStream.wav"
Convert the Audio Codec
- Generic Stream Creator
Right click on "GUI.exe" and "Run as administrator".
When the tool is open, click on "Browse" and select the "AudioStream.wav".
Before you click on "Create", you have to add some commands to the "Input file" line:
C:\ModTheSims\AudioStream.wav" -fps"15" -loops"-1" -loope"-1
Please note: The fps must be same as the fps of your Custom Video file. To get this info, use VLC MediaPlayer or define the fps in the Free MP4 Video Converter, for instance.

Now click "Create" and after the "AudioStream.dat" is created, click on "Exit"
Create the final AVI file
- VP6 Converter
Right click on "VP6Converter005.exe" and "Run as administrator".
When the tool is open, click on "Browse" next to the text field for "Input video file" and select the "VP6Video.avi".
At next step, activate "Audio", click on "Browse" next to the text field for "Input audio file" and select the "AudioStream.dat"
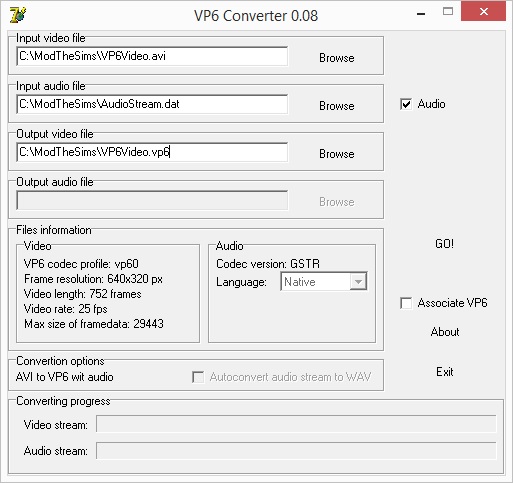
Please notice, the official download link (from where I've downloaded the tool) of the VP6Converter in version 0.08 is no more available from http://sg.redsys.ru/files/video/VP6_Builder.rar
If you've got errors, please search for version 0.08 on the internet and if you find a functional download link, please leave a comment.
Now click "GO!" and after the "VP6Video.vp6" is created, click on "Exit"
- Rename the VP6 file
I have researched for a long time, how to transmute this file back into a AVI file.
Eventually, I thought, why do I not rename the file easy to AVI.
And lo and behold, it worked
So the last step for preparing your video file is: Simply rename "VP6Video.vp6" into "FinishedVideo.avi".
That's it.
Search for the right Instance ID
- Open "ClientFullBuild1.package" using s4pe
Start s4pe and click on "File", "Open". Navigate to your installation path: "Program Files (x86)\Origin Games\The Sims 4\Data\Client" and select the "ClientFullBuild1.package".
- Activate filter to find all video files
Todo this: Simply activate "Filter active" (1), activate "Tag" (2), fill in "AVI" (3) and click on "Set" (4)

- Search for the video to replace
The easiest way to watch all video files is to select all AVI files, click on "Export" and "To file ..", select a folder and open these files.

Please Note: The Windows MediaPlayer cannot play these video files (because of the unsupported codecs), instead use the VLC MediaPlayer, for instance.
In this way I found the intro files for my "No Intro"-Mod: http://modthesims.info/download.php?t=532966
For example, the filename of the Sport Show is "S4_376840D7_00000000_83AA458A9FF99646%%+_AVI.avi".
The syntax of exported files using s4pe is: "S4_Type_Group_Instance%%+_AVI.avi". Because of that, the instance ID of the Sport Show is "0x83AA458A9FF99646"

Last preparations and create Package
- Rename your "FinishedVideo.avi"
After you've found your favorit video file which you want to replace, copy its filename.
Then rename your "FinishedVideo.avi" to the copied name.
For example, rename "FinishedVideo.avi" to "S4_376840D7_00000000_83AA458A9FF99646%%+_AVI.avi". So the custom video will be played instead of the Sport Show in the game.
- Create a new package file and save it the Mods folder
Start a new instance of s4pe, click on "File" and "New".
Right-Click on the empty space, then on "Import" and "From file.." and import the replacement video.

In the appearing window, uncheck "Use resource name" (1) and click on "OK" (2).
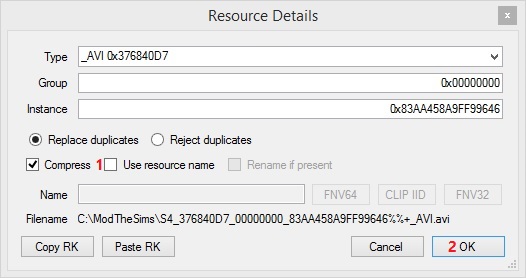
To save the package, simply click on "File", "Save", goto "Users\Documents\Electronic Arts\The Sims 4\Mods" and name it uniquely (e.g. "Replace Sport Show.package").
Have Fun with your custom video
- Start The Sims 4
That's it. Now start the game.
A "MODS"-window will appear, where you can see the filename of the package (without file extension).
Load your savegame and watch the channel you've edited.
Additional Credits
- Thanks to all developers of:
- s4pe
- VP6 Video Codec (On2 Technologies)
- VirtualDub
- FFDShow
- Generic Stream Creator (Siberian GRemlin)
- VP6 Converter (Siberian GRemlin)
- VLC MediaPlayer
- FreeStudio
- Thanks to these People:
- leefish (You've respond very quickly to my request and realized the new Plain Header. Here is the Thread.)
- Shimrod101 (You gave me the crucial information.)
- Odistant (You create a very detailed tutorial for Sims 3, it is almost completely useful for Sims 4.)
- blackg72 (You wrote the solution for audio and video sync.)
- Matthew Lee (You wrote the solution for converting VBR to CBR on eHow.)
- Appw0905 (Thank you for the link of the VP6 Converter 0.08.)
7 users say thanks for this.
(Who?)
Thanks
Advertisement
#2
 10th Sep 2014 at 7:55 PM
Last edited by Simser der Deutschen : 15th Sep 2014 at 4:02 PM.
Posts: 57
Thanks: 3155 in 4 Posts
TUTORIAL PART 2:
Editing TV Channels and Import using Package File
Editing TV Channels and Import using Package File
Additional Requirements
- The Sims 4 Data Tool (Download from modthesims.info): This tool is needed for editing DATA files.
- TS4 STBL Editor (Download from github.com): With this Editor we will edit the TV Channels' Names.
Install and configure required Tools
- The Sims 4 Data Tool and the TS4 STBL Editor
Simply download and place the tools from the additional requirements where you'd like.
Search for the right Instance ID
- Open "ClientFullBuild0.package" using s4pe
Start s4pe and click on "File", "Open". Navigate to your installation path: "Program Files (x86)\Origin Games\The Sims 4\Data\Client" and select the "ClientFullBuild0.package".
- Activate filter to find all DATA files
Todo this: Simply activate "Filter active" (1), activate "Tag" (2), fill in "DATA" (3) and click on "Set" (4)

- Export all DATA files
Click on "Resource", "Select all" (This will take few seconds) and then on "Resource", "Export" and "To file .." and select the "Data" folder in "ModTheSims" (This will take more seconds).
- Search for the videoplaylists
If you want to know how I got all playlists, click on the button below:
- Start "The Sims 4 Data Tool", click on "Browse" and open one random ".data"-file in the "Data" folder.
- Click on "Export all" button and wait for finish. This will convert all ".data"-files to ".txt"-files and put them into the "as_text" folder.
- Because the Windows Search Engine can search in text files, we can now search for "VideoPlaylist" in the "as_text" folder.
- The result is a list of 9 files and this are the videoplaylists.
Now go into "C:\ModTheSims\Data", search for the following files and copy them to "C:\ModTheSims\ChannelData":
Filename Description S4_545AC67A_00BF458B_EFE29AB011F5411A%%+DATA.data Action Channel S4_545AC67A_00BF458B_E8CB9FDC4B99B39D%%+DATA.data Sport Channel S4_545AC67A_00BF458B_C908D4D7C3EF5D31%%+DATA.data Comedy Channel S4_545AC67A_00BF458B_88D4D4581A01C683%%+DATA.data Kids Channel S4_545AC67A_00BF458B_5D630A58015C3E89%%+DATA.data News Channel S4_545AC67A_00BF458B_5120A894AE36D1F8%%+DATA.data Cooking Channel S4_545AC67A_00BF458B_2EDC07BA49FB2931%%+DATA.data Drama Channel
These DATA files contains videoplaylists too, but there channel names are not present by default in the game:
Filename Description S4_545AC67A_00BF458B_AAEE767EB7683E1D%%+DATA.data Music Channel (This Channel will be available when you upgrade your TV.) S4_545AC67A_00BF458B_A9D0C45A4A9CC2C5%%+DATA.data Surf Channel (I will found out its function soon.)
Working with the STBL Strings
- Open "Strings_<Your locals>.package" using s4pe
Start s4pe and click on "File", "Open". Navigate to your installation path: "Program Files (x86)\Origin Games\The Sims 4\Data\Client" and select the "Strings_<Your locals>.package".
- Export the STBL file
Richt-Click on the STBL file, "Export" and "To file .." and select the "ChannelData" folder in "ModTheSims".
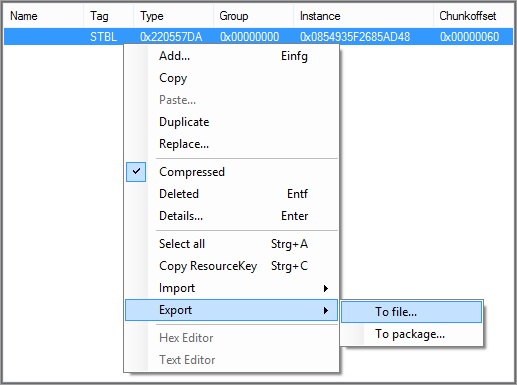
- Edit the STBL file
Now you have to start the TS4 STBL Editor, click on "File", "Open STBL File" and select the exported STBL file.
You can edit the Strings directly in the Tool, but there is a very huge number of Strings and currently we have no Search function in the tool (I'm working with release 1.2).
So we should simply export the STBL file to a more comfortable filetype: Click on Export and export it as XML file to the "ChannelData" folder.
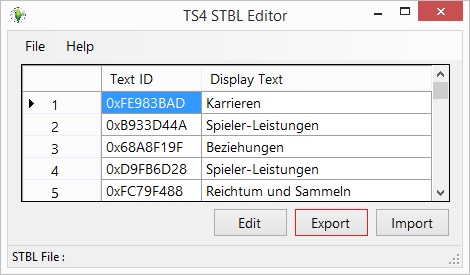
Go into the Windows Explorer and open this XML using the Editor (Notepad) by right-click on it and select "Edit".
Now hit the shortcut for searching: CTRL+F (For all germans: STRG+F).
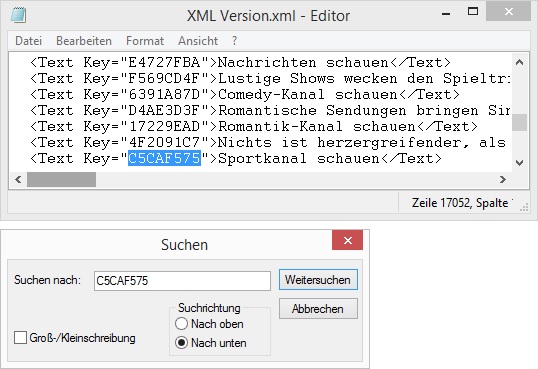
Then type in the IDs of the strings you want to edit. To shorten your work, here is the list of the IDs:
Channel ID of the displayed text in the Channel menu ID of the tooltip, which will appear on mouseover the channel name Action FF6ECE89 17061643 Comedy 6391A87D F569CD4F Kids 2DF89760 C7F00AD8 Cooking 4E8C22E3 EB04D85E News E4727FBA 75632946 Romance A6EAE91B D4AE3D3F Sports C5CAF575 4F2091C7
When you've find the string you want to edit, type in your favorite channel name between the <text>-Tag.
Save the file by pressing CTRL+S (For all germans: STRG+S). and close the Windows Editor.
Go back to the TS4 STBL Editor, click on "Import" and select the just now saved XML file.
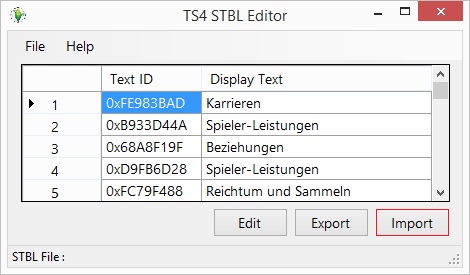
Then click on "File" and "Save". Sometimes the editor crashes for me by clicking only "Save", if it crashes for you too, select "Save as.." and overwrite STBL.
Last steps and Packaging
- Create a new Package file using s4pe
Start a new instance of s4pe, click on "File" and "New".
Right-Click on the empty space, then on "Import" and "From file..".
In the appearing window you can now select the custom Video file from Tutorial Part 1.
If you doesn't renamed the "FinalVideo.avi" to the s4pe syntax (S4_Type_...), the video will not be listet in the appearing Import window. Anyway, to import the "FinalVideo.avi" just click on the dropdown menu ("Exported files (S4_*.*)") and select "All files (*.*)".

Open the AVI file and fill in the following Resource Details:- Type: _AVI 0x376840D7
- Group: 0x00000000
To do that, make sure "Use resource name" is activated and fill in a unique name for your movie in the text field near to "Name".
(Don't use words like "Test", "Movie" and so on, they could be already used in the game).
For example, my "FinalVideo.avi" certains the official Sims 4 tv commercial, so I filled in "Sims 4 TV Werbespot" (It's german )
)
After you've chosen your favorite name, click on "FNV64". This will create a hopefully unique id in the "Instance" field.
For me, the video file will have the instance: 0xB1DCED21EFBD7BB0
Now uncheck "Use resource name", otherwise s4pe will run into an error.
To finish the import, click on "OK".
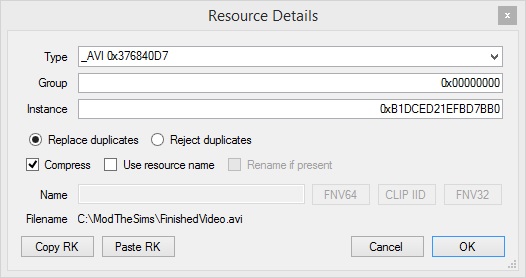
Important: Do not close s4pe, we're continuing with it in step 3 "Import the new Playlist DATA and save the Package".
- Add the Custom Video to a Playlist
Now we have the new instance id, which will added to the Video Playlist.
At the next step, you have to chose the TV Channel where you want to play your Custom Video.
I decided to play the Sims 4 TV Commercial on the Kids Channel.
Start now a new instance of "The Sims 4 Data Tool" and click on the "Browse" button.
Go into the folder "C:\ModTheSims\ChannelData" and select your favorite channel data (See the list above to find the right file name).
I will open the Kids Channel data: S4_545AC67A_00BF458B_88D4D4581A01C683%%+DATA.data
You will now see a simple list in the main part of the tool:
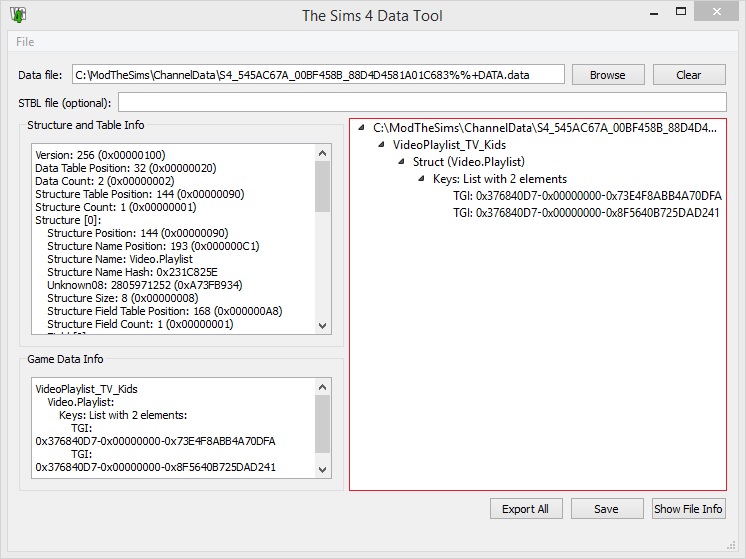
Then just right click on the last TGI item and click "Clone TGI: [Key]".

The syntax of these TGI keys is similar to exported s4pe files: "[Type]-[Group]-[Instance]"
The only thing you have to do now: Double click on the cloned key and change the [Instance] to the newly generated one from the step before.
I will change "0x376840D7-0x00000000-0x8F5640B725DAD241" to "0x376840D7-0x00000000-0xB1DCED21EFBD7BB0"

Just click on "Save" and save it into the folder "C:\ModTheSims\ChannelData\Edited".
Important: Do not rename the DATA file, because you need the right filename syntax for importing in s4pe.
- Import the new Playlist DATA and the customized STBL file
You are very good. These are the very last steps.
Back into the opened s4pe, Right-Click on the empty space, then on "Import", "From file.." and select your edited DATA + the customized STBL file.
(Simply select the DATA and hit SHIFT while clicking on the STBL).
Make sure that "Use resource name" is disabled on the appearing import window and click on "OK".
To finish the progress, save the package: Click on "File", "Save", goto "Users\Documents\Electronic Arts\The Sims 4\Mods" and name it uniquely (e.g. "Sims 4 Channel instead of Kids Channel.package").
Have Fun with your customized videoplaylist
- Start The Sims 4
That's it. Now start the game.
A "MODS"-window will appear, where you can see the filename of the package (without file extension).
Load your savegame and watch the channel you've edited.
Additional Credits
- Thanks to the developers of:
The Sims 4 Data Tool
TS4 STBL Editor
- Thanks to this MTS Member:
velocitygrass (You create the very useful Data Tool and support me in the "Export all" function.)
#3
 10th Sep 2014 at 7:56 PM
Last edited by Simser der Deutschen : 11th Sep 2014 at 12:40 PM.
Posts: 57
Thanks: 3155 in 4 Posts
TUTORIAL PART 3:
Create custom TV Channels and Import using Package File
Create custom TV Channels and Import using Package File
Still in Progress
#4
 10th Sep 2014 at 7:56 PM
Last edited by Simser der Deutschen : 11th Sep 2014 at 7:06 PM.
Posts: 57
Thanks: 3155 in 4 Posts
TUTORIAL PART 4:
Reserved for eventually tutorials which depend on "Creating Custom TV Channels"
Reserved for eventually tutorials which depend on "Creating Custom TV Channels"
Reserved
#5
 11th Sep 2014 at 12:31 PM
Last edited by Simser der Deutschen : 15th Sep 2014 at 3:53 PM.
Posts: 57
Thanks: 3155 in 4 Posts
CURRENT ACHIEVEMENTS:
Some informations about the current progress
Some informations about the current progress
Interesting files
- S4_545AC67A_00B6465D_00000000000081A4%%+DATA.data
Name: aspiration_Utility_AllChannelsStations
Content:- Instance ID: 0x0000000000008195 Watch_Action
- Instance ID: 0x000000000000819A Watch_Comedy
- Instance ID: 0x0000000000008198 Watch_Cooking
- Instance ID: 0x0000000000008199 Watch_Fireplace
- Instance ID: 0x0000000000008197 Watch_Kids
- Instance ID: 0x000000000000819B Watch_News
- Instance ID: 0x0000000000008196 Watch_Romance
- Instance ID: 0x0000000000008194 Watch_Sports
- Instance ID: 0x000000000000819E Listen_Alt
- Instance ID: 0x000000000000819F Listen_Blues
- Instance ID: 0x00000000000081A0 Listen_Classical
- Instance ID: 0x000000000000819D Listen_Electro
- Instance ID: 0x00000000000081A1 Listen_Pop
- Instance ID: 0x00000000000081A2 Listen_Retro
- Instance ID: 0x00000000000081A3 Listen_Romance
- S4_545AC67A_0069453E_0000000000008194%%+DATA.data
Name: Watch_Sports
Content:- display_text: STBL ID: 0x00000000
- satisfaction_points: Integer: 0
- tooltip: STBL ID: 0x00000000
- S4_545AC67A_00BF458B_E8CB9FDC4B99B39D%%+DATA.data
Name: VideoPlaylist_TV_Sports
Content:- TGI: 0x376840D7-0x00000000-0x83AA458A9FF99646
- S4_545AC67A_00E9D967_0000000000012AC9%%+DATA.data
Name: tv_PickChannel
Content:- PieMenuCategory:
- _collapsible: Bool: true
- _display_name: STBL ID: 0x8C366632
- _display_priority: Integer: 8
- _icon: TGI: 0x00000000-0x00000000-0x0000000000000000
- _parent: Instance ID: 0x0000000000000000
- _special_category: Value: 0x0000000000000000
- mood_overrides: Empty list
My thoughts about these files
- S4_545AC67A_00B6465D_00000000000081A4%%+DATA.data
This seems to be a list of all TV and radio channels.
In addition, the instance id of "Watch_Sports" matches with next file (It matches for the other channels, too) - S4_545AC67A_0069453E_0000000000008194%%+DATA.data
After I've found this file, I was really happy - but not a long time. The STBL IDs of every channel instance id are empty.
I've also tried to edit the STBL ID in this file to "0xEA23232" (It represents the word: TV). I thought maybe the Sport Channel will be renamed to "TV".
But it doesn't.
- S4_545AC67A_00BF458B_E8CB9FDC4B99B39D%%+DATA.data
This is the already known playlist of an channel (Compare to tutorial part 2, when we've added new videos to this playlist).
Looking at these 3 files, I recognize some connections:- In the first file, there are all channels listed. For example, it lists the Sport Channel and linked it to the instance id "0x0000000000008194".
- The second file is the target of this connection and could set the channel name and description. (Maybe there is an error in the Sims 4 Data tool, which deletes the right STBL ID)
- But the third file is not linked to the first 2 files. There is no information in it, which represent that this is the playlist for the instance id "0x0000000000008194".
I think, there is an file missing between the second and the third. There must be a file which links the playlist to the "S4_545AC67A_0069453E_0000000000008194%%+DATA.data".
- S4_545AC67A_00E9D967_0000000000012AC9%%+DATA.data
This files contains the button for the channel menu. But the only useful information in it is the STBL ID.
It's not important to create my own channel.
Summary
- I'm on the right way

I think the goal is no longer in too far away. If anyone have an suggestion, idea or usefull links, please leave a comment and we will find the right solution together.
#6
 11th Sep 2014 at 7:04 PM
Last edited by Simser der Deutschen : 28th Dec 2014 at 3:11 PM.
Posts: 57
Thanks: 3155 in 4 Posts
CHANGELOG:
News, Updates and Announcements
News, Updates and Announcements
Quote:
|
[15.09.2014 16:50 PM CET] Now I've updated Tutorial Part 2, too. So I can go back on working with the XML Tuning files. |
Quote:
|
[15.09.2014 16:14 PM CET] I've updated Tutorial Part 1 and decided to not provide a new "ModTheSims.zip" because I'm not allowed to put tools in it. In addition, Windows does not allow to include empty folders in a zip file. So it is not necessary any more. |
Quote:
|
[15.09.2014 14:11 PM CET] For now, I stop my work for custom channels. I have to update the tutorial and the ZIP, because it seems to violate the copyright. Thanks for the note, plasticbox. The problem, I forgot where I've found a working VP6 Codec. Please be patient. |
Quote:
|
[15.09.2014 13:13 PM CET] I misunderstood. It is possible to load the tuning files. I will start working again. For now, my game says an error on startup and all TVs are deleted. If I buy a new one, it cancels with an error: There is an Script error (Or similar like that) Thanks again to velocitygrass. |
Quote:
|
[15.09.2014 12:40 PM CET] With the support of velocitygrass, if found out, what I think I have to do with xml tuning files to get custom channels. But the problem is, since the update from 09. Septembre, xml tuning files will not be loaded by game. Link to this news |
Quote:
|
[15.09.2014 08:50 AM CET] I'm really hard working on custom TV Channels. I've got some really usefull informations from velocitygrass, but for now, it doesn't work. Because of that, I will add a quick addition to Part 2, where I will clear, how to edit the right IDs in the STBL to change the TV Channels' Names. |
Quote:
|
[11.09.2014 07:32 PM CET] Okay, It was a really hard work, but after nearly 3 hours, I've finished Tutorial Part 2 Feel free to use it, and leave a comment, if you need help/have suggestions or simply say thanks.  |
Quote:
|
[11.09.2014 04:19 PM CET] I found out, how to edit the channel playlists. Please be patient, I'm writing Tutorial 2 in this moment. It will appear within the next hours. |
Quote:
|
[11.09.2014 01:14 PM CET] I've finished the tutorial, upload it and attached all required files. Now everyone can use this guide to import your own video files, it is no longer for alpha testers. All works fine, if you completely go step by step, no game crash will appear (I hope so, otherwise leave a comment). At the next time, I will try to edit the playlists of the tv channels and later on: Create own Channels. But for now, have fun with your custom movies. |
Quote:
|
[11.09.2014 09:42 AM CET] Because of a missing file ("sx.exe") in the "ModTheSims.zip", I've updated it. Please redownload the new one. |
Quote:
|
[11.09.2014 07:31 AM CET] I was right, there was an issue with the audio codec and found out, how to solve it: The video file contains an audio stream with a variable bit rate (VBR), but succession only works with constant bit rates (CBR). So we need to convert it. I will update the tutorial within the next hours. |
Quote:
|
[10.09.2014 08:55 PM CET] This Tutorial is for alpha testers only, because the game crashes at one point: If the generated playlist for the tv channel (where you place in the Custom video) is set to play the Custom Video one time and then another video, all works fine. But if it is set to play the Custom Video in succession, the game crashes. So please import the Custom Video only for testing. Your savegame won't be deleted or damaged, but you will lose every unsaved progress after the last gamesave. If anyone has an idea, or solves the problem, please leave a comment. By the way, I think, maybe there is an error in the audio codec. Maybe the sampling or bit rate, I don't know for now. Or maybe the extra command in the GUI.exe is in Sims 4 not necessary (I have just inserted the phrase because it was needed in Sims 3.) Please be experimental. |
#7
 13th Sep 2014 at 8:28 PM
Posts: 2,671
Thanks: 62741 in 190 Posts
This is great work, thanks! Can't wait for part three!
To save a bit of time, you can combine steps 2 and 3 in Working with VirtualDub. Just setup the video once with the final VP60 video compression and MPEG3 audio compression settings and do the save AVI and save WAV in quick succession. At least that's been working for me so far, haven't seen a crash yet.
To save a bit of time, you can combine steps 2 and 3 in Working with VirtualDub. Just setup the video once with the final VP60 video compression and MPEG3 audio compression settings and do the save AVI and save WAV in quick succession. At least that's been working for me so far, haven't seen a crash yet.
#8
 14th Sep 2014 at 11:55 AM
Last edited by Simser der Deutschen : 14th Sep 2014 at 1:40 PM.
Posts: 57
Thanks: 3155 in 4 Posts
Quote: Originally posted by scumbumbo
|
This is great work, thanks! Can't wait for part three! To save a bit of time, you can combine steps 2 and 3 in Working with VirtualDub. Just setup the video once with the final VP60 video compression and MPEG3 audio compression settings and do the save AVI and save WAV in quick succession. At least that's been working for me so far, haven't seen a crash yet. |
Thanks for this hint.

I know the tutorial is very detailed and very long. I will reduce this soon, but at first I wanted to upload my achievements

I thought about when I've used mods for the first time - it was for Sims 2 and I had no idea and don't understand, how the modders create so cool modifications. So wanted to provide a really detailed step-by-step guide which will work for all who had no experience in modding.
Test Subject
#9
 14th Sep 2014 at 6:30 PM
Posts: 1
Quote: Originally posted by Simser der Deutschen
Thanks for this hint. 
|
Hey Simse.. first of all thank you very much for the step by step. It got me started in the whole modding community (and well, the reason why I even signed up here!)
I'm having some issues though, and they are real weird ones. I've spent numerous hours on this but still no 100% success. I have some problem with Sims4 sometimes crashing when it's playing my custom video.
I've made sure that the audio isn't VBR, I basically do everything you do with the difference that I cut out clips in another program before jumpin on VDub and the rest. Now the strange thing is I feel like I'm getting really mixed results. For whatever reason, and I have no idea what my final change is to make it work.. but sometimes I export a clip and it's happy and dandy, and then I export another clip using the same methods.. And it will crash. If I try to do it EXACTLY the same every time (and with that I mean, same amount of frames/length on the clip, same resolution, same fps etc) it's still pretty random if I get a crash or not.
When it works... it works just like it's supposed to, every time.. the clips are looping their playlist and my sim is quite happy with the new entertainment values.
I'm on Windows. I'm chopping up my clips to a mpeg4-container so vdub can read them. Vdub then converts the audio (to mp3 320kbps cbr 48khz stereo) and the video and then I run it through generic stream converter and vp6 converter that you supplied and out pops a .vp6 that I rename and then pack in s4pe. (No resource name on OK, tried with compressed on/off in S4PE because I noticed that Maxis doesn't put their AVIs compressed.). And it also runs fine when playing it from VLC. I've tried with sound and no sound, no difference.
I'm pretty solid when it comes to computers being a system developer for about 8 years so I know mostly what I'm up to. Just basically wondering if you encountered any issues like this? And if you did, how did you solve it? I'm really starting to lose it here. The strange thing is that a clip that's 15-30 seconds long using 256x144 might crash. But then I might export a one minute long 256x144 clip and that particular time it works fine. I used the same methods and made a 30 sec clip, crash... I made a 15 sec clip.. crash.. I made a 13.200sec clip, it runs fine. Oh and I always use 15fps.. although 25fps have worked on a few occasions so I don't know if it could be the bitrate on the video itself that's making it crash?
Any clue at all to what my problem could be? And again, great work, I've had good fun with this not counting the hours I've been pissed!

Thanks in advance mate and fingers crossed that you had some kind of similar problem.
#10
 14th Sep 2014 at 6:53 PM
Posts: 57
Thanks: 3155 in 4 Posts
Hey emanuel2k,
your issue seems to be really tricky
At first: Before I've found the right things to do, my game only crashes on video playback. And it seems to crash for you too only if the video will be played in succession, right?
I would say, this crash must depend on the audio stream. I've read a lot of threads for Sims 3 which handle with Custom Videos. And in Sims 3, the game mostly crashes on video playback because of an issue in the audio stream.
In addition: As I've done in Part 1, it is possible to play the Sims 4 Intro on TV and also in succession - and the game won't crashing.
The Video Stream of the Sims 4 Intro has the following params:
If your custom videos comply this condition, then we can assume that there is an issue with the audio stream.
I know you spend a lot of time in this tricky issue, but could you really double check that you've done all right with the audio stream?
If it solves the issue, or not - please reply. We will get it to work
your issue seems to be really tricky

At first: Before I've found the right things to do, my game only crashes on video playback. And it seems to crash for you too only if the video will be played in succession, right?
I would say, this crash must depend on the audio stream. I've read a lot of threads for Sims 3 which handle with Custom Videos. And in Sims 3, the game mostly crashes on video playback because of an issue in the audio stream.
In addition: As I've done in Part 1, it is possible to play the Sims 4 Intro on TV and also in succession - and the game won't crashing.
The Video Stream of the Sims 4 Intro has the following params:
- Codec: On2's VP6.2
- Resolution: 1280x720
- FPS: 29,97
- Duration: 7 seconds
If your custom videos comply this condition, then we can assume that there is an issue with the audio stream.
I know you spend a lot of time in this tricky issue, but could you really double check that you've done all right with the audio stream?
If it solves the issue, or not - please reply. We will get it to work

Quote: Originally posted by emanuel2k
| Hey Simse.. first of all thank you very much for the step by step. [...] |
#11
 15th Sep 2014 at 12:58 PM
Posts: 11,006
Thanks: 423049 in 1121 Posts
@Simser der Deutschen , do you have permission to redistribute the software attached to post 1? Please ONLY (re)upload things here that 1. you have authored yourself and 2. are not available elsewhere for a good reason. Everything else, please use links instead.
Edit: I removed the attachment from post #2 as well as this makes no sense at all. Users are capable of finding the Tools thread I would think.
Stuff for TS2 · TS3 · TS4 | Please do not PM me with technical questions – we have Create forums for that.
In the kingdom of the blind, do as the Romans do.
#12
 15th Sep 2014 at 1:10 PM
Last edited by Simser der Deutschen : 15th Sep 2014 at 3:56 PM.
Posts: 57
Thanks: 3155 in 4 Posts
Quote: Originally posted by plasticbox
|
@Simser der Deutschen , do you have permission to redistribute the software attached to post 1? Please ONLY (re)upload things here that 1. you have authored yourself and 2. are not available elsewhere for a good reason. Everything else, please use links instead. Edit: I removed the attachment from post #2 as well as this makes no sense at all. Users are capable of finding the Tools thread I would think. |
Okay. I don't wanted to violate copyright, I wanted to eliminate the day, when some required download links are not available. Especially the VP6 Codec is very out to date, On2 was bought by Google and they deleted all downloads of the VP6 Codec from their server.
I thought, when I provide the additional credits, and the detailed requirements, I'm right.
I will update the Tutorial.
[UPDATE]
Finished working on the Tutorial.

Test Subject
#13
 29th Sep 2014 at 11:24 PM
Posts: 53
Quote:
|
Requirements S4PE (Download from github.com - I use release v0.1d): This tool is needed for working with the packages. VP6 Video Codec from On2 Technologies (Download from marc.simon999.free.fr): This is the Video Codec for Sims 4 Movies. VirtualDub (Download from Sourceforge.net): I've used version 1.10.4 (stable) (x86) and with it we will create the right movie files. |
Well, that leaves me out. I was hoping S4 didn't still use the illusive VP6 format, but they kept it. Even with the codec, VP6 format does NOT show up in my 'compression...' tab in VDub. I spent a full week, morning day and night trying to get it to show up when I attempted this for S3, so I can't make channels.
Can't it be compressed to something else? VP6 is completely out of the question for me...
#14
 3rd Oct 2014 at 8:47 AM
Posts: 57
Thanks: 3155 in 4 Posts
Quote: Originally posted by AwfulArchdemon
|
Well, that leaves me out. I was hoping S4 didn't still use the illusive VP6 format, but they kept it. Even with the codec, VP6 format does NOT show up in my 'compression...' tab in VDub. I spent a full week, morning day and night trying to get it to show up when I attempted this for S3, so I can't make channels. Can't it be compressed to something else? VP6 is completely out of the question for me... |
Hey, i've got these issue too. But the reason for this was another software or something else. On my normal Windows 8 PC I also don't get it work to show the VP6 in compression.
So I decided to create a virtual machine with Windows 8 Evaluation License in it, so I got a fresh win 8, and this works.
Maybe you could try this, too.
Test Subject
#15
 4th Oct 2014 at 5:45 AM
Posts: 53
Got Windows 7. Don't even know wtf "So I decided to create a virtual machine with Windows 8 Evaluation License in it, so I got a fresh win 8, and this works" means... :-/ Feelin' like a newb over here...
Test Subject
#16
 16th Oct 2014 at 11:20 PM
Posts: 2
It took me a while to get everything working for this tutorial, but I finally got it and it does work.  Thank you very much!
 Thank you very much!
Test Subject
#17
 20th Oct 2014 at 10:30 PM
Posts: 53
Does VP6 have an equivalent? Another compression Sims 4 would recognize? VDub could care less if I have the VP6 Codec. It doesn't show up in 'Compression', and the more I ask about it, the more I find others with this problem.
Or maybe another program with a default VP6 compression, so I don't need to dl it separately and pray VDub recognizes it??
Or maybe another program with a default VP6 compression, so I don't need to dl it separately and pray VDub recognizes it??
Test Subject
#18
 1st Nov 2014 at 11:21 PM
Posts: 11
This is really a neat guide. Thank you so much.
Test Subject
#19
 15th Apr 2015 at 1:42 AM
Posts: 1
I found a working download for the VP6 0.08!!!!!!!!!!!!!!!!!!!!!!! http://files.planetcnc.ru/sg/video/VP6_Builder.rar
#20
 15th Apr 2015 at 6:59 AM
Posts: 57
Thanks: 3155 in 4 Posts
Thank you for the link 
I've added you to the Thanks-part

I've added you to the Thanks-part

Quote: Originally posted by Appw0905
| I found a working download for the VP6 0.08!!!!!!!!!!!!!!!!!!!!!!! http://files.planetcnc.ru/sg/video/VP6_Builder.rar |
Test Subject
#21
 21st Apr 2015 at 7:50 AM
Posts: 11
Hi sorry to be such a pain.
I followed your tutorial and there's just a few things that I think I need help in.
Firstly for some reason when I use vdub, the mpeg-3 section has no plugins found so there's nothing I can pick there.
Alternatively I managed to successfully install LAME mp3 and that instead pops up which then I use the same settings you post in the tutorial, 48000 khz, 320 bits and 40kb.
Everything else after that seems to go fine and I successfully create the package.
The problem is when I play the custom video in the game, it plays once and when it's supposed to loop the game just completely crashes back to desktop.
I was experimenting around and the section where you say to put the in command "fps 15, loop -1" etc, I decided to leave out the "loop/loope" commands and did the rest of the normal steps.
So when I tested it in game, it didn't crash and was able to loop the video, but it was just very choppy and laggy.
Is there something I'm doing wrong with the original steps or is the LAME mp3 plugin causing the problem?
The only way I've managed to not let it crash to desktop is to remove the loop command lines when you first add it to the input in generic stream creator.
Any help would be greatly appreciated.
#22
 4th Jul 2015 at 7:34 PM
Posts: 68
I know this hasn't had a reply in months but the two soundexchange.rar files wouldn't even extract kept getting an error that the archive is broken.
#23
 18th Jul 2015 at 1:22 AM
@SimserderDeutschen
I was thinking about this FOR a very long TIME! THANK YOU SO MUCH!
 :D
:D
I was thinking about this FOR a very long TIME!
Sim Renders
www.ansettanimation.com
Ansett Animation Studios is a subsidiary of RomerJon17 Productions © 2019 - 2020
www.ansettanimation.com
Ansett Animation Studios is a subsidiary of RomerJon17 Productions © 2019 - 2020
#24
 18th Jul 2015 at 7:05 AM
Hey Simser der Deutschen, I have the movie WORKING!
Sim Renders
www.ansettanimation.com
Ansett Animation Studios is a subsidiary of RomerJon17 Productions © 2019 - 2020
www.ansettanimation.com
Ansett Animation Studios is a subsidiary of RomerJon17 Productions © 2019 - 2020
Test Subject
#25
 11th Aug 2015 at 7:09 PM
Posts: 11
Back again, so I'm trying out the second tutorial but for some reason when I'm trying to export the data resources in s4pe, I keep getting an "unhandled exception" error.
Can anyone shed any light on this please?
Can anyone shed any light on this please?
Who Posted
|
|

 Sign in to Mod The Sims

