 Tipsy OMSP
MTS has all free content, all the time. Donate to help keep it running.
SCREENSHOTS
3__1330444293_83.77.199.jpg - width=800 height=498
2__1330444270_83.77.199.jpg - width=800 height=498
1__1330444234_83.77.199.jpg - width=800 height=498
cat1__1330811509_81.62.125.100.jpg - width=800 height=498
cat2__1330811546_81.62.125.jpg - width=800 height=498
Picked Upload!
This is a picked upload! It showcases some of the best talent and creativity available on MTS and in the community.
Created by newshoes
Uploaded: 4th Mar 2012 at 12:01 AM
Updated: 7th Mar 2012 at 12:39 PM
Updated: 7th Mar 2012 at 12:39 PM
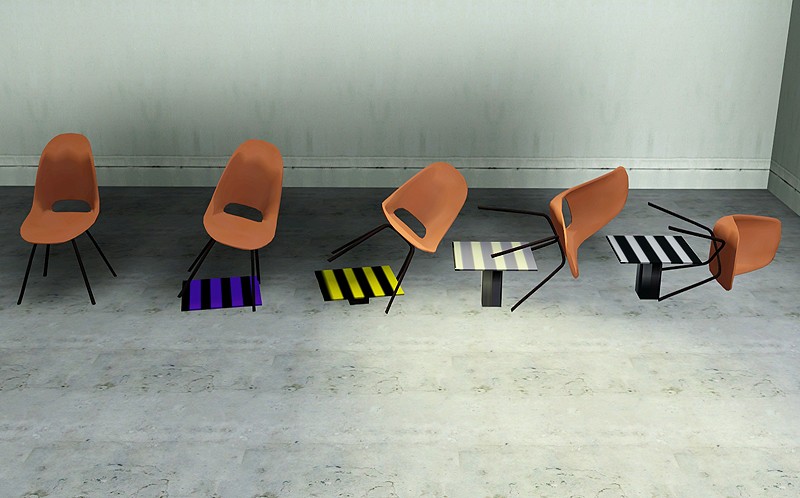
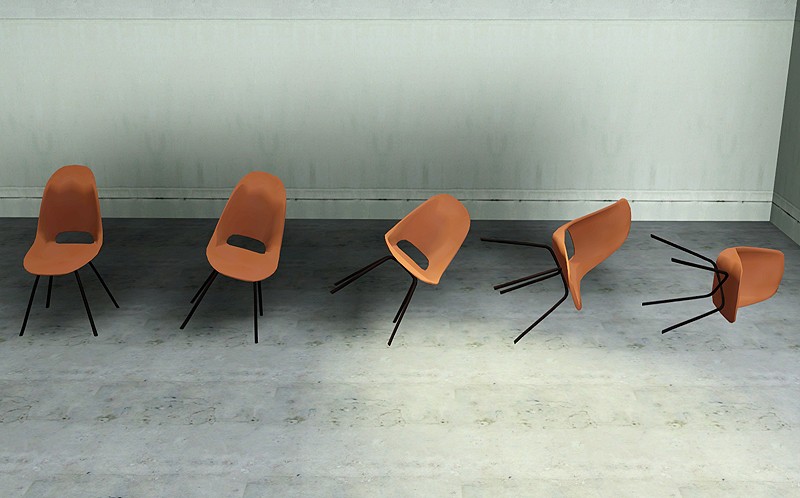
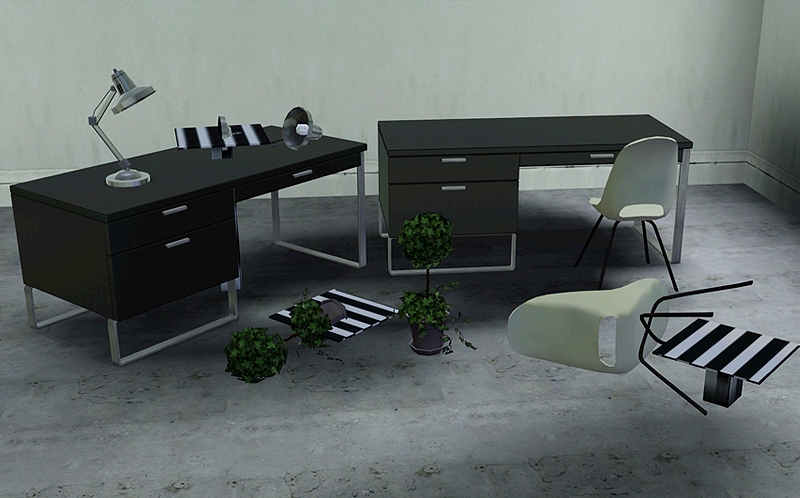
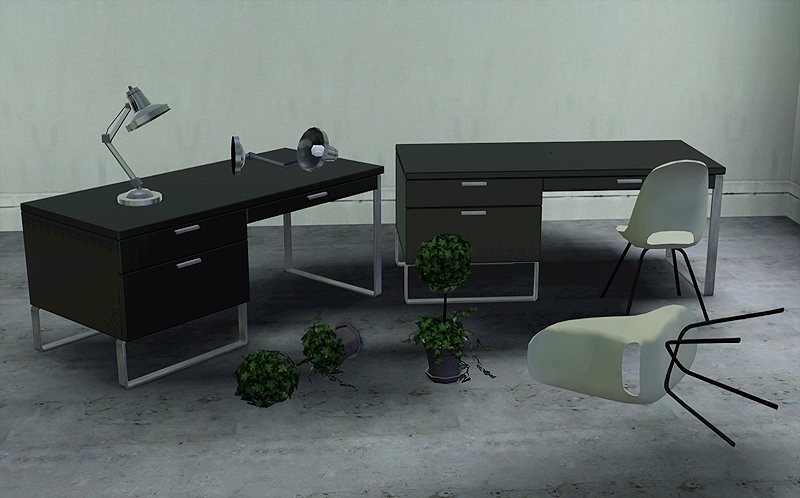
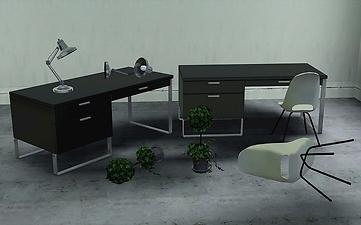
This is an omsp that allows you to "tip over" objects at unique angles. It is based on the original One More Slot Package by Granthes. Thus once the object is tipped over, you may also vertically shift the omsp to the desired height.
***This object requires the original OMSP by Granthes to function. You must have it in your packages in addition to these tipsy omsp. Download the original HERE

How it works:

Once you have both Granthes original OMSP and the Tipsy omsp installed in your packages:
1. Find the omsp in Misc Surfaces. Place any object on the omsp and it will immediately tip over 90, 75, 45, or 15 degrees. These angles are not exact.
2. You can use the <> keys or alt and mouse to rotate the object as usual. However, some non-decor objects, especially large objects override the rotation with their own facing code. In this case you cannot rotate the object once placed on the omsp.

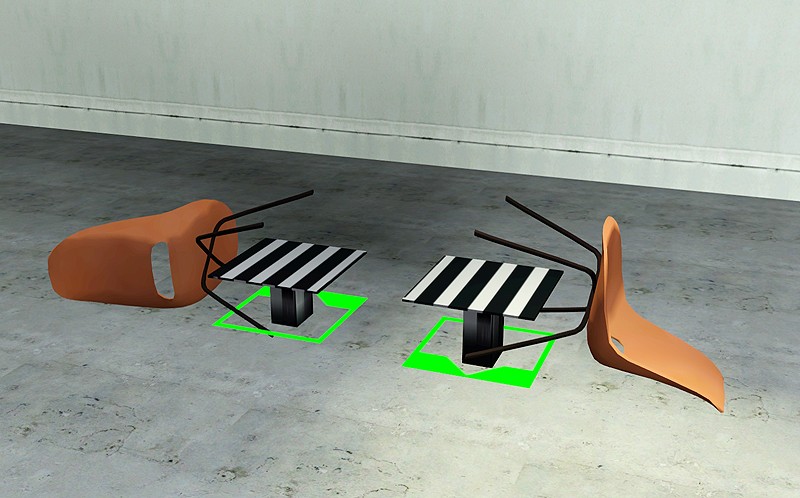
3. Depending on the initial direction of the omsp, the object you place on it will turn to a different angle. As you can see in the picture above, one chair is on its back while the other on its side due to the omsp being placed in a different direction.
4. When you place the object, depending on its size it may sink into the ground. This is where the unique functionality of Granthes' OMSP comes in. Holding down ctrl + shift, click on the omsp to raise or lower to the desired height. More information about the functionality of the original omsp can be found HERE
5. Ground shadows are attached to the mesh of object, so sometimes the shadows may float in the air.
6. Nice update from Grant about whether Sims can interact with objects tipped over using the tipsy omsp:
"The answer is the same as the original OMSP: They can, mostly. Sometimes for strange reasons they will route fail, but most of the time they work fine. Video Clip <----- This shows a sim using a chair that was tipped over.
Object has been tested with base game only as well as pets and 1.29.
You can download 90, 75, 45, 15 degrees separately or all of them in a combined package. I personally find the 90 the most useful.
Polygon Counts:
Vertices = 68, Polygons = 29
Additional Credits:
A Huge thank you to Granthes for permission to modify his original One More Slot Package. Without the unique functionality of this original object the tipsy omsp would not have been possible!
Thanks also to ATSSandy , Mireluk and Ninoosims for kindly testing the object.
Custom Content used in pictures: Chair Yuxi, converted to sims 3 here.
The rest of the content used in pictures is base game and ambitions.
***This object requires the original OMSP by Granthes to function. You must have it in your packages in addition to these tipsy omsp. Download the original HERE

How it works:

Once you have both Granthes original OMSP and the Tipsy omsp installed in your packages:
1. Find the omsp in Misc Surfaces. Place any object on the omsp and it will immediately tip over 90, 75, 45, or 15 degrees. These angles are not exact.
2. You can use the <> keys or alt and mouse to rotate the object as usual. However, some non-decor objects, especially large objects override the rotation with their own facing code. In this case you cannot rotate the object once placed on the omsp.

3. Depending on the initial direction of the omsp, the object you place on it will turn to a different angle. As you can see in the picture above, one chair is on its back while the other on its side due to the omsp being placed in a different direction.
4. When you place the object, depending on its size it may sink into the ground. This is where the unique functionality of Granthes' OMSP comes in. Holding down ctrl + shift, click on the omsp to raise or lower to the desired height. More information about the functionality of the original omsp can be found HERE
5. Ground shadows are attached to the mesh of object, so sometimes the shadows may float in the air.
6. Nice update from Grant about whether Sims can interact with objects tipped over using the tipsy omsp:
"The answer is the same as the original OMSP: They can, mostly. Sometimes for strange reasons they will route fail, but most of the time they work fine. Video Clip <----- This shows a sim using a chair that was tipped over.
Object has been tested with base game only as well as pets and 1.29.
You can download 90, 75, 45, 15 degrees separately or all of them in a combined package. I personally find the 90 the most useful.
Polygon Counts:
Vertices = 68, Polygons = 29
Additional Credits:
A Huge thank you to Granthes for permission to modify his original One More Slot Package. Without the unique functionality of this original object the tipsy omsp would not have been possible!
Thanks also to ATSSandy , Mireluk and Ninoosims for kindly testing the object.
Custom Content used in pictures: Chair Yuxi, converted to sims 3 here.
The rest of the content used in pictures is base game and ambitions.
This is a new mesh, and means that it's a brand new self contained object that usually does not require a specific Pack (although this is possible depending on the type). It may have Recolours hosted on MTS - check below for more information.
| Filename | Size | Downloads | Date | |||||
|
TIPSYOMSPALL.package.zip
Size: 339.8 KB · Downloads: 31,833 · 4th Mar 2012 |
339.8 KB | 31,833 | 4th Mar 2012 | |||||
|
TIPSYOMSP15degrees.package.zip
Size: 98.8 KB · Downloads: 4,331 · 4th Mar 2012 |
98.8 KB | 4,331 | 4th Mar 2012 | |||||
|
TIPSYOMSP45degrees.package.zip
Size: 57.5 KB · Downloads: 4,347 · 4th Mar 2012 |
57.5 KB | 4,347 | 4th Mar 2012 | |||||
|
TIPSYOMSP75degrees.package.zip
Size: 95.7 KB · Downloads: 4,333 · 4th Mar 2012 |
95.7 KB | 4,333 | 4th Mar 2012 | |||||
|
TIPSYOMSP90degrees.package.zip
Size: 95.2 KB · Downloads: 6,115 · 4th Mar 2012 |
95.2 KB | 6,115 | 4th Mar 2012 | |||||
| For a detailed look at individual files, see the Information tab. | ||||||||
Key:
- - File was updated after upload was posted
Install Instructions
Quick Guide:
1. Click the file listed on the Files tab to download the file to your computer.
2. Extract the zip, rar, or 7z file. Now you will have either a .package or a .sims3pack file.
For Package files:
1. Cut and paste the file into your Documents\Electronic Arts\The Sims 3\Mods\Packages folder. If you do not already have this folder, you should read the full guide to Package files first: Sims 3:Installing Package Fileswiki, so you can make sure your game is fully patched and you have the correct Resource.cfg file.
2. Run the game, and find your content where the creator said it would be (build mode, buy mode, Create-a-Sim, etc.).
For Sims3Pack files:
1. Cut and paste it into your Documents\Electronic Arts\The Sims 3\Downloads folder. If you do not have this folder yet, it is recommended that you open the game and then close it again so that this folder will be automatically created. Then you can place the .sims3pack into your Downloads folder.
2. Load the game's Launcher, and click on the Downloads tab. Find the item in the list and tick the box beside it. Then press the Install button below the list.
3. Wait for the installer to load, and it will install the content to the game. You will get a message letting you know when it's done.
4. Run the game, and find your content where the creator said it would be (build mode, buy mode, Create-a-Sim, etc.).
Extracting from RAR, ZIP, or 7z: You will need a special program for this. For Windows, we recommend 7-Zip and for Mac OSX, we recommend Keka. Both are free and safe to use.
Need more help?
If you need more info, see:
- For package files: Sims 3:Installing Package Fileswiki
- For Sims3pack files: Game Help:Installing TS3 Packswiki
Also Thanked - Users who thanked this download also thanked:
Packs Needed
None, this is Sims 3 base game compatible!
Other Information
Style:
– Not Applicable
: None of the above
Room:
– Kitchen
– Living
: Living Room
– Dining
: Dining Room
– Bedroom
– Nursery
– Bathroom
– Study
: Study/Office
– Outdoor
Maxis Flags:
– Not Applicable
Tags
#omsp

 Sign in to Mod The Sims
 Tipsy OMSP
More Downloads BETA
Here are some more of my downloads: